When you own an active blog or website, you always love to read and reply to your reader’s comments. However, in the blogging world, comments left behind continue to be in text format and can be seemingly impersonal. Even email, website, or social media comments still feel impersonal using the usual text formats.

Now, you can allow audio feedback with the new SpeakPipe. Hearing the actual voiced comments from someone adds a personal touch to comments for any blog or website.

Learn How To Automatically Generate Thumbnails, Screenshots For Any Website

At present, anyone can leave voicemail podcasts attachments. However, telephone podcasting quality is very poor. Another method is to record audio attachments. This means, recording, saving, editing, encoding, attaching, and sending. Both of the above is not convenient for any user.

Listen To Your Website Visitors, Customers or Readers With SpeakPipe (link)

SpeakPipe is like your personal web voicemail directly accessible from your site. Your visitors can then leave high quality audio comments for you with just a few clicks. When you download and then install SpeakPipe’s box on your blog, your readers can now instantly send voice messages instead of the traditional plain text.


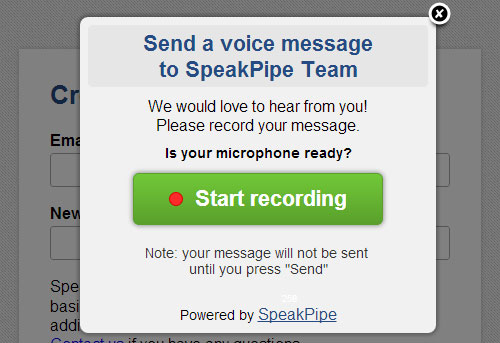
In short, anyone with a microphone and a computer can leave any kind of audio feedback or message without much technical fuss and trouble. They can even listen to their recording, edit, or redo it before sending.

When a message is sent, you then receive an email notice with an Mp3 download link. The sender has the option to leave a name and email address. This will show up on the SpeakPipe inbox.

Split, Paginate Long Blog Post In WordPress, Blogger/Blogspot, and Tumblr

SpeakPipe is entirely JavaScript-based so it is compatible with Android and iOS devices (iPhone, iPod Touch, and iPad).

Its little drawback is that, while the initial download is free, it has a time limit, and that means you need to purchase the full version. However, you get a refund after using it for 120 days and not being satisfied with it. Other minor issues include email notifications do not include the name and email address of the messenger, only one inbox, and there are no sorting options like folders or labels.

Create Contact Forms For WordPress, Blogger, Tumblr, etc.

Overall, SpeakPipe is still good to use and worth the time to try out for testing on you website or blog.

SpeakPipe: Let Your Visitors Leave Voice Messages -- for Wordpress and Blogger

I received a tutorial request from my reader that asked me how to paginate or split a very long blog post in WordPress, Blogger or Tumblr. So here I’m going to show you a simple workaround on how to split that long blog posts into multiple pages in your WordPress, Blogger or Tumblr blog.

Split, Paginate Long Blog Posts In WordPress, Blogger and Tumbler

Splitter for WordPress - Splits Long Posts Into Pages

Splitting a long blog post into pages has never been this easier with Splitter. Splitter is a plugin for WordPress that splits your blog post into multiple pages by automatically adding ‘nextpage’ while maintaining the validity of your HTML. Paginating or splitting your blog post in WordPress with Splitter is very simple. Here’s how:

Tip: Learn How To Auto Generate Website Thumbnails, Screenshots In WordPress

Step 1 Install and activate Splitter for WordPress here. Or you can search for "Splitter" at WordPress plugin directory site.

Step 2 Once installed, you should see Splitter below your WordPress text editor (see screenshot below). There you can specify a maximum number of characters per page.


Splitting long blog posts in WordPress is really that easy! Here's the final look (of course, you can customize the pagination links/buttons):


Pages: 1 2 3

How To: Split, Paginate Long Blog Post In WordPress, Blogger/Blogspot, and Tumblr

If you enjoy blogging as much as I do, you should have recognized the importance of subscription links in your website. Your visitor who finds your post useful is most likely to subscribe and spread the word by sharing it to their friends. RSS subscription button and social bookmarking links play a vital role in gaining more traffics.

And if you want to expand your reach, you might want to try Google SMS Channels, a Beta service of Google which allows web visitors to instantly subscribe your blog via SMS. Your visitors will instantly get notified thru text message by the time you post a new content in your blog.
Google SMS Channel Subscribe

Setting up SMS subscription service using Google SMS Channels is easy. Follow this step-by-step guide on how to set up SMS subscription service for your blog:

Create awesome, secure Contact Us form for your blog

NOTE: Google SMS Channels is currently available in India, which means only visitors from India can subscrible your blog via SMS and only bloggers based in India can avail the service. But don't worry because the guys behind Google promised to make this SMS subscription service available worldwide very soon.

And just because you're outside India doesn't mean you can't let Indian visitors subscribe your blog via SMS. Here I will teach you also how to implement this cool SMS subscription service even if you're outside India.

Step 1 : Go to Google SMS Channels website and login using your Google Account.

Step 2: If you've successfully logged in, you should be taken to Google SMS Channel homepage where you can see a section 'Create your own channel' in the right sidebar. Now, click 'Try Now'.

Step 3: Enter your Indian mobile number. You should receive an SMS from Google with verification code.

Step 4: Enter the verification code and verify your mobile phone and click the 'Try Now ' link once again.

Step 5: Now, specify the name of the channel (e.g. WebTips), description, category, and location.

Step 6: Now provide your blog RSS/Atom or feed address. If you're using Blogger, you can choose to give your blogspot address.

Step 7: Check the 'Title' and optionally the 'Body' boxes if you want to send both the blogpost title and post body.

Step 8: Select 'Allow Publishing By ' as 'Only Me' and 'Who can subscribe' as 'Any User'.

Step 9: And finally, hit 'Create Channel'.
Your SMS Channel is now active and ready. Just append the generated link/script anywhere in your blog and your readers can now subscribe your blog via SMS.

Make your blogger, blogspot website mobile friendly

As promised, bloggers outside India can still implement this SMS subscription service. Try to connect to your Indian friends and ask them a little favor; ask their Indian mobile number, ask them to forwad back the verification code sent by Google, and proceed to Step 3. That's it.

Currently I'm still waiting for my Indian friends in Facebook for their replies...hopefully they'll cooperate. And if you can't wait, you can get an instant virtual Indian phone number, but it comes at a price.

SMS subscription service trully is a great addition to your blog. Loyal visitors can freely choose what type of notification they're most comfortable to deal with.

Wait for my update for I'm going to show you how to come up with your own SMS subscription service for your blog using PHP and free SMS gateway available in your country. Subscribe via email below.

Google SMS Channels: Let Visitors Subscribe Your Blog via SMS

A "contact us" form  that allows users to drop instant messages is crucially important for a website. Your web visitors can surely save time when they want to communicate with you as they don't need to access their individual email account.

This post will teach you how to create beautiful and spam-proof "contact us" form, which allow users to conveniently send inquiries thru email. You don't have to be a coder to implement this as the process is whole lot simple; auto-generate the contact us form script with a click of a button, optionally modify the code if you're comfy with JavaScript, and embed it anywhere in your website (e.g. Blogger, Tumblr, WordPress, etc). Try these yourself:

Create Contact Us form - Let web visitors drop instant email messages

1. Kontakt - Clean, Simple, and Secure Contact Form [link]


Kontactr is an online one-click contact form service that allows webmasters, newbie bloggers to create instant  contact form so that visitors can contact you anytime without exposing your email address. It comes with captcha  to protect you from spammers and is customizable. Sign up for free Kontactr  account here and build your awesome Contact Us form for your blog.

Best Online PSD Editor - Create, edit Photoshop files online

2. FoxyForm - Create contact form in seconds [link]


FoxyForm is another highly customizable, secure and free online contact form creator. Just choose HTML controls you wish to include (e.g. name, address, website, zip, etc) and specify email address where form data will be delivered. You can also specify which form fields must be filled. And best of all, you can  fine-tune its appearance to best suit your needs. I love the simplicity of FoxyForm service and you should give a try. Start creating contact us form script here and embed it to your website. 

3. Email Me Form - Create contact form, mailing list, surveys, guestbook, etc [link]


Email Me Form is another killer form builder especially designed for website owners and bloggers who hate codes. This online form creator lets you create awesome, jQuery-powered form in just a matter of seconds. The website comes with customizable form templates such as contact form, mailing list, newsletter subscription, guestbook, restaurant and customer satisfactory survey, registration forms, etc. And the best part about it is that it's free. Build your own contact form here.

Automatically tweet your blog post to Twitter

Move your blog to next level. Pick any of these FREE one-lick online contact form creator for your WordPress, Blogger, TypePad and virtually all types of blogs.

How To: Create Contact Forms For WordPress, Blogger, Tumblr, etc.