Google Drive is our easy option when it comes to sharing files — be it for personal or work team collaboration. And it’s easy to see why. Aside from the fact that it’s free, it got a plethora of apps you can use to even supercharge your workflow and save your time in the process.

One of those Google Drive apps that I stumbled upon is BeFunky Photo Editor. If you live in a country where internet is an issue (read: slow, expensive, and often capped internet), BeFunky Photo Editor will do you a favor.

Few days ago while finishing a customer’s website, a client shared a Google Driver folder containing a bunch of images to load up into his landing pages. The problem: the images came straight from a DSLR camera and were almost 30mb each. And we’re talking about 70-100 images.

Imagine the frustration I felt realising I had to download them all using my capped internet data so I can crop, resize them offline. I only needed at least 1200px wide versions of those images.

5 Handy Google Sheet Tricks To Help You Work Fast & Save Time

Just as you can unzip files on Google Drive without downloading them, there has to have a way to also crop, resize images straight from Google Drive without downloading them for offline editing. So I ended up rummaging through Google Drive apps directory and discovered BeFunky Photo Editor.

Easily Crop, Resize Images on Google Drive without Downloading them

google drive crop resize images

BeFunky Photo Editor is a top-rated photo editor on Google Workplace Marketplace with 4k+ users as of writing. It’s one decent, full-featured photo editor that works straight from your browser. Probably the biggest strength of this app is the simplified editing controls, making it easy to edit photos with a few click.

BeFunky is a uniquely powerful online and mobile photo editor. Think Photoshop, but simplified for everyday users. With BeFunky, you can easily create stunning, professional-quality images with a single click. The process might be simple, but the results are incredibly sophisticated. Thanks to BeFunky, there’s no need to choose between a powerful, do-it-all tool and an easy, user-friendly interface. We’ve got it all!

Here’s how to get started:

  1. Navigate to your Google Drive folder

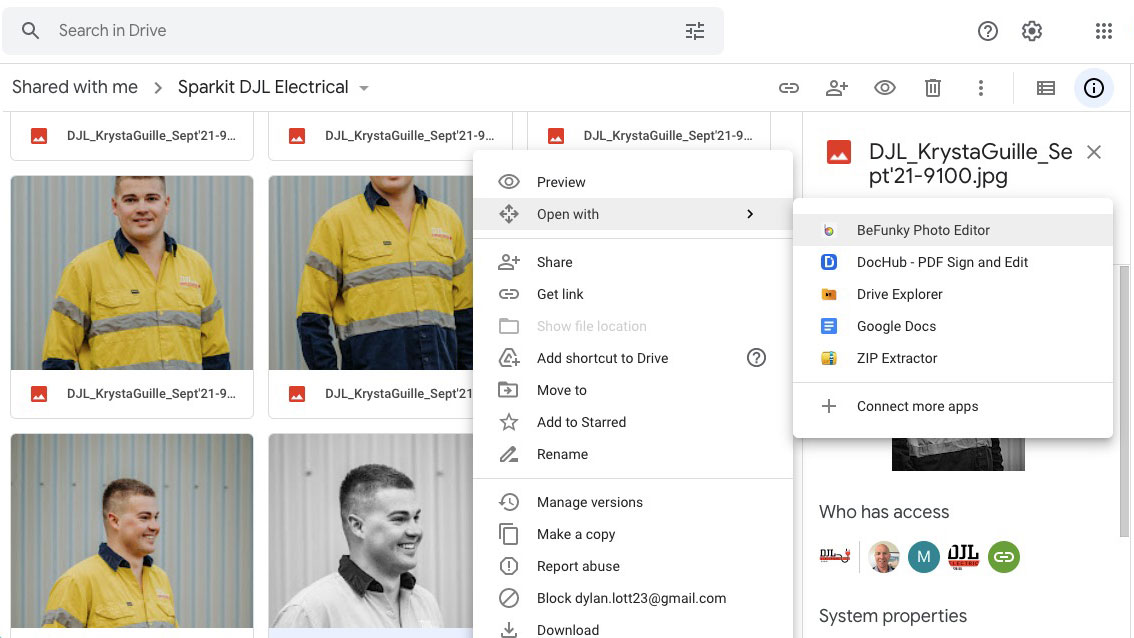
  2. Right-click any image > Open with > Connect more apps. This will bring the Google Workplace Marketplace popup

    befunky photo editor google workplace marketplace

  3. Search for “BeFunky Photo Editor” and install

  4. Once installed, follow the on-screen prompts to authenticate the app to manage your Google Drive files

Once done, you’re good to go. Just navigate back to your Google Drive folder and refresh. You should be able to right-click any image and open with BeFunky Photo Editor.

crop resize google drive images

While BeFunky got all the image editing tools you’re familiar with from desktop apps like Photoshop, I specially like the crop/resize feature and support for Google Drive to quickly import, resize, and crop Google Drive images.

How To: Extract All Images Embedded In .DOC Word Documents All At Once

And if you need fancier editing experience like text and graphics overlays for your ad banners perhaps or social media stuff, BeFunky got you covered. How cool is that?

Go check out BeFunky Photo Editor.

Quickly Crop, Resize Images on Google Drive - No Download Required


Unless you're using the latest version of Google Chrome, you're not probably enjoying the nice speed boost of turning on hardware acceleration. Hardware acceleration, in its simplest term, is a technique used to improve both the speed and quality of playback of flash/media files embedded on web pages. Hardware acceleration makes your web browsing whole lot faster by utilizing Graphic Processing Unit (GPU) of your computer instead of CPU -- that definitely is the advantage of hardware acceleration.

Give your Mozilla Firefox a speed boost - easiest way to speed up your Firefox

This short tutorial will walk you through to 5 easy steps to speed up your Google Chrome browser by enabling Hardware Acceleration and Pre-Rendering of webpages. If you used to frequent a lot to graphic-intensive websites (e.g. YouTube) at slow shared internet connection, this post is for you.


Follow this step-by-step guide on how to speed up your Chrome browser by enabling hardware acceleration and pre-rendering:

Step 1 On the address bar, type "about:flags" (without quotes) and hit enter.

Step 2 Scroll down and click on enable link under GPU Accelerated Compositing

Step 3 Just below that, also click on enable link under GPU Accelerated Canvas 2D.

Note: If you're using Chrome 11, 'GPU Accelerated Compositing' is activated by default. For Mac users, you can only enable GPU Accelerated Compositing; GPU Accelerated Canvas 2D is not yet available.

Step 4 Scroll down a little, and click on enable Web Page Prerendering.

Step 5 Finally, hit the Restart button at the bottom of the page.

You're done!

How To: Speed Up Your Chrome By Enabling Hardware Acceleration

For those of you who maintain multiple Twitter accounts, you probably are familiar with that pain of signing in and signing out if you wish to switch to another Twitter account. One may switch between multiple Twitter accounts by having more than one browser opened — one for personal Twitter account and the other is for work-related stuff.

And for Twitter power users, there's Hootsuite to the rescue being the de facto Twitter multiple account manager, which lets you manage multiple social media accounts including Twitter in one, centralised dashboard.

New AI-Powered Apps Help You Generate Captions, Hashtags for Instagram

Twitter's lack of native multiple account switching support is just dead annoying. It's a feature long requested by millions of social media managers who take advantage of their platform for virality and growth.

Thankfully, Twitter finally heeded the call. Now, you can add multiple Twitter accounts and switch between multiple Twitter handles with ease.

Twitter Adds New Account Switching Option

For now, Twitter's multiple account switching feature is available for the web version (both mobile and desktop), Twitter Lite, and Twitter for Windows. Jack Dorsey's team must be brewing multiple accounts support for Android and iOS version too (I hope so).

How To Add, Switch Between Multiple Accounts on Twitter

As mentioned, the new feature is available only on web version and Twitter Lite. Here's how to get started:

  1. Login to your Twitter account and ensure you're using the new Twitter web version UI.

  2. In top right section, click on your name to bring the Account info panel

  3. Now, click on that Add an existing account. You'll be asked to login for that new Twitter handle.

You're done!

Your newly added Twitter account should sit nicely beside your main account. Just click your profile or name to switch to another Twitter account without having to log out and log in again.

Twitter may be late to the party, but this new Twitter multiple accounts switching option is sure a welcome update that power users would surely appreciate.

New Web App Efemr Lets You Send Self-Destructing Tweets

Twitter Gets Multiple Accounts Switching Support, Lets You Switch Between Accounts with Ease

If you’ve been using Chrome for a while, you probably have noticed that nice PiP icon that sits on your toolbar when you’re on a page that plays a video. As soon as you hit that PiP icon, a sleek, resizable floating window will popup within your screen. That’s Picture-in-Picture (PiP) in action, a feature recently added built-in on Chrome.

Now, what if you want to achieve the same feat for virtually any tabs, not just for videos? Well, that’s basically the premise of this brand new extension called TabFloater.

How To: Use iOS 14 Picture-in-Picture on YouTube App (No Jailbreak)

Currently, available for Chrome and Firefox (Windows for now), TabFloater lets you easily multitask & interact with other tabs. You don’t have to switch between tabs to copy or compare stuff.

"I created a browser extension called TabFloater, which can replicate the picture-in-picture functionality with any website. It moves a chosen tab into a smaller window, which is going to remain always on top, so you can interact with both websites at the same time." — Balázs Gyurák, Creator of TabFloater

Getting Started with TabFloater

Just like any browser extensions, getting started with TabFloater is straightforward. Just get your copy at their website and install the companion app. And you’re good to go.

Caveats

Unlike those PiP videos that play on a sticky window regardless of which app screens you’re on, TabFloater will only be active within the parent app of course. So, if you close or minimize your Chrome or Firefox, TabFloater will exit too.

Additionally, TabFloater currently works on Windows. So for Mac users, it will come up soon. The add-on creator does invite interested party to develop TabFloater Companion for Mac. Just comment on the official GitHub repo.

TabFloater Adds Picture-in-Picture Support to Any Tabs (Chrome/Firefox)

Ever wanted to know who deleted you on Facebook? Ever wondered why the number of your Facebook friends has changed? Want to get notified when someone removes you as friend on Facebook? Facebookers who're curious (and hurt) about those who took time removing you as friend on Facebook can now take advantage of a handful of tools that tell you whether someone unfriends you on Facebook.

At first, I thought of it as a scam. Who would ever thought this is possible when Facebook has this restrictive policy especially when it comes to privacy thing? But again I was wrong; it is actually possible to find out who unfriended or removed you as friend on Facebook, and am going to show you how:

Find Out Who Deleted, Unfriended You On Facebook

The first method that we're going to use is Unfriend Finder, a browser extension designed for major web browsers such as Mozilla Firefox, Google Chrome, Safari and Opera. Unfriend Finder, as what the name goes, tracks your friend's list and notifies you for any irregularities or "unfriends" made by your friends.

For Mozilla Firefox Users:

If you're using Firefox, you need to install Greasemonkey first, it's a Firefox add-on, to make Unfriend Finder work for you. By the time you have Greasemonkey installed, download Unfriend Finder for Firefox. Once Unfriend Finder is installed, close the tab with Facebook, or/and open a new tab and go to Facebook.com. You should be welcomed with the introduction to Unfriend Friend, where it will take you through the necessary steps, and tips you need to get started.

For Google Chrome Users:

For non-Firefox users like Chrome, the process should be fairly simple. Just search for Unfriend Finder in Google Web Store or you can download Unfriend Finder for Chrome here. Once installed, go to Facebook.com and you should get the same welcome screen.

NOTE: Be sure to uninstall all previous extensions of Unfriend Finder to make it work.

"Who Deleted Me?" also is worth a try. This is a free service that notifies you via email whenever a friend removes you as friend on Facebook. The only downside for this is that email notification is delivered weekly, bi-monthly or monthly. And "unfriends" made prior to the installation/integration of "Who Deleted Me?" are not recorded.

How To: Find Who Deleted, Removed You As Friend On Facebook

The Google Chromium team is currently brewing a new feature to its beloved Google Chrome browser that lets you mitigate tab overload, or at least that's what they try to solve.

Judging from the above screenshot, the upcoming release of Google Chrome enables users to declutter and organize multiple active tabs into one or more groups.

Add Chrome-Like Multiple Tabbing Support To Windows File Explorer With Clover

Such a feature is sure a relief for those power user who constantly juggles between multiple tabs. You can simply move your work-related active tabs into one group and separate the others, creating a less messy working environment.

Google Chrome is not the first browser that implements such Tab Groups feature. In fact, Firefox used to incorporate it first but later discontinued because only a small number of Firefox users were actually using the feature and that maintaining such unpopular feature turned out to be costly for the Firefox team.

5 Best Memory-Saving Chrome Add-ons to Help You Manage Tab Overload

Tab Group is one of the biggest updates of Google Chrome so it might take a couple of months to finally hit the online shore. For the meantime, check out these third-party Chrome extensions that help you manage tab overload.

LOOK: Upcoming Google Chrome Feature Lets You Organize Active Tabs into Groups