At long last, the multiple tab browsing support you've loved and seen on apps such as Chrome and Firefox has finally landed on Windows Explorer.

Thanks to this handy Windows app called Clover which adds a multiple tab functionality to your Windows default File Explorer. That is, when you want to navigate to another file, you don't need to launch it in a separate window and have multiple windows opened at the same time.

Turn Your Laptop, PC Into Wi-Fi Hotspot Without Using Ad-Hoc -- Internet Sharing Made Easy

The current version of Windows File Explorer doesn't have a multiple-tabbing support yet. And so Clover must be a good news especially if you do a lot of copy, paste, move, cut or deletion of files.

Get A Google Chrome-Like Tabs Interface On Windows Explorer With Clover (link)

Clover (2.7MB) is a tiny, free Windows app that adds a multiple-tab functionality on your Windows File Explorer. Once installed, you'll get a Google Chrome-like tabs interface on top of the Explorer of every window.


No special requirements to use this app. All you have to do is to download and install Clover from their website (link).

Extract All Images Embedded In .DOC Word Documents All At Once

Other notable goodness of Clover:

Convenient Tab page

To master the powerful, easy-to-tab, just remember that Ctrl + T to open the page, and Ctrl + W close the page, Ctrl + Tab to switch pages, the work efficiency far more than doubled!

Seamless integration of operating system

Clover by the BHO plug-in form, integrated into Windows Explorer, to keep your usual habits, without having to learn new software operation, and immediately you can use.

Lightning-fast bookmarks bar

Press Ctrl + D to add the current path, or directly to the folder into the bookmarks bar. No longer around to look for the folder to access, instant reach, how happy!

Clover is a a must-have utility app that makes file browsing a completely new experience. Supported platform includes Windows XP, Windows Vista, Windows 7 and Windows 8, on both 32-bit and 64-bit OS editions.

Add Multiple Tabbing Support To Windows File Explorer With Clover [Must Have]

Do you know that Windows 7 has a builtin File Transfer Protocol (FTP) support built into its native explorer?

If you're running a weblog or a website on a separate web server, you know exactly how important Filezilla, CuteFTP, and other FTP clients can be. But just in case you miss to know, you can also perform file transfer straight from your computer using Windows explorer alone. If you love the simplicity and convenience of Filezilla, well, then, you'll also love the builtin FTP support of Windows 7.

Accessing your remote files through FTP is as easy as manipulating your files and folders in your Windows explorer. Here's how you can easily access your remote web files without using a third party FTP client:

1. At the address bar of Windows 7 explorer, type in the FTP host name of your remote server (e.g. ftp.TipTutorial.com), and hit "Enter".

2. If a valid FTP host name has been entered, you should be prompted for Username and Password. Provide them and click "Log On".

3. After a successful login, you can now manage your remote web files just like you manage your files in a regular folder in Windows 7 explorer.

One thing I like the most about this default FTP support of Windows 7 is that you're just like browsing through your regular files and folder in windows explorer; copy-pasting is fully supported making it easier to copy and transfer files from your computer to a remote web server (and vice versa).

So, if you need to access your web files to a remote host server, you don't have to waste your disk space installing third party FTP application as Windows 7 comes with a builtin FTP function that works like a charm.

(via: TipTutorial.com)


How To Access Remote Web Files Without Using FTP Client

Unless you’re a really die-hard fan of XP and Vista and have no plans of upgrading, it’s assumed you’re using the latest Windows 7.

Many professionals and novices alike are finding Windows 7 a real crowd pleaser because of its user-friendly abilities and features. Speaking of features, many people including some IT pros aren’t familiar with Window 7’s hidden secrets that are pure work productivity boosters, and fun, too. We’re not just talking about your usual keyboard shortcuts, but real features such as:

Hidden "Send to" Icons

Hidden Send to Icons Windows 7 
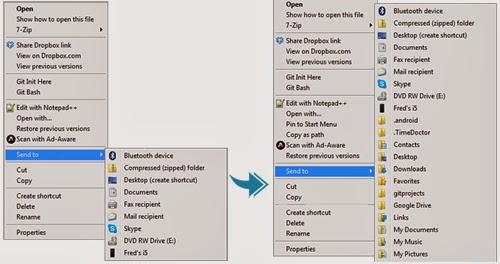
When you right-click on an icon, the options in “Send to” are actually quite limited. For a full list, just press Shift key before right-clicking. This will save you time rather than doing copy/cut-paste.

Recover Closed Browser Tab

We often close a browser tab accidentally. You can search for it without using the history. For Google Chrome, Firefox, and Explorer, press Ctrl + Shift + T.

Additional Clock and Time Settings

Default Additional Clock in Windows 7 
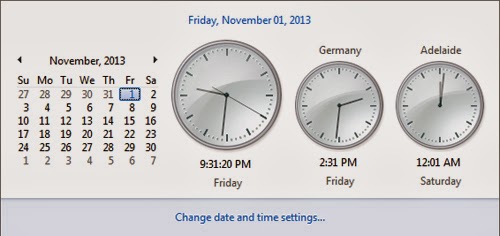
Need to call Uncle Marvin? What time is it in Alaska? Is mom still awake in Brisbane? No one can memorize so many time zones (even Americans still get hung up with their 5 time zones). You can add more clocks when you click on the date and time icon. Click the time and date at the right side of the taskbar and then click Change Date and Time Settings. Look for the Additional Clocks tab and you can add one or two extra clocks with custom time zones and labeling of your choosing. After you click Apply and OK, click the time and date again. The local time should be the big clock, and the ones next to it the custom additions.

Updating the BIOS Revision

When tuning up a slow or troublesome PC, one of the first things to check is whether they have the latest BIOS revision. Most people never update their BIOS, and in the case of hardware or OS upgrades it can often be the key to solving mysterious crashes.

Must-Have: Recover All Items Stored On Your Clipboard with Ditto (Windows)

You can use a search engine to find the latest BIOS release for a particular PC model. To find out what's in the PC you're working with, use the System Information utility. Just click Start and begin typing System Information in the search box. The shortcut should pop to the top of the list within four or five characters. The System Summary page includes a wealth of information, including the manufacturer and model for major-brand PCs, the exact processor, and the BIOS version and date.

Using the Windows Registry Editor

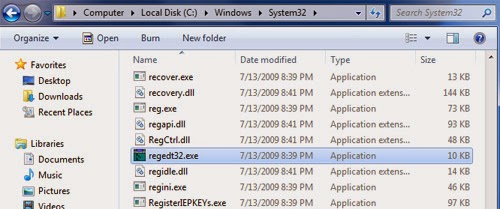
There are a thousand tweaks that you can do only by editing an obscure value in the registry. So you make one of those changes, and then a few weeks or months later you need to do it again. It's easy to find your way back if you leave behind a trail. You can simply save the key in question to Window’s Registry Editor, or the Regedit built-in Favorites menu. At the top of the editing window, click Add to Favorites and the current location is saved, using a name of your choosing. If you need to remove entries from the list, just click Remove Favorites.

Power Settings to Save on Electricity

Part of boosting work productivity is to save on your electric bills and lessen overhead expenses. You can do this by simply making your PC more energy-aware. The biggest change of all is to let your PC go to sleep when they're not being used. That cuts the amount of power they consume by 97%, and they wake up quickly when they're needed again. Just go to Control Panel > System and Security or Hardware and Sound. Click on Power Options and make the necessary power saving settings.

Play Loud Audio Sound, MP3 When Phone's Battery Is Full

Window switching with Alt+Tab

Window switching with Alt+Tab 
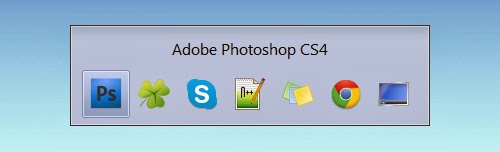
Another useful tool in Windows 7 is Alt + Tab. In the window you can click on any icon including the desktop to open it. Alternatively on pressing tab, it moves to the subsequent icon and after you leave alt, the highlighted window opens. If you want to move the highlighter the other way, press shift while hitting tab.

Some of the Best Tricks and Tweaks in Windows 7 You Might Not Know Yet

I do have a chance to try nearly almost every remote-controlling app for the Android, but none of them seemed to surpass the feature-filled power of WIN Remote.

WIN Remote is a free, fun, and easy-to-use app that turns your Android phone into a PC remote control. So wherever you are in your house, you can control your Windows PC with a tap or flick of a finger.

Phone As Spy Camera - Turn Your Phone Into Remote Surveillance Camera With Motion Detection

WIN Remote has been designed to perfectly work with the Windows 7, giving you new ways to operate your computer.

WIN Remote can remotely control the following PC operations:

  • The Browser
  • The Task Manager
  • Various Video and Audio Players such as VLC, Windows Media Player
  • Image Viewers
  • Windows Media Center
  • PowerPoint
  • Open Office, etc.
  • Power on and off, Reboot, or Hibernate the PC
To start everything rolling, you need to download and install WIN Remote on both your mobile phone and your desktop. Both apps are different so don’t interchange them when downloading and installing. The desktop app is the necessary app service for remote input while the mobile app will allow you to enter, transmit, and remotely control your computer.

1 Download WIN Remote for Android HERE

2 Download & install Server (Windows Remote service) for Windows and start it. Download it from http://www.banamalon.net

3 Select 'Change Server' from HomeScreen. A list of the Servers should appear otherwise press the refresh button.

4 And that's it!

Screenshots: 
The WIN Remote homepage.

Remote file management. You can browse through  your Desktop files through your Android phone.

You can remotely browse/open your files.

The Windows Media Player, controllable thru your phone

The Task Manager.

Yes, WIN Remote can remotely snooze off your PC.

In addition to the PC operations mentioned above, you can even control volume, play next/previous track, and refresh a current web page.

DokRemote: Remotely Control Your iPhone, iPod Music Player Via Web Browser

WIN Remote is free to download and also ad-supported. As an alternative, you can download an ad-free donate version if you prefer.

Download: WIN Remote [Google Play link]

WIN Remote Is Your Swiss Army Knife In Remote Controlling Your PC With An Android Phone

For the uninitiated, Recordit Fast Screencasts is a Mac-only piece of software recently launched that lets you create video screencasts FAST. This app works similarly to Jing; you decide what particular area of your screen you want to screen-capture, hit the record button, then wait for a few seconds for the app to upload & generate a unique link for the screencast. If you have a Mac, go check out Recordit.

Add Multiple Tabbing, Chrome-like Support To Windows File Explorer With Clover [Must Have]

What makes Recordit unique is the nifty GIF support, which is kind of envy to all Windows users out there considering that there's not much good screencasting apps available for Windows with decent GIF support.

But fret not, I got you here a decent (even better) alternative to Recordit that works well on any Mac and Windows computer.

LICEcap Records Your Screen Activity And Saves It As High Quality GIF (Windows & OSX)


LICEcap is FREE and fully functional GIF creation tool both for Windows and Mac that allows you to capture an area of your computer and store it as a high quality GIF. LICEcap is very lightweight and there's no extra fuss to get started. Just grab and install the app, and you're good to go.

LICEcap Features:

  • Record directly to .GIF or
  • Move the screen capture frame while recording
  • Pause and restart recording, with optional inserted text messages
  • Global hotkey (shift+space) to toggle pausing while recording
  • Adjustable maximum recording framerate, to allow throttling CPU usage
  • Basic title frame, with or without text
  • Record mouse button presses
  • Display elapsed time in the recording

Why use GIF when there's a video?


The problem with most video screencasting software today is that the size of video or flash file it generates is too large that you can't quickly embed it on a web page nor share it to your co-workers or employer. With GIF as an output format, the size is too minimal, thus saving you time.


Link: LICEcap

Best & FREE Alternatives To Otixo To Manage Multiple Cloud Storage Accounts

LICEcap Is The Best Alternative To Recordit To Screencast & Create High Quality GIFs

A single browser tab opened on Chrome can consume an average memory of around 30MB. Can you imagine what happens while you’re working on the internet (web development, SEO, etc.) and you open up, say, 20 or more browser tabs?

This might result in your browser getting bogged down. Worse, you might suddenly experience performance issues, unresponsive webpages, unexpected crashes, or the computer just freezes over. That’s because some webpages can consume a lot more memory than 30MB.

It’s a good thing someone thought about Tab Managers.

Since we’re talking about Chrome, we picked the Top 5 Chrome Add-on or Extension Tab Managers and picked at it to see how each one worked:

Manage Tab Overload with this 5 Best Memory-Saving Chrome Add-ons

Tab Managers Chrome

Tab Manager (link)

Tab Manager Is an open source add-on that allows you to handle your tabs fast. The add-on allows practical functions such as displaying all tabs and windows, allowing new tabs and windows, selecting of tabs using Ctrl + Shift, moving  tabs between windows, deleting tabs and windows, pinning and unpinning of tabs, and searching tabs by title or URL.

Page Snooze (link)

Even with so many tabs open, Page Snooze can help manage tab overload by allowing you to snooze tabs for up to 2 weeks. This can pop back up once the time is up. You can view all your snoozed tabs and manage them on the Page Snooze options page.

The Great Suspender (link)

With Great Suspender, you can unload, park, or suspend tabs to reduce the memory load of Chrome. Tabs can be configured with auto-suspend after a set period of time or they can be suspended manually. You can whitelist tabs to be excluded from automatic suspension. Suspended tabs are retained after closing and reopening the browser, preventing the tabs to reload even after restarting the computer. Tabs are restored using a very simple and intuitive interface.

OneTab (link)

With this extension you save up to 95% memory by reducing tab clutter. You simply click on OneTab to convert all your tabs into a list. When you need to access any tab, you can either restore them individually or all in one go. This can also reduce the CPU load on your computer.

TooManyTabs (link)

Developed by Visibo Ltd, TooManyTabs was first used with great success on Firefox. This version for Chrome carries virtually all of the same features when you open a lot of tabs on Chrome. The extension helps you manage your tabs even when too many are opened and you can’t anymore identify the tabs or favicons. You get a bird’s eye view of all opened tabs; clear preview of each tab’s content; instant tab search; tabs sorted by opening time, domain, or title; and ability to restore recently closed tabs; suspend idle tabs to save memory, and import tabs data from TooManyTabs unto Firefox.

Split Screen: Splits Your Web Browser into Multiple Resizable Windows


5 Best Memory-Saving Chrome Add-ons to Help You Manage Tab Overload

One frustrating part about installing fresh copy of Windows XP is that it takes almost an hour to complete. 40 to 50 minutes is normally the waiting time for XP installation, which is quite long for users who hate to wait.

Should you need to perform fresh installation of new operating system in the future, follow this simple technique on how to save time and install your new Windows XP in less than 25 minutes. The trick is safe and simple. Follow these steps:

Protect your USB stick with password

Windows XP Install

Step 1 Boot your genuine copy of Windows XP. This should load necessary files.

Step 2 After all needed files are loaded, you should get the option to select the partition. Just select “C”.

Step 3 Now format the partition (normal or quick with NTFS or FAT).

Step 4 Once the formatting is completed you should be asks to restart your system. Just press Enter.

And here comes the trick to quick install your XP:

Step 5 After rebooting, you get a screen where it takes 40 minutes to complete or finalize the OS installation.

Step 6 Now, Press "SHIFT" + "F10" key. This should open command prompt.

Step 7 Launch "Task Manager" by entering “Taskmgr” at the command prompt window.

Step 8 In Task Manager, click "Process Tab", here we find a process called "Setup.exe".

Step 9 Right click on Setup.exe -> Set Priority -> Select High or Above Normal.
This should instruct your computer to prioritize "Setup.exe", thus facilitating XP setup process.

That's it! The next thing you gotta do is to set back, relax and see how fast the Window XP installation process completes.

Trigger a loud alarm when someone touches/moves your computer mouse

Now, you can also apply the same technique when installing other applications or software, be it drivers, productivity tools, etc. Just set the priority level to highest or above normal -- that's the word. Please spread the word...share it to your friends..

Quick Install Windows XP In 15-20 Minutes

So you copied something, a photo or a tiny line of codes perhaps, and out of carelessness and itchy happy fingers, you accidentally copied another. And then you realized you need to re-access those previously copied items. And so you begin to wonder: is there a clipboard history, or a temporary folder where all your copied items are saved?

If you’re on Windows and you don’t have any clipboard manager installed, there is not such a way to recover those previous clippings. The notorious Windows’ clipboard only holds one item at a time. New items will permanently delete the previous one.

Add Multiple Tabbing Support To Windows File Explorer With Clover [Must Have]

Not Until the arrival of clipboard managers -- an extremely useful group of applications that can save you from any computer disaster like sudden shutoff, system crashes, etc. And here, I’m going to share you one of my favorite: Ditto.

Recover/Restore Previously Copied (and Cut Items) Back To Your Clipboard With Ditto (link)


Ditto is an open source (and therefore, FREE) extension for a standard Windows clipboard. This cool utility app extension allows you to save each item previously placed in a clipboard, thus, allowing you to access these items later on. Ditto allows you to save any type of information that can be placed in a clipboard, whether it is text, images, HTML, and even custom formats.

Block, Restrict Access To Unwanted Websites - No Additional Software Needed

Simply put, Ditto allows you to save, manage, and retrieve the countless clipboard grabs you make each day. It’s like recording all your cut and paste – copy and paste activities on a separate clipboard.

Some of the good features of Ditto and its Quick Paste Tools:
  • Easy to use interface.
  • Searching previously copied files.
  • Saving any type of information that can be placed on a clipboard.
  • Keeping multiple computer clipboards synchronized.
  • Data is encrypted when sent over a network.
  • Sending individual clips to other computers.
  • Able to access tray icons or global hot keys.
  • Can assign hot keys to specific copy entries.
  • Automatically checks for updates.
  • Can select any entry by double clicking.
  • Can use drag drop or enter key.
  • Can paste into any window that accepts standard copy or paste entries.
  • Displays thumbnail of copied images on a list.
Download: Ditto Clipboard Manager (FREE)

Must-Have: Recover All Items Stored On Your Clipboard with Ditto (Windows)

There has been a lot of tutorials on the internet on how to run/install Android applications on Windows computer. Most of the installation process, however, are little too complex that even advanced users could hardly make it work.

This short tutorial will introduce you another way -- a much simpler way -- on how to run/install Android applications on your computer. Here you'll be able to experience Google Android even if you don't have Android mobile phone device. This time you don't need to install multiple third party applications such as SDKs, emulators or Java RE just to make your Android running on your PC. And neither will you need to undergo same complicated process just to get your Android apps running on your XP, Vista or Windows 7 computer. Here we go:

YouWave - The Quickest Way To Run Android Apps On Your Laptop, PC [link]

Those who wish to run Android apps on their PC may want to try YouWave, a groundbreaking, high performance Android solution specifically designed for Windows PC. YouWave lets you experience 'real' Android mobility straight from your Windows computer. With YouWave, you can test run, install and preview your favorite Android application on your computer before finally moving it to the actual Android device.

Password Protect, Lock Specific Applications Installed On Your Phone

YouWave must be the fastest way to run/install Android applications on your PC. The program is very easy to use and there's no special requirements just to make it work. Just download and install your free copy of YouWave here and you're ready to go! After installation, launch the app (click on the icon in the Desktop), import your favorite Android apps (APK files), and see them in action on your computer screen.

Run PHP Scripts Straight From Your Android Phone

To run Android apps on your computer, just download your favorite Android app (.apk file) from your browser and put it in the default apps directory "/youwave/Android apps/" or any drives/directory of your choice. You cannot install directly from Android Market so you have to do the installation manually. Just google your favorite Android app (.apk file) and import it to your preferred Android directory app. It's that easy!


YouWave
YouWave starting up...

Android for PC
The homescreen...

Android for Windows
The Android menus...you can drag it to the homescreen

YouWave Android
Trying to install PHP for Android...Cool!

YouWave requires at least Intel 1.6GHz CPU or its equivalent, with 1G of RAM and 500MB of free disk space. Internet connection is required if you're to run Android app that requires internet connectivity. Enjoy!

Learn How To Automatically Switch Off Your Phone At Specific Time

If you find this post useful, kindly share this to your friends.

How To: Quick Install, Run Android Applications On Your Computer

Ever ran into a problem trying to download an email attachment in Gmail but you can’t because Gmail's virus scanner says it's a virus and unsafe to download?

Well, you’re not alone.

Few days ago, I ran into the same problem trying to retrieve my old email attachment in Gmail I sent five years ago. The file contains an executable file I wrapped in a zip file. But Gmail deems it as a malware and they cannot allow me to download the file at all cost (see screenshot below).


Gmail's Addon Streak Lets You Monitor, Track If Emails Are Read, Viewed By Recipients

Here's an explanation I got from their support page:

As a security measure to prevent potential viruses, Gmail doesn’t allow you to send or receive executable files (such as files ending in .exe). Executable files can contain harmful code that might cause malicious software to download to your computer. In addition, Gmail doesn’t allow you to send or receive corrupted files, files that don’t work properly.


It does makes sense, and it's a proactive step imposed by Google to prevent malicious programs to get inside and contaminate our computers.

But in case you need to access blocked email attachment and you're certain it's just false positive, then, here's a neat trick on how to circumvent this restriction and download blocked attachment in Gmail.

Bypass Gmail's Virus Scanner and Download Blocked Gmail Attachments

The trick is easy. Just launch your Gmail account in a third party desktop app like Outlook for Windows or Mail for Mac.

For Mac Just launch Mail app. Be sure to add your Gmail account in your Mac and navigate to that account to get all your emails.

Once you get there, rummage through your inbox and search for the email attachment you want to download.

How To: Automatically Send Email Messages At Later Time

For Windows Be sure you have your Outlook or Windows Mail correctly setup. If you're on Windows 10, the setup should be pretty straight-forward.

Once your Outlook is up, just search for that particular email attachment and you should be able to download it without any problems.

If you find this tip helpful, would appreciate if you can share it to your friends :)

How To: Download Blocked Email Attachment in Gmail — Bypass Gmail Virus Scanner

Not all websites are safe for kids; some portals promote sexual curiosity while others expose anti-racism and some violence of that sort. In corporate scene, there are websites that are not supposed to be visited especially during working hours. Facebook, YouTube, TumBlr, Orkut, Twitter – name them all – have been the major problems recently in schools and many other business organizations.

If you’re a mother who wishes to protect your child from bad websites or a network admin who is responsible for the network activity of company workforce, then, this short tutorial will teach you how to restrict internet access to a specific website – no additional software needed.

Block Specific Websites At School, Office Workstations - No Software Needed

Step 1 Log in to your computer as Administrator.

Step 2 Navigate through the Hosts File. Click Start > Run and type the following:
\Windows\System32\drivers\etc\hosts
Windows should prompt you an "Open with" dialog (see below). Just select "Notepad" or any other text editor and hit OK.

NOTE: To access the hosts file on on Windows 7, you may need to temporarily disable all active antivirus software first. Then run Notepad as Administrator, open the host file by navigating over here: \Windows\System32\drivers\etc\hosts.

Step 3 Now, let’s try to block Facebook and Twitter. All we need to do is to add the following codes below the lines containing 127.0.0.1 localhosts (if you cannot see it, create it):
127.0.0.1 facebook.com
127.0.0.1 www.facebook.com
127.0.0.1 m.facebook.com
127.0.0.1 touch.facebook.com
127.0.0.1 twitter.com
127.0.0.1 m.twitter.com
Step 4 Now, save the File and see it yourself!

If you’ve performed right the procedures above, your computer should not be able to access Facebook and Twitter. If you want to block more websites (e.g. Twitter, YouTube, Orkut etc.), just access the Host File and append the domain name or web address and save.

Blocking specific websites is really that easy!

How To: Block, Restrict Access To Unwanted Websites - No Additional Software Needed

Ever wanted to watch your favourite movies and TV shows on Netflix or YouTube while opening other work-related apps? Well now, you can continue to look busy and pretend working while enjoying your guilty pleasure movies on Netflix and YouTube.

Being able to dock YouTube or Netflix videos on a nice, overlay window that floats over other opened apps is one great feature Google Chrome and Firefox could introduce to its core. Sadly though, that picture-in-picture (PiP) feature is currently not supported in their recent version for both Windows and Mac. So we are all left in the dark, given the classic option of staying within the browser to continue watching your favorite stuff.

But, someone decided to change that.

A Chrome extension called Picture in Picture for YouTube & Other adds an unofficial PiP support for Chrome that works well with YouTube, Facebook and Netflix. Which means, you can pop out virtually any active playing video into a small, draggable mini-mode window that sits nicely on top of other opened apps.

Watch Netflix, YouTube in Foreground While Keeping Other Windows Opened

Picture in Picture for YouTube & Other promises to give you the best viewing experience (and distractions) on popular sites like YouTube, Netflix and Facebook. Essentially, it lets you watch Netflix or YouTube videos on overlay mini-window that floats over other opened windows.

Here's How to Watch Netflix In Floating, Resizable Windows

  1. Launch Google Chrome and install Picture in Picture for YouTube & Other. Installation should take no more than a minute. Once installed, you should see this icon:

  2. Now, go to Netflix or YouTube and play a video of interest.
  3. Once a video begins to load, click on that tiny PiP icon. Netflix or YouTube video player should automatically dock at the bottom right of your screen as an overlay. Feel free to drag or resize it.
  4. Now, head back to whatever it is you're working and continue juggling emails or pretend you're busy writing stuff, etc.

Get Instant Lyrics for Grooveshark, Spotify and YouTube Web Players with This Cool Add-on

The really nice thing about this Chrome add-on is that it continues to play your Netflix or YouTube videos in a nice resizable floating overlay even if you're opening other apps like office apps, CRMs, code editor, and just about anything. Just make sure the video is actively playing in a tab.

Here's me watching Polar on Netflix while opening my code editor.

Here's yours truly listening to TED Talks on YouTube

New Browser Extension "Turn Off The Lights" Gives YouTubers The Feel Like They're In A Cinema

Now feel free to share the good news below using social buttons below or subscribe via email to get notified for goodies like this in the future.

How To: Watch YouTube, Netflix on Sticky, Floating Window While Keeping Other Apps Opened

Previously on this blog we have talked about YouWave, a high performance Android emulator that makes it easier to run Android on your PC. If you haven't had a chance to check it out, head over HERE.

Modern technology has brought computer desktop applications to be used on smartphones and iPhones. However, what if there are phone applications that you want to use on your desktop?

Add Multiple Tabbing Support To Windows File Explorer With Clover [Must Have]

Introducing Cubiez, the apps that brings your favorite phone apps on your desktop. All the apps on your mobile phone that you love or need to use can now be accessed on any desktop or laptop.

As of date, Cubiez is a free app download, though only the first lucky few who download can avail of the exclusive Alpha version.

Cubiez: Bring Your Favorite Mobile Content to Your Desktop (link)

Cubiez allows your phone apps to be made available at the bottom of the taskbar screen so they are always accessible. Should there be any new content for your phone apps, instant notification will alert you. The platform is also non-intrusive because you never have to leave what you are doing just to check for updates.


Cubiez is very simple to use. All you need to do is to download the free app and then install. A marketplace will appear on the taskbar, the purpose is to choose the phone apps that you like. In one click, installation can be completed and everything will show up on your taskbar. Now, all you need is to do is log into your favorite apps.

Turn Your Laptop, PC Into Wi-Fi Hotspot Without Using Ad-Hoc -- Internet Sharing Made Easy

The mobile apps on your desktop are even made to like, well, like mobile apps, the way you see them on your mobile phone.


Download: Cubiez (Windows)

Cubiez is available only for Windows. However, the developers will soon come out with versions for Mac and Linux.

Bring Your Favorite Mobile Contents to Your Desktop with Cubiez (Windows)

Here’s the thing, you’re doing research on the net and you need to take notes. What you’re doing is you’re either switching screens continuously from the website to your notes or you just minimize Microsoft Office Word or Notepad to take notes, which can be very tedious and annoying.

Now, there’s a simpler way to facilitate research work and learning. Google Chrome introduces Split Screen, a Chrome extension for convenient note taking.

Split Your Chrome Browser into Multiple Resizable Windows With Split Screen (link)

Split Screen is a free add-on for Google Chrome. It simply splits the screens on your PC browser into multiple re-sizable windows. Its default feature is its two windows, the left window opening up as a notepad for taking notes.


Another feature of Split Screen is that it can be set so that two websites open side by side. This is useful if you need to do multiple sources research or site comparisons. The user can even split the screen horizontally, another great option feature. If the user decides to split two notepads with one website, it can be done.

How To: Password Protect, Lock Google Chrome Browser

Split Screen is easily customized. All you need to do is select from the “Options” or just type the appropriate command into the address bar of a window.

Installation of the Google Chrome extension is fast and easy. It just gives another good reason to stick with, and use, Google Chrome.

Split Screen: Splits Your Web Browser into Multiple Resizable Windows

Found this really clever and evil site that lets you prank your friends and co-workers with a fake system update and thought you might like this too ;)

If seeing your friends’ worried look delights you, then, this fun website lets you do just that. The website, Update Faker, lets you select a fake system Windows or Mac update on your unsuspecting friends’ computer by simply visiting the website and selecting the “theme”. Just be sure to press F11 to go fullscreen mode on your Windows or Ctrl+Command+F on Mac.

The fake Windows update screen looks too real; from fonts, colors and even progress bars. Your target should definitely freak out upon seeing their computer screen doing the dreaded system updates. Just be prepared for possible reprisal.

Update Faker Themes to Choose From

Yet another reason why you should lock your computer when you take a quick break however short that is. Or else you could be a victim from pranksters lurking around your corner.

This is probably one of the meanest websites we’ve come across.

This Website Lets You Prank Your Friends with Fake System Updates

Your PC, laptop and even PDAs can all be protected from illegal access with a password using dedicated file security programs. Users get prompted for a password every time they attempt to open the protected files. Yeah, this is cool! But, do you know that you too can protect your USB sticks from illegal access using password? Every time a user tries to open and format your USB stick, he will be asked for a correct password. And the coolest part about it is that you don’t need to install third party application just to encrypt and password protect your files and documents stored on your USB sticks.

If you rely on USB stick or portable hard disk as your main storage device, you should take the full advantage of BitLocker. BitLocker is a built-in program of Windows 7 designed to help you restrict access to your pen drives and external disks. Encrypting and protecting your USB sticks with a password using BitLocker is just a matter of minutes. Here’s the step by step guide on how you can secure your files/documents inside your thumb drive by encrypting and setting up a password.

Step 1 - Insert your portable hard disk (e.g. USB flash drive).

Step 2 - Using Windows Explorer, map and right click your USB stick and select "Turn on BitLocker".

Step 3 - A small window should now pop up prompting you for a password. Enter your desired password and hit “Next”. (Note: this password will be required by the time you open your USB stick later).

Step 4 – BitLocker will now create and save a recovery key on your computer just in case you forget your password. Just select the first option to save the recovery key in a text file in a secure place.

Step 5 – BitLocker should now start encrypting your portable disk. The process could take a few minutes depending on the data volume in your removable disk.

Step 6 – Now once done, remove your USB stick and try to insert it again and voila, you should be prompted for a password!

Just because BitLocker is a Windows 7 application doesn’t mean you can still break and open your BitLocker-protected USB stick on your XP and Vista computers. The nice thing about BitLocker is that it is machine independent and should be useful for locking your USB thumb drives!

(By Freddie Lore of TipTutorial.com)


How To Encrypt and Password Protect Your USB Sticks?

Do you know that you can still recover all your unsaved word documents without using third party applications or any other word recovery tools? You heard it right! The auto-save function of Microsoft Word 2003 should save you from all the hassles of retyping unsaved word documents after sudden shut off or system loss.

One of the little known features of Microsoft Word is its built-in auto-save function that automatically saves a copy of the file to a separate (hidden) directory. When you start typing/editing your word document, Windows by default automatically saves a backup of the file in every ten minutes once this auto-save function is on. These word documents usually are stored temporarily at these locations:

C:\Documents and Settings\Username\Application\Data\Microsoft\Word

C:\Documents and Settings\Username\Local Settings\Temp

Unless you have modified this auto-save function of Windows, you should be able to retrieve back all recently edited word documents even if you get struck by a system failure or power loss. Take note that the backup copy of your recently edited word files are hidden, so make sure to show all hidden documents when you start searching for unsaved word document.

If you're using Word 2007, chances of getting back your unsaved word file are even greater with the Auto Recovery Feature of Microsoft Word 2007. Microsoft Word 2007 comes with auto recovery facility that will automatically recover the lost/unsaved word file after system crash or power shortage.

This auto-recovery feature of Word 2007 poised to be the best way to recover unsaved word documents. To enable this feature, follow these steps: 


1. Go to "Word" and click "Word Options"
2. Click on "Advanced Tab".
3. Check "Always create backup copy" then "Allow background saves" (this should instruct Windows to recover files automatically in the future).

There you have it! Say goodbye to all the hassles of retyping lost/unsaved word file by following those simple tips.


Via: http://tiptutorial.com/computers-a-it/item/how-to-recover-unsaved-word-documents.html?category_id=4

How To Recover Unsaved Word Documents?

Ever wondered how your website looks in an iPhone or iPad? Do you want to know whether your blog renders properly in a handheld device or not? This short tutorial will introduce you to another useful tool that lets you test-run or preview your website in an iPhone or iPad from your Windows/Mac computer.

Best iPhone, iPad Emulator - See How Your Website Looks In iPhone or iPad Using Only Your Browser

User Agent Switcher Add-On is a browser extension that lets you switch the user agent of a browser. Put simply, you’ll be able to view the iPhone, iPad or mobile version of any website in just a click. The extension is currently available for Firefox and will run on any platform that this browser supports including Windows, Mac OS X and Linux.

Here’s how you can preview your website in an iPhone or iPad using User Agent Switcher Add-On for Firefox:
  1. Download and install the user agent switcher add-on for Firefox. You may need to restart your Firefox for the changes to take effect.
  2. Download the following list of user agent strings for iPhone, iPad and various other mobile devices:
    http://dl.dropbox.com/u/34093859/uas1.xml.
    http://dl.dropbox.com/u/34093859/useragentswitcher.xml
    These are XML documents which will let you change user agent in Firefox to the user agent of an iPhone, iPad, BlackBerry, Nokia, Samsung and other popular mobile phones.
  3. After you’ve downloaded the XML files, go to Tools > Default user agents and click on “Edit user agents”.
  4. A small window should popup where you can see an “Import” button. Now click on that button and import the XML list of user agents you just downloaded.
Once you have imported the lists, you’re now ready to test and preview your website in an iPad, iPhone, Android, BlackBerry, Nokia and other mobile operating systems. To start, just select the default user agent and select the device where you want to preview your site’s design, and reload the page.


Update: ScreenFly is an excellent emulator too. No more pesky-clicking involved.

Finally, A Working iPhone, iPad Online Emulator for Windows, Mac

Previously on this blog we have talked about Connectify, a tiny piece of app that turns your laptop into a wireless hotspot so you can quickly share your internet connection without having to spend hours of frustration doing it via Ad-Hoc.

Connectify is great, but only if you're willing to toss $40 for the lifetime Pro version that unlocks a plethora of features which of course you don't need all. While there's a Connectify Lite version, I find it too limited especially the latest version. And that's not only my opinion.

Add Multiple Tabbing Support To Windows File Explorer With Clover [Must Have]

Now if you want a decent and FREE alternative to Connectify to share your LAN, 3G/4G internet connection, then, you might you want to check out mHotspot.

mHotspot Transforms Your Computer Into Portable WiFi Hotspot  (link)


mHotspot is a 100% free software which converts your Windows-based computer into a functional and secure Wifi Hotspot. If you have DSL or 3G/4G broadband at home, you can quickly share that to other wireless devices. Absolutely no router or additional external hardware required.

With mHotspot, you can:

  • provide internet access to other devices (10 devices max)
  • set your own hotspot name without any prefix or restrictions (unlike Connectify Lite)
  • secures your wireless hotspot with WPA2 PSK password security
  • application size is 400KB only (that's cool)
  • share any type of Internet connection (LAN, Ethernet, 3G/4G, etc)
  • see the details of the connected devices (e.g. device name, IP & Mac Address)
  • see the network usage (upload and download speed)
  • turn your laptop as a repeater


mHostpot, the best Connectify alterntive as yet, has already amassed over 2 million downloads to date. Go check out mHotspot.

Must-Have: Recover All Items Stored On Your Clipboard with Ditto (Windows)

mHotspot Is A FREE Alternative To Connectify That Turns Your Computer Into Wifi Hotspot

Few days ago, I ran into a problem trying to embed a 40-seconds video into a website.

The problem:

The short video was too large — about 80MB in size — which doesn't seem to justify the length of the video we need to upload. With that ridiculously large size, we cannot easily upload and make it publicly accessible in the website for some performance reasons (if you're a web guy, you get it).

Since video hosting services like Vimeo and YouTube were not an option at that point, we had to come up with ways on how to minify the video without compromising the quality before finally embedding it to the site. And thankfully, we found this awesome tool called Handbrake.

Optimize, Compress Video for up to 90% (Useful for Web Embeds)

Handbrake is one bad-ass video optimizing software that will surely save your day. It allows you to compress any videos of any format, thus significantly reducing the file size without losing quality. It's lightweight, free, and it just works like a charm.

Here's why everyone loves Handbrake:
  • Great video format support. You can compress any types of videos like .wmv – Windows Media Video File, .avi – Audio Video Interleave File, .m4v, .mov, etc.
  • It is Open Source. That means you don't have to spend a penny
  • It works on Windows, Mac and Linux so everyone can enjoy.

GistBox: The Best Place to Store, Organize Code Snippets and Pastes


Using Handbrake is pretty easy. First, you have to specify the Source video file, define Output settings as well as the Destination folder, then, hit Start. It's that easy. See the demo below (click to enlarge):

LICEcap Is The Best Alternative To Recordit To Screencast & Create High Quality GIFs

The result:


Look at that file reduction I got — from 80MB I was able to shrink it down to 7.6MB. That's 90% reduction!

Still not convinced? Download Handbrake for Windows or Handbrake for Mac and see it for yourself.

How To: Web-Optimize, Compress Videos Without Losing Quality (90% Reduction Guaranteed)