Computer starts to slow down? Conflicting software, driver incompatibility, and corrupt registry can be the reason why your PC starts to bog down. And here’s more: if you constantly leave your PC on standby (with active applications opened), expect for the performance of your PC to get worse.

If you constantly open multiple files and applications all at the same time, you probably have noticed that annoying delays, less-responsiveness, and deprived processing on your PC. This normally is the case especially with Window-based computers; when you launch certain app, say Firefox, it actually generates ample amount of data which are temporarily saved on your disk. And the longer you leave the app running, the more it accumulates data, and that could significantly reduce the overall performance of your PC.

In a situation like this, we often resort to reset/restart our PC. The same action is taken if our computer experiences “freezes” and “hangs-up” due to unresponsive programs or if we’re asked to restart our PC after installing certain app. But actually, you don’t really have to. Follow this simple trick on how to reset your computer without actually restarting:

Computer Freezes, Hangs-Up? Reset Your Computer – No Restart Needed

Step 1 Access your Task Manager with the famous Alt+Ctrl+Delete. This should bring the Windows Task Manager.

Step 2 Find explorer.exe in the list of active processes. Right-click on it and hit End Process. This should bring the Task Manager Warning dialog. Just hit Yes.


Step 3 Launch explorer.exe. Simply click on File > New Task and type “explorer” (without quotes). Hit Ok.

You’re done!

Like this post? You might also want to check out this Windows tips and tricks.

Computer Freezes, Hangs-up? Reset Your Computer Without Restarting

There may come a time when you need to extract all images inside a .DOC Word document and save them as separate PNG or JPEG files. This can be strange but there are insanely weird scenarios when a friend or a working colleague of yours will forward you a copy of images embedded in a Word file.

Exporting and saving all embedded images in a Word document can surely be a pain especially if you’re dealing with large files. Microsoft Word doesn’t have a quick option to extract and save all embedded images/pictures as separate JPEG files at the same time. While you can always save pictures from a Word file by simple right-clicking the image and choosing “Save Picture” option if any, that process is just a whole waste of time. On top of that, you’ll get prompted to save the file in the form of multiple “Save As” boxes which can be very annoying sometimes!

So, how do you batch extract and save all images/pictures embedded in a .DOC file all at once?

The solution is simple: just save the .DOC file as HTM or HTML. By the time you save any .DOC file containing images, MicroSoft Word automatically extract those images and save them in a folder named as that of your .DOC or HTML file. Take a look at these screenies (click to enlarge):
There’s not any or anything that can extract all images inside a word file more quickly other than Microsoft Word itself. Microsoft Word comes with many great functions that you can even use it to create a simple webpage or have it as your datasource. For more tips of this type, click related entries below.

How To: Extract All Images Embedded In .DOC Word Documents All At Once

There has been a lot of tutorials on the internet on how to run/install Android applications on Windows computer. Most of the installation process, however, are little too complex that even advanced users could hardly make it work.

This short tutorial will introduce you another way -- a much simpler way -- on how to run/install Android applications on your computer. Here you'll be able to experience Google Android even if you don't have Android mobile phone device. This time you don't need to install multiple third party applications such as SDKs, emulators or Java RE just to make your Android running on your PC. And neither will you need to undergo same complicated process just to get your Android apps running on your XP, Vista or Windows 7 computer. Here we go:

YouWave - The Quickest Way To Run Android Apps On Your Laptop, PC [link]

Those who wish to run Android apps on their PC may want to try YouWave, a groundbreaking, high performance Android solution specifically designed for Windows PC. YouWave lets you experience 'real' Android mobility straight from your Windows computer. With YouWave, you can test run, install and preview your favorite Android application on your computer before finally moving it to the actual Android device.

Password Protect, Lock Specific Applications Installed On Your Phone

YouWave must be the fastest way to run/install Android applications on your PC. The program is very easy to use and there's no special requirements just to make it work. Just download and install your free copy of YouWave here and you're ready to go! After installation, launch the app (click on the icon in the Desktop), import your favorite Android apps (APK files), and see them in action on your computer screen.

Run PHP Scripts Straight From Your Android Phone

To run Android apps on your computer, just download your favorite Android app (.apk file) from your browser and put it in the default apps directory "/youwave/Android apps/" or any drives/directory of your choice. You cannot install directly from Android Market so you have to do the installation manually. Just google your favorite Android app (.apk file) and import it to your preferred Android directory app. It's that easy!


YouWave
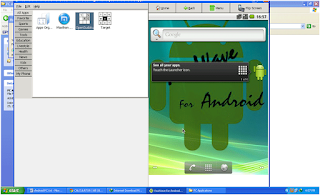
YouWave starting up...

Android for PC
The homescreen...

Android for Windows
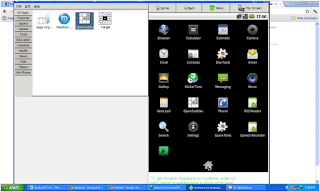
The Android menus...you can drag it to the homescreen

YouWave Android
Trying to install PHP for Android...Cool!

YouWave requires at least Intel 1.6GHz CPU or its equivalent, with 1G of RAM and 500MB of free disk space. Internet connection is required if you're to run Android app that requires internet connectivity. Enjoy!

Learn How To Automatically Switch Off Your Phone At Specific Time

If you find this post useful, kindly share this to your friends.

How To: Quick Install, Run Android Applications On Your Computer

One frustrating part about installing fresh copy of Windows XP is that it takes almost an hour to complete. 40 to 50 minutes is normally the waiting time for XP installation, which is quite long for users who hate to wait.

Should you need to perform fresh installation of new operating system in the future, follow this simple technique on how to save time and install your new Windows XP in less than 25 minutes. The trick is safe and simple. Follow these steps:

Protect your USB stick with password

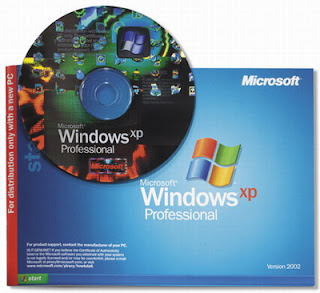
Windows XP Install

Step 1 Boot your genuine copy of Windows XP. This should load necessary files.

Step 2 After all needed files are loaded, you should get the option to select the partition. Just select “C”.

Step 3 Now format the partition (normal or quick with NTFS or FAT).

Step 4 Once the formatting is completed you should be asks to restart your system. Just press Enter.

And here comes the trick to quick install your XP:

Step 5 After rebooting, you get a screen where it takes 40 minutes to complete or finalize the OS installation.

Step 6 Now, Press "SHIFT" + "F10" key. This should open command prompt.

Step 7 Launch "Task Manager" by entering “Taskmgr” at the command prompt window.

Step 8 In Task Manager, click "Process Tab", here we find a process called "Setup.exe".

Step 9 Right click on Setup.exe -> Set Priority -> Select High or Above Normal.
This should instruct your computer to prioritize "Setup.exe", thus facilitating XP setup process.

That's it! The next thing you gotta do is to set back, relax and see how fast the Window XP installation process completes.

Trigger a loud alarm when someone touches/moves your computer mouse

Now, you can also apply the same technique when installing other applications or software, be it drivers, productivity tools, etc. Just set the priority level to highest or above normal -- that's the word. Please spread the word...share it to your friends..

Quick Install Windows XP In 15-20 Minutes

When trying to delete an undeletable file or folder, you must have surely faced this error message:

Cannot delete. Access is denied. Make sure the disk is not full or write-protected and that the file is not currently in use

This error message usually occurs when you’re trying to remove a file/folder currently in use by your computer or a certain program/services is currently accessing the file. But most often, this error message occurs when you’re trying to delete a file with file attributes modified by a malware (usually hidden, write-protected and stored at 0KB by size). Why do we actually need to trash such files when they’re not bogging anyway on our computer? Simple. We hate seeing them residing on our hard drives.

This article will walk you through on how to permanently delete “Recycler” folder and persistent .BAT files, .EXEs, and other undeletable files in minutes.

Deleting undeletable file/folder using notepad

The simplest way to delete an undeletable file/folder is to create the same file/folder within that directory using only your native notepad. Here’s how:

  1. Open your Notepad by clicking Start>Run and type Notepad. This should launch a new Notepad document.
  2. Optionally, you can type anything in your Notepad but leaving it blank will do.
  3. Click File and Save As. This should open a Save As dialog.
  4. Locate the directory where your undeletable file/folder is.
  5. On the ‘File Type’ box, choose All Files.
  6. Click once on the undeletable file you want to force delete and its filename should appear in ‘File Name’ box (e.g. Autorun.inf).
  7. Put a double quote (“) at the start and end of the file name. This instructs Notepad to overwrite it. So from Autorun.inf, it should now be ”Autorun.inf”. Then, hit Save.

Notepad should now prompt you to overwrite the existing file, just choose Yes and that’s it! You can now delete an undeletable file/folder as normal.

How To Delete Undeletable File or Folder Using Notepad?