Grabbing APK files from the Play Store may sound absurd, considering that you can just fire up the Play Store app and search your desired Android app and install. That's the de facto legal method of obtaining apps of your choice from the Play Store.

However, there are situations when you needed to bypass the app marketplace for some reasons. For instance:

(a) you may be fiddling around an Android simulator on your Windows or Mac and the only way to install an app is by loading its APK files.

(b) Or you desperately need to install an Android app not available in your country so you resort to bypass the Google Play Store country restriction and just grab its APK files.

(c) Or you've stumbled upon a controversial Android app and you know it's going to be removed soon so you create an APK file as a backup.

Whatever the motivation is, you can always grab a standalone Android Package Kit (APK) from an Android app published on Play Store.

Generate APK File from Google Play Store

The trick is easy.

  1. Head to APK Download website (https://apps.evozi.com/apk-downloader/)

  2. Copy and paste the package name or Google Play URL (e.g. wifi.killl.com)

    generate APK from Google Play

  3. Click Generate Download Link button.

    apk generator online

You're done.

Obtaining APK file may take a minute or so depending on an Android app's package size.

How To: Generate APK Files Straight from Google Play Store

best ad blocker for ios - block facebook and youtube video ads

The release of Content Blocking Extensions on Safari back in iOS 9 days was met with excitement among iOS users, who've seen the barrage of ads assaulting their iPhone screens from time to time.

With Content Blocking Extensions finally supported on Safari, iOS users now have complete control over the level of privacy-invading adverts and trackers they are willing to tolerate.

While we do believe ads are necessary nuisance to skip paywalls and keep everything free online, some web pages are just plain annoying, deliberately degrading user experience by bombarding us with ads and popups.

If you're just as fed up as me and want to block ads on iPhone including those pesky Facebook ads and YouTube ads that's cluttering your iPhone screen, then, read on!

Meet Wipr: the Best and Last Ad Blocker You Need for iOS — Blocks Facebook and YouTube Ads Too

Forget about Adamant, Purify, or Crystal. Those popular content blockers on iOS just don't make the cut. I had an unpleasant experience with those apps that I decided to completely remove them for good. And not too long ago, some of those well-advertised apps even caught receiving $$$ from big-time advetizers in exchange of whitelisting their ads.

Wipr is heaps better than them. It works just as promised without compromising your iOS browsing speed. And it's regularly-updated list of trackers ensures all ads, trackers, cryptocurrency miners, EU cookie and GDPR notices are all blocked.

One thing I appreciate about Wipr is this bold promise of transparency:

"No one can pay to unblock ads. There are no acceptable ads. Wipr only answers to you."

Which means, no single advert gets whitelisted.

Wipr works in Safari (for now)

You can best appreciate Wipr if you regularly use Safari on your iPhone. It's tough on ads and gives you speedier browsing experience. One reason why a website takes ages to load is because of multiple trackers and adverts competing a slice of attention from you as user.

With Wipr, not only can you save precious data but websites now load significantly faster.

Block ads on Facebook and YouTube

Wipr also blocks Facebook and YouTube ads on iPhone's Safari. If you primarily use Safari to access web pages like Facebook and YouTube, Wipr is a must. I've long uninstalled YouTube and Facebook apps in an attempt to limit the amount of time I spend on these apps. But if I needed to quickly see Facebook updates or binge watch on YouTube, I just turn to Safari.

How To: Watch YouTube, Netflix on Sticky, Floating Window While Keeping Other Apps Opened

Wipr sets you back around $1.99, but it's worth your money considering that you can now permanently block ads on iOS, including that on Facebook and YouTube ads. (Download Wipr)
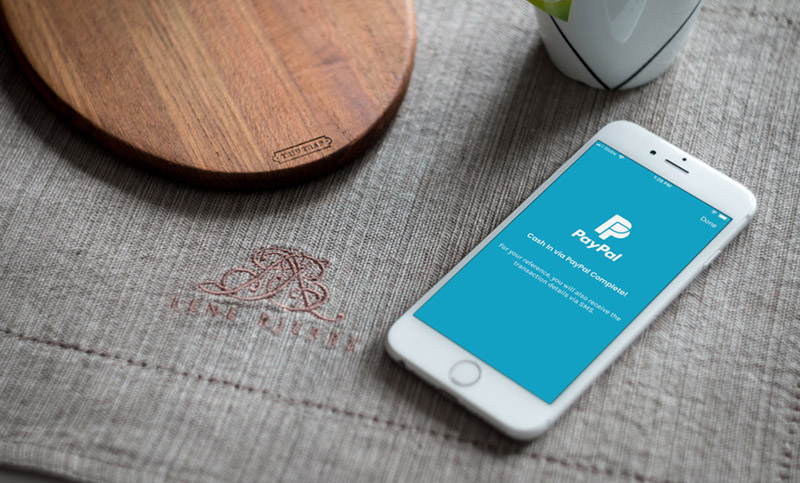
How To: Block Ads on iOS, Including Facebook Ads and Youtube Video Ads (iPhone & iPad)

withdraw-paypal-to-bank-account-realtime-fast

If you've been working online as an independent contractor providing remote services such as content writing, web development or digital marketing, you know exactly how indispensable PayPal can be. PayPal makes it easy for your clients anywhere in the globe to send money for your freelancing services.

And if you're based in the Philippines, it's nearly impossible to do some online gigs without relying to PayPal. In fact, clients would require you to get it as it makes their lives easier as well.

Getting a PayPal account is free and fast. And transferring PayPal funds to another PayPal account is equally fast. However, moving your PayPal funds to your bank account can take as much as 2-5 business days, understandably because of destination bank account's verifications and additional checks.

Waiting for 2-5 business days is fine to be honest, especially if you don't immediately need the cash. But what if there's an emergency and you want an immediate cold cash in hand? Read on as I'll show you how I withdraw PayPal funds to my bank account in minutes even during weekends and holidays.

Transfer PayPal Funds to Bank Account in REALTIME, FAST

The trick is easy: move your PayPal funds to GCash and from GCash transfer it to your bank account via InstaPay.

PayPal has this partnership with GCash allowing GCash users to immediately cash-in using PayPal balance. And the nice thing about GCash is that it partnered with the country's banking institutions such as UnionBank, BPI, BDO, and more, making it even a lot easier to move funds between bank accounts via InstaPay.

I had a GCash account before (like 3-5 years ago) but I ditched the service because there's not much going on about it aside from making it easy to buy prepaid loads and pay to partner merchants. But I checked out GCash last week and truth be told: they've upped their game making it hard to ignore.

Here's how I instantly moved PayPal funds to my bank account in action:

Just swipe to the left/right

paypal-cash-in-gcash Select 'Cash In'
paypal-cash-in-remittance 
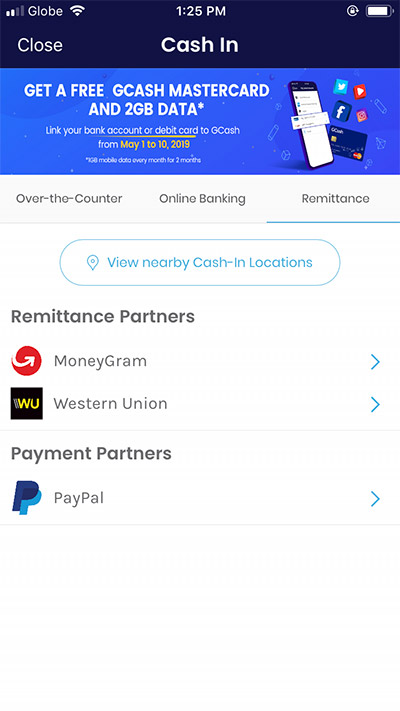
Payment Partners > PayPal
paypal-to-gcash Enter amount to widthdraw
paypal-to-gcash-complete PayPal confirmation
paypal-cash-in-gcash Click 'Send Money'
gcash-to-bank-account Click 'Send to Bank'
gcash-to-bank-account-select-bank 
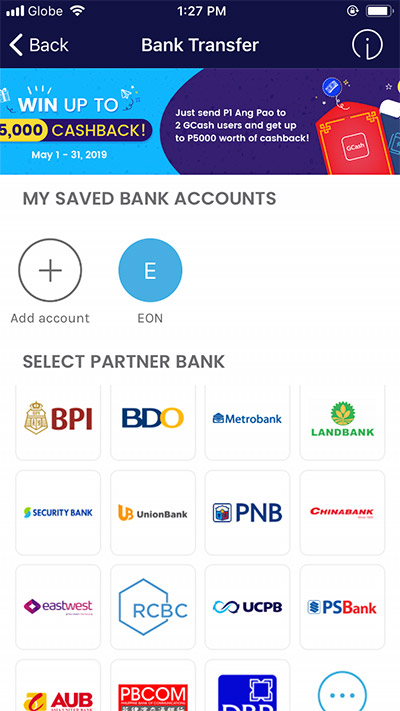
Select destination bank account
gcash-to-bank-amount Enter amount
gcash-to-unionbank-instapay 
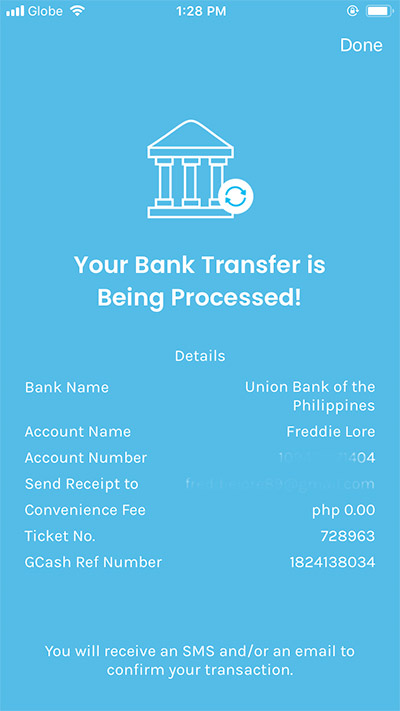
Money successfully sent to UnionBank

Note: your GCash account needs to be verified first so you can link your PayPal to GCash via Menu > My Linked Accounts (on iOS).

Instantly Withdraw PayPal Funds to Philippines Bank Account In MINUTES, Even During Weekend

If for some reason you want to restore that crucially important text message on iPhone that was deleted by accident or maybe you've bricked your phone and wanted to recover those important text messages, chances are you'll immediately hop back to your computer and look for backups to restore.

But what if you don't always have a scheduled backup and you desperately need to retrieve that lost text message?

Fret not! As dodgy as it may sound, you can fully recover deleted text messages on iPhone even if you don't have a backup. And best of all, you don't have to spend a penny to restore those deleted precious text message data.

How it's possible to recover text messages on iPhone

When you permanently delete a message on your iPhone, you're not actually deleting the data itself. What iOS' Message app does is it only removes the indexing file.

So you can imagine your actual SMS data still sits inside your iPhone's internal memory and can be fully restored even if that message is deleted.

iPhone Message Recovery: A FREE Text Message Recovery Tool for iOS That Actually Works

Everyone, meet iPhone Message Recovery. It's a tiny piece of app currently available for Mac that lets you recover accidentally deleted text messages on iPhone at no cost. I was told Windows version is in the works, so maybe a little wait is required for Windows users.

I nearly had to shun and skip this tool thinking maybe this is yet another garbage app that secretly installs malware instead of delivering the promised iPhone text message recovery as advertised. But the entire install file is just below 15MB so me being too skeptical had to give it a go.

To my surprise, iPhone Message Recovery actually works like a charm! After just a few scans, the app was able to recover my deleted text message and lets me preview those deleted text messages! Sweet.

Here's how to restore deleted text messages on iPhone without backup

  1. Download and install iPhone Message Recovery for Mac (14.6MB). It's FREE, no sign-ups needed.

  2. Launch iPhone Message Recovery on your Mac, it should prompt you like this

  3. Once installed, connect your iPhone to your Mac. It should automatically detect your iPhone

    There are two sources for text message data recovery: Device or Backup. Be sure you're selecting Device mode.

  4. Click Next, it should immediately start the scan. Analyzing your iPhone data can take a while, so wait for a few mins and do not disconnect your iPhone.

  5. As soon as you're done with the scan, the app prompts you this:

    If you're recovering just standard plain text message, just toggle Messages and click Next

  6. Let iPhone Message Recovery app do its thing and wait until you're taken to this screen

    You'll notice that two striked-through items being the deleted text messages. And see how I can easily preview them even if they're deleted inside my iPhone.

Wrapping it up

iPhone Message Recovery is not your typical dodgy data recovery app you've come to know from other data recovery apps. It's a fully functional data recovery app for iPhone that brilliantly recovers lost text messages data and even recover iMessage's photos and videos attachments in one go.

How To: Recover Deleted Text Messages on iPhone without Backup for FREE

Google Forms, without a doubt, is still the best polls creation tool available to date. It's a free service from Google packed with all the essential features that make it tad easy to create quizzes or surveys on the fly.

While Google Form has all the components needed to create surveys real quick, it can be disappointing to note that the platform lacks the ability to collect users' inputs using the latter's language of choice. Google Form doesn't have multilingual support yet. However, as what the popular adage goes, there's always a way out.

In this article, we'll show you how you can easily create a single multilingual Google Form that prompts users their preferred language before finally asking survey questions. This is not a perfect solution but offers a neat workaround to collect users' info using their preferred language.

If you know a much better way, please buzz us off.

How To Create Single Multilingual Google Form

For the sake of this tutorial, we'll be re-creating this Demo Multilingual Google Form I previously built. Notice how it prompts you with preferred language before finally asking actual questions.

  1. First off, you'll need to go and create your first Google Form. Give your form a sensible name.

  2. Let's create your first question. Your first question should be of Multiple Choice type that asks users their preferred language. You can add as many language as you can.

  3. Let's add at least three sections. In this tutorial, we'll be supporting three languages, hence, the three sections. Google Form's section works like a group that lets you separate your poll questions.

  4. Each of this section holds the initial poll question from each supported language. So your three sections may look like these:

  5. Now, scroll up and navigate back to your first question (Preferred Language prompt). Click any of the options to bring the destination selection box. At this point, you can now instruct Google Form to jump to English section when English option is selected, Go to section X (Spanish) if Spanish is selected, and so on and so forth.

If you wish to create additional questions for each supported language, just add another three sections and redo steps three to five above.

All responses will be automatically stored in a Google Sheet, and each question and answer gets its own column in that sheet.

Extensis Fonts Lets You Access, Use Google Fonts In Your Google Documents

Creating a multilingual Google Form may not be as straight-forward as you might think. Until Google rolls out an update to their poll-creation platform, we can take refuge at the above method to add a multi-language support to Google Forms.

Create Single Multilingual Google Form and Display Questions Based on Selected Language

The older we get, the less time is spent on quality slumber. Blame it to the corporate life' stress, household responsibilities, or maybe that's just how adulthood simply works?

That's why we always try to snatch that much-needed naps whenever we can, whether on a bus or a train.

So, if you're among those millions of nine-to-five warriors who commute your way to work, or you're a backpacker with long trips to the countryside, here's a neat trick how to sleep off your commute without worrying about missing your stop. Let your phone automatically alerts you when you're about to enter your destination just in time.

What you need

  • IFTTT app (available on Android, iOS)
  • Mobile data connection

For the uninitiated, IFTTT (short for If This, Then That) is a powerful web-based service that lets you perform actions based on user-defined triggers. We call these actions as “applets”. IFTTT works like Zapier but much easier to use.

Let Your Phone Alerts You When You Arrive At Your Destination

The goal here is to create an IFTTT applet that notifies you when you arrive at your destination. To do this, we'll use both Location and VoIP Calls services. Here's how to get started:

  1. Install IFTTT app (iOS, Android), and sign-up.
  2. Create your first applet by going to My Applets tab and click on + icon top right.
  3. Now, you'll be asked to define the trigger and action, like this:

  4. Tap on this and search for Location > You enter an area and specify the area you want to be notified.

  5. Once done you'll be taken back to step 3 where you create an action. Just tap that and search for VoIP Calls service where you can fire Call my device action, as seen below:

  6. Save your applet and ensure your IFTTT is running in the background. You're done.

    Use IFTTT As A Spy App: Secretly Copy, Collect iOS Photos on iPhone, iPad (No Jailbreak)

While Google Maps' previous update already has a push notification that alerts you when you're approaching your stop, I find it too unreliable to be honest. A VoIP call works better, ensuring you get off the bus or train just in time.

Long Commute? Get Power Naps and Get A Phone Call When You Arrive At Your Destination

Trying to get its share from the pie in a market dominated by Apple, Google Podcasts was launched back in 2018 exclusively for Android, allowing non-Apple users to discover and enjoys shows at their fingertips. Google Podcasts democratizes podcast discovery and consumption, allowing podcast creators to connect with millions of untapped Android users around the world.

The app uses Google's algorithm that recommends shows based on people's listening habits. It has all the features we are all familiar with as a podcast app.

In spite of being a Google technology, Google Podcasts sadly lacks the ability to be played on a desktop or in a web browser. One has to download the dedicated Android app so you can access and enjoy publicly available shows.

Easiest Way To Play YouTube in the Background on iPhone, iPad + Auto Play While Keeping Other Apps Opened

Now, if you're curious about how to listen to Google Podcasts on a desktop web browser, here's a neat trick.

Here's how to stream Google Podcasts on desktop web browsers

  1. Obtain Google Podcasts episode feed URL. To do that, open the podcast episode on your Google Podcasts Android tap and then click the three-dot menu button in the top right corner, then click Share. Copy the URL or email it to a friend.

    The generated Google Podcasts feed URL normally look like this: https://www.google.com/podcasts?feed={a-very-long-hashed-feed-url}

  2. Rename the URL. Now, just rename the URL to https://podcasts.google.com?feed={a-very-long-hashed-feed-url} to make it playable straight in a web browser (no need for Android app).

See Google Podcasts in a web player in action.

Being able to play Google Podcasts on a desktop web player is prove useful if you want to share a podcast episode to a friend who doesn't have an Android device.

Do you find this entry useful? Share it to your friend or subscribe below.

Listen Google Podcasts on Desktop Web Browser Without Google Podcasts App

The Google Chromium team is currently brewing a new feature to its beloved Google Chrome browser that lets you mitigate tab overload, or at least that's what they try to solve.

Judging from the above screenshot, the upcoming release of Google Chrome enables users to declutter and organize multiple active tabs into one or more groups.

Add Chrome-Like Multiple Tabbing Support To Windows File Explorer With Clover

Such a feature is sure a relief for those power user who constantly juggles between multiple tabs. You can simply move your work-related active tabs into one group and separate the others, creating a less messy working environment.

Google Chrome is not the first browser that implements such Tab Groups feature. In fact, Firefox used to incorporate it first but later discontinued because only a small number of Firefox users were actually using the feature and that maintaining such unpopular feature turned out to be costly for the Firefox team.

5 Best Memory-Saving Chrome Add-ons to Help You Manage Tab Overload

Tab Group is one of the biggest updates of Google Chrome so it might take a couple of months to finally hit the online shore. For the meantime, check out these third-party Chrome extensions that help you manage tab overload.

LOOK: Upcoming Google Chrome Feature Lets You Organize Active Tabs into Groups

Not everyone has the time and skill to generate a simple 2-3 minutes social video for Facebook or Instagram. Stitching your video clips and adding music can be all easy to achieve on iOS, but adding styled, custom text? It can be bloody difficult feat especially for a non-techie person who easily gets intimidated by video editing apps.

iOS' built-in video editing app iMovie doesn't make the cut either. Their “Add Text” overlay functionality is just plain boring, unusable. iMovie is decent enough in combining your clips with nice transitions and custom audio background but not in adding custom styled text.

The hunt for Canva for video

I had this interesting challenge last week where I needed to add a few texts to my travel videos. And me being a non-multimedia person, I'd rather do it straight on my iPhone and totally skip the headache of editing them with Adobe Premier or Quik, which for me are all complicated to use.

With that said, I had to check out and try nearly almost all video editing apps on iOS that allow me to add a text overlay for my videos. Some are very promising but one app that really stood out: Vont.

What is Vont?

Vont, currently available on iOS, lets you add highly customizable text overlays to videos. You have the flexibility to choose your own font or use Vont's font collections, change font sizes and colors. And the best part? It lets you insert multiple text overlays to any given video timeframe.

New AI-Powered Apps Help You Generate Captions, Hashtags for Instagram

And the fun doesn't stop there. Vont also lets you add transitions to each text overlay, giving you full control how you want your text enters the viewport.

Here's Vont in action:

It's easy to imagine Vont as Canva for videos. First off, Vont interface is so neat and it's a delight to use, almost similar to Canva.

For the uninitiated, Canva is a must-have app that lets you create professional-looking photos and banners for all your social media needs. Its suite of pre-made layouts makes it easy to create graphics, cards, flyers, invitations, and posters straight from your iPhone or iPad.

How To: Watch YouTube, Netflix on Sticky, Floating Window While Keeping Other Apps Opened

The true strength of Canva lies in its ability to let anyone — with or without design experience — generate professional-looking visuals for their marketing needs.

Now, if you're looking for Canva for video alternative offering the same editing experience, then, you've got to check out Vont.

Vont: Canva for Video Alternative that Lets You Easily Add Custom Text to Videos (iOS)

Whether you're using Instagram for business or not, writing a killer caption and well-optimized hashtags is a must. Ask any Instagram marketer it's second most tricky part immediately next to generating the visuals to post on Instagram.

A good caption should drive user engagements and virality, while a relevant set of hashtags ensures you have the most optimal reach to get the exposure you need. People discover interesting posts thru hashtags, and it's a good opportunity for your brand to get discovered and ultimately earn followers.

While the best way to come up with words to accompany your Instagram post is to write it yourself, it doesn't hurt to try and get some assistance from new breed of apps to do just that.

Excel Gets OCR Support, Lets You Snap Tables and Convert Into Editable Spreadsheet

In this post, we'll be featuring an Android and iOS app that should help you decide what captions to post next.

Caption AI - Your Smart Instagram Caption Assistant ()

Caption AI currently hosts 15,000 captions (and growing) grouped into easy to navigate categories. Running out of caption idea for your next Instagram post? Just launch the app, open an image to post and Caption AI will automatically detect what caption and hashtags to post based on your picture.

Not happy with the generated caption? Just tap on any of the categories like Nature, Fitness, Travel, and Caption AI automatically suggests a caption for you.

Of course the auto-generated captions aren't original. They're mostly coming from third-party sources that curate popular lines and quotes from notable people and writers. Perhaps in the next update the developer gives proper attribution to each line.

This Android app can also suggest the most popular hashtags relevant to your post. So next time you're stuck deciding what to post, check out this app.

Auto Caption - Get Caption Ideas for Instagram (, )

Another app that I am pretty much impressed is Auto Caption for iOS. The moment you open a photo to post, it automatically detects whether it's ocean, mountain or food. Auto Caption will then suggest a caption and hashtags based on what it sees.

It's pretty clever and helpful app ideally recommended for Instagram marketers or casual Instagrammers.

Wrapping it up

Again, the above-mentioned apps aren't for everyone. A more personalized and well-thought out captions will still do wonders in your Instagram marketing efforts. But if doing so takes you forever, then, maybe time to explore those apps?

New AI-Powered Apps Help You Generate Captions, Hashtags for Instagram

You probably have noticed that while inside Google Drive, one cannot easily extract nor preview zipped files straight from Drive's interface. Google Drive is still deprived of that native functionality and one has to manually download the entire archived file to obtain its contents.

I've been using Google Drive since its initial rollout. Although not my main virtual drive for backups, I use it primarily to store personal documents and some work-related files. And Google Drive being developed by Google gives you tight integrations with other G Apps.

And for occasions when you need to recover a file inside a large compressed ZIP file hosted on Google Drive, you better skip the hassle of manually downloading it yourself and just browse it on-the-fly.

Use Mover.io To Copy, Move Files From FTP To Google Drive, DropBox, SkyDrive and Vice Versa

Here we will show you a smarter way to unzip archived files and browse extracted straight from Google Drive.

Browse Contents Inside Zipped Files On Google Drive

The trick is easy. While you're on your Drive's folder, just right-click any zipped file and click on Connect more apps. Just search for “Zip Extractor”.

Once installed, refresh your Drive's page. You can right-click again the zip file and Google Drive now gives you the option to open it with Zip Extractor.

Zip Extractor will prompt you a one-time authorization request so it can do its thing. After that, you can unzip and browse zipped files with its neat interface. You can also selectively extract specific files inside a zipped file. Just uncheck

Another decent Drive app is Zip, Unzip App. Just like Zip Extractor, it lets you preview and browse zip files straight from Google Drive. What I like about Zip, Unzip App is that it quickly gives you a unique URL for each file found inside your zip file. The UI may need attention though but for a simple task of obtaining a specific file inside a ZIP file on Google Drive? I would go for Zip, Unzip App.

Conclusion

There you go! Google Drive definitely needs a lot of catching up when it comes to dealing with common file types like ZIP files. Being able to preview what's inside a zipped file is already a built-in feature in DropBox, but not in Google Drive.

How To: Browse, Extract Contents Inside Zipped Files in Google Drive

Microsoft just rolled out an update to their spreadsheet editing app Excel that allows you to point your phone's camera into printed tables and turn them into editable spreadsheets.

The update is made possible by artificial intelligence (AI) trained to recognize characters and detect datasets inside printed tables before finally importing them as spreadsheets. If you're familiar with how Google Translate app works that translates words in realtime when you point your camera to a foreign text, you can expect the same capability with this update but for printed tables.

The update is first available on Android, but iOS should expect the roll out in the coming days.

How Apple Watch's Fall Detection Saves One's Life and How It Can Save Yours

Excel is not the first app that gets AI treatment from Microsoft. A few weeks ago, Microsoft-owned Skype also gets AI-assisted background-blur support that smartly obscures your often messy, distracting background.

Satya Nadella's helm at Microsoft continues to deliver the much-needed disruptions and innovations. And with its billions of cash being pumped into their Machine Learning (ML) department, we can expect few more nifty advancements in AI in the next few years.

Excel Gets OCR Support, Lets You Snap Tables and Convert Into Editable Spreadsheet

If you're a traveler who wants to stay productive while on-the-go or you're a digital nomad who loves to mix leisure and work, chances are you'll need a decent power bank for your laptop more than you'd imagine.

An extra power bank that can charge your Mac or laptop ensures you have extra battery juices you can turn to when you needed to do last minute work while your laptop's battery is dead empty. A portable power bank that fully supports your Mac or Windows laptop is especially useful if you're in the most remote part of the country where rotational brownouts are expected.

In this article, we will show you top-of-the-line power banks for your Mac or Windows computer that guarantee to give you those extra hours without hurting your wallet. We specially hand-picked below's list with charging speed/time, safety, and capacity as criteria.

The Best Laptop Power Banks You Can Carry Anywhere

  1. Crave PowerPack Power Bank (50000mAh)

    Topping from this list is this 50,000mAh backup power bank from Crave PowerPack. Crave PowerPack CRVPP101 is your compact, high-density travel companion guaranteed to fully charge your devices anywhere you go. This power bank has two laptop power supply ports and universal compatibility with virtually any mobile devices.

    Capacity: 50,000mAh Laptop Compatibility: Acer, Asus, Compaq, Dell, Fujitsu, HP, IBM, Lenovo, NEC, Samsung, Sony, Toshiba (Apple Laptops draw > 5 Amps, not supported) Port Compatibility: 1 20V/3 Amp Port for Laptops

  2. Mophie Powerstation (22,000mAh)

    Powerstation AC is another strong contender under this category. This quick-charging emergency power bank offers you a legit AC port that gives your notebook or Mac a safe 100W power (110V) and a USB-C charging port that provides 30W power.

    5 Surprisingly Cheap IoT Devices to Easily Upgrade Your Home for Less

    Although not as big as Crave PowerPack's 50,000mAh, Mophie Powerstation AC should be enough to give your laptop additional 15+ hours emergency battery.

  3. Omnicharge AC/DC (20,400mAh)

    Omnicharge's 20,400mAh power bank is another easy favorite amongst travelers and digital nomads, and it's easy to see why. This emergency power bank is well-equipped with fast-charging USB ports and a 100W AC outlet that can power your MacBook Pro, MacBook Air, Microsoft Surface Pro 3/4, Lenovo, Dell, HP Laptops, DSLR cameras, and even DJI drone's battery.

  4. MAXOAK Laptop Power Bank (50,000mAh)

    MAXOAK's 50,000mAh power bank is your compact and lightweight external battery pack ideally recommended for Windows-based laptop. This power bank has a total of 6 charging ports: one 20V/5A for laptops, one 12V/2.5A for digital cameras, two 5V/2.1A, and two USB 5V/1A for iPhones, tablets. MAXOAK has a wide laptop compatibility support which includes Dell, HP, Lenovo, Microsoft Surface Pro, Sony, Samsung, Acer, and Toshiba.

  5. AC Jackery PowerBar (23,200mAh)

    Jackery PowerBar 23200mAh external battery pack delivers 85W of power via AC outlet and a few powerful outputs including Quick Charge 3.0, USB C, and 5V/2.4A, making it an indispensable travel companion. This power bank can charge your 15.4" MacBook Pro and other 15'' laptops, GoPros and other hand-held devices.

There you have it! So next time you embark on another beach pilgrimage or go in an adventure, be sure to bring one of these power banks for your laptop!

5 High-Capacity Laptop Power Banks for Your On-The-Go Lifestyle

Since the release of Apple's ARKit back in 2017, we've seen how it stirred the pot of curiosity among app developers wanting to deliver a whole new level of user experience.

Online retailers like Lacoste for instance now employs AR app to let customers virtually try on shoes. IKEA also has an AR app where customers can visualize how a piece of furniture fits and looks in their homes.

Augmented Reality isn't only disrupting retails. Right now, we're also seeing cool AR apps that virtually take you to other places around the world.

One of those apps that caught our attention is Portal: Learning with AR. It's a fun app best played with kids that let you explore the world at your fingertips.

Currently available in iOS, Portal: Learning with AR lets you create portals where you can walk right in and experience a different world (virtually of course). The portal is quite immersive; you can interact and walk around.

5 Surprisingly Cheap IoT Devices to Easily Upgrade Your Home for Less

Portal: Learning with AR is one basic Augmented Reality app that proved fun and useful. You can let your kids or students visit ancient medieval Rome or a green energy field.

LINK: Portal: Learning with AR

This Augmented Reality App Lets You Create Your Own Portal, Teleport to New Places (iOS)

Unless you're on an unlimited data plan and your phone still has gigabytes of extra space at your disposal, you can skip this guide now. However, if you are a heavy WhatsApp user under a throttled, capped data plan and notice that sudden drop of available phone storage space, then, this guide is for you.

In this article, we will show you how you can save precious data and free up some space on your iPhone or Android by restricting WhatsApp from automatically downloading shared photos, videos, and documents on your phone. WhatsApp by default automatically downloads photos or videos being shared within the app so you get the best possible user experience. But if that UX feature means exhausting our data plan fast while shrinking our storage space, then, we don't want that.

Save Data and Space - Restrict WhatsApp from Automatically Downloading Photos and Videos

The process is easy, you just need to go to WhatsApp Settings tab and just fiddle around those toggles and checkboxes.

For Android:

  • Navigate to Settings > Data and storage usage.

  • Just scroll down and under Media auto-download, tap on When using mobile data. It should bring you a dialog. Just uncheck Photos, Audio, Videos, and Documents.

  • Do the same process for When connected on Wi-Fi and When Roaming options.

For iOS

  • Go to Settings > Data and Storage Usage
  • Tap Photos and select Never option to stop downloading photos automatically

  • Do the same for Audio, Videos, and Documents

You're done!

WhatsApp Web Now Lets You Watch Shared YouTube, Facebook Videos Within the App

Restricting WhatsApp from automatically downloading photos or videos is one simple action that can save you both space and data.

How To: Prevent WhatsApp from Automatically Downloading Photos, Videos