As what ultra-minimalist Steve Jobs famously once said, we “improve by removing more”. That's one of the guiding maxims of Apple that helped propel its way to greatness in the techno-wizardry scene.

Now, if you're convinced with that guiding principle of Apple, why not apply that same ethos into how you consume your music and movies?

I'm talking about those classic wired surround speakers & subwoofer systems sitting on your desk right now and all its tangled wires glory. While this wired speaker system works just fine, why not free yourself from all these clutter and get that simple joy of wireless you deserve?

How To: Remotely Control Apple Music on Computer, Mac Using iPhone, iPad

If you have a good old non-wireless loudspeaker lying around in the corner, don't throw that just yet. The truth is you can make it "cool" again by repurposing and turning it into a wireless Bluetooth speaker so you can wirelessly fire up your favorite Spotify playlist from the comfort of your fingertips.

Play Music On Your Wired Speaker System Wirelessly from Your iPhone, Android

Step 1 Get your preferred Bluetooth Audio Receiver from your favorite shop like Amazon. I scored a decent Bluetooth Receiver from Lazada for only Php 330.00 ($7). Sweet.

Step 2 Do the one-time setup. These Bluetooth Stereo Receivers usually have this simple setup:

  1. Plug in your speaker's 3.5mm stereo jack into the Bluetooth device
  2. Pair your Bluetooth Audio Receiver with your iPhone, Android or any Bluetooth-enabled devices

You're done!

You can now listen to your favourite music from iTunes or Spotify while you can freely move around.

Image source: nerdtechy.com

How To: Make Any Wired Speaker Into Wireless Bluetooth Speaker for Less than $7

Call it an early Holiday treat!

After years of waiting, Netflix has finally heeded everyone's call and just rolled out an update on their iOS and Android apps which now lets you download Netflix movies and shows offline so you can watch them on your iPhone, iPad or Android even without an internet connection.

Netflix first broke the news on Twitter which must be making everyone excited, YES, me included!

Netflix Now Lets You Download Movies, TV Shows To Watch Offline On iPhone, iPad, Android

So, starting today, you'll now be able to download select Netflix movies and TV shows so you can watch them on the go without mobile data. Of course, you need to update your app first to enjoy this Netflix offline playback support.

One big caveat though is that only select movies and TV shows are available for offline view, and it can vary region-to-region. But they do plan to expand their catalog as soon as the required licensing arrangements are made with its content partners.

How To: Send, Save Quora Answers In Pocket and Read Offline

While not all Netflix contents are available for download offline, it is still a welcome addition considering the pricey mobile data rate which could inflate your bill.

Finally, Netflix Gets Offline Playback Support for iOS iPhone, iPad and Android

Ever ran into a problem trying to download an email attachment in Gmail but you can’t because Gmail's virus scanner says it's a virus and unsafe to download?

Well, you’re not alone.

Few days ago, I ran into the same problem trying to retrieve my old email attachment in Gmail I sent five years ago. The file contains an executable file I wrapped in a zip file. But Gmail deems it as a malware and they cannot allow me to download the file at all cost (see screenshot below).


Gmail's Addon Streak Lets You Monitor, Track If Emails Are Read, Viewed By Recipients

Here's an explanation I got from their support page:

As a security measure to prevent potential viruses, Gmail doesn’t allow you to send or receive executable files (such as files ending in .exe). Executable files can contain harmful code that might cause malicious software to download to your computer. In addition, Gmail doesn’t allow you to send or receive corrupted files, files that don’t work properly.


It does makes sense, and it's a proactive step imposed by Google to prevent malicious programs to get inside and contaminate our computers.

But in case you need to access blocked email attachment and you're certain it's just false positive, then, here's a neat trick on how to circumvent this restriction and download blocked attachment in Gmail.

Bypass Gmail's Virus Scanner and Download Blocked Gmail Attachments

The trick is easy. Just launch your Gmail account in a third party desktop app like Outlook for Windows or Mail for Mac.

For Mac Just launch Mail app. Be sure to add your Gmail account in your Mac and navigate to that account to get all your emails.

Once you get there, rummage through your inbox and search for the email attachment you want to download.

How To: Automatically Send Email Messages At Later Time

For Windows Be sure you have your Outlook or Windows Mail correctly setup. If you're on Windows 10, the setup should be pretty straight-forward.

Once your Outlook is up, just search for that particular email attachment and you should be able to download it without any problems.

If you find this tip helpful, would appreciate if you can share it to your friends :)

How To: Download Blocked Email Attachment in Gmail — Bypass Gmail Virus Scanner

Since its debut, Apple Music has seriously got some mixed reviews both from critics and fans alike. Some discontented Apple fans called it “a nightmare” while others lauded it as a refreshing and a nearly perfect music app.

And if you are one of those Apple fanboys who are convinced that Apple Music is the best music app in the planet, then, you don't want to miss out this one cool interoperability feature of iOS and OSX: wirelessly control, play Apple Music on your PC/Mac using your iPhone or iPad as a remote.


DokRemote: Remotely Control Your iPhone, iPod Music Player Via Web Browser

Spotify Connect is one sought-after, premium-only feature of Spotify that lets you control the music from any phone or tablet using the Spotify app. And if you're looking for Spotify Connect alternative for Apple Music, then, good news is you too can have the same wireless convenience at no cost!

Play Apple Music Through Your Speakers, Mac or Apple TV Using iPhone, iPad as Remote

Follow this step-by-step guide on how to remotely control music playback active on your PC, Mac using your iPhone or iPad as a wireless remote.

  1. Download and install Remote on your iPhone or iPad

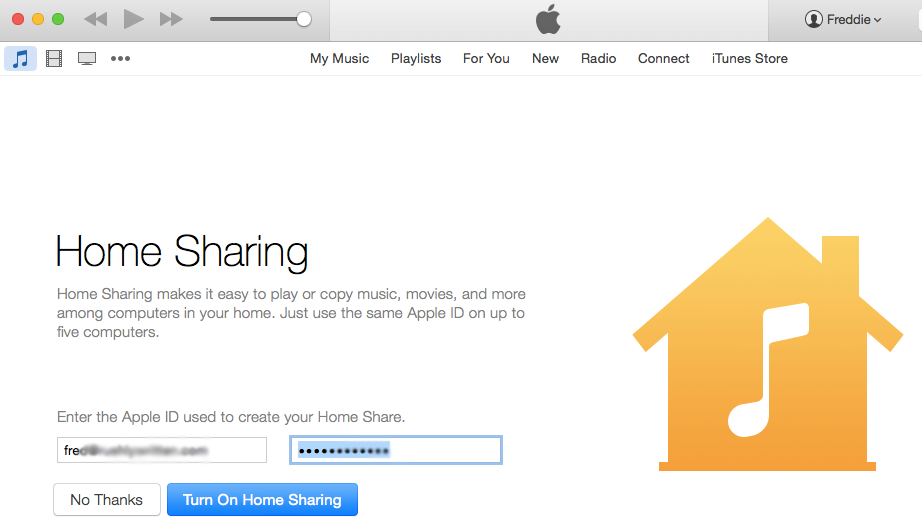
  2. Once installed, enable Home Sharing on your iPhone. You'll be asked to login using your iCloud account. You should see something like this:

  3. Turn on Home Sharing in iTunes on your computer or Mac. Go to File > Home Sharing > Turn On Home Sharing. Once enabled, your Remote app on your iPhone should automatically retrieve all your music collection and display them on your iDevice.

    Use IFTTT As A Spy App: Secretly Copy, Collect iOS Photos on iPhone, iPad (No Jailbreak)

  4. Let's test it. Browse through your iTunes library on your Mac and play whatever playlist/albums you've got. As soon as you hit the play button, your iPhone should automatically pick the track actively playing your Mac, as seen on the video below:

You're done! You can keep the music flowing on your Mac from anywhere in your house using your iPhone or iPad as remote.

Works flawless on my iPhone 5 (iOS8.4) and Mac (Yosemite).

Caveats

Apple's official Remote app for iOS only allows you to choose music you've added on your library. The app can't let you search for new songs in the cloud just like what you normally do on Spotify Connect.

How To: Transfer Large Files Between iPhone and Other iDevices Over Existing Wi-Fi Network

How To: Remotely Control Apple Music on Computer, Mac Using iPhone, iPad

Previously on this blog we have talked about Cloud Save, a nifty Google Chrome extension that lets you right-click any in-page links & files and save them straight to the clouds.

We've also talked about Mover.io, a much advanced cloud files manager that consolidates all your virtual drives so you can manage all your cloud files in one centralised dashboard.

And now I am thrilled to introduce you yet another rare gem on the web that you'll gladly welcome in your productivity arsenal: Ballloon.

New Web App Ballloon Tranfers Files to the Clouds in Seconds


Ballloon is a brand new web service that lets you save files directly to your cloud storage accounts like Dropbox, OneDrive, Google Drive, Box, etc. It eliminates the need for you to manually download files from the web, whether it's a 1MB audio file or 800MB zip file. Use Ballloon' web app instead to automatically save them to your DropBox or any cloud storage accounts of your choice. You just have to provide a direct link and you're done.

All it takes is your Google account to get started and you can start connecting all your cloud storage account and start Ballloon transfer in seconds. You can also assign a default remote directory every time you initiate a transfer for each cloud storage account.

There's also an official Google Chrome extension you can use, but that's optional. So for those who don't want to bloat their browser with add-ons, the web-based version is already pretty much functional and it works like a charm.

The Good

Ballloon is FREE, and the guys behind it promised that there will always be a free plan should this app matures into a full-blown premium web app.

User interface is also a delight to use, notably modern and straight-forward to navigate; from signing up all the way to connecting your cloud storage accounts, the whole process is seamless.

Access, Manage All Files Stored Across Multiple Cloud Accounts All At Once


What really makes Ballloon stand out is the fact that it moves your files amazingly fast (and I mean it). A 4MB audio file for instance takes only five seconds to arrive in my Google Drive. A 150 MB backup file from my other blog only takes 50 seconds to arrive on my Google Drive.


Think of server-to-server communication; no more delays regardless of your internet speed. And transfers take place in the background; you can close your browser's tab once you've initiated the transfer and your files should arrive in its destination shortly.

The Bad

Apparently only the following cloud storage accounts are supported:
  • DropBox
  • Google Drive
  • Copy
  • SugarSync
  • One Drive
I hope they can add support for other cloud storage providers like Amazon, Rackspace and even FTP. If they can bring this integration while maintaining the same level of speed I used to enjoy today, I'm happy to fork out a few bucks and be one of their premium users.

Check out the FAQ page for more information.


LINK: Ballloon

Ballloon: Directly Save Large Files To DropBox & Other Cloud Accounts In Seconds

Learn how you can use IFTTT as an iOS photo spy software to secretly copy every single picture taken on your spouse or kid's iPhone, iPad. Automatically get a backup of every iOS photo including selfies, n*des and other inappropriate snaps.

WARNING: The author shall not be held responsible or liable for any misuse of the app detailed on this post. The method outlined below can get you in serious trouble. Do it at your own risk.

Been fiddling around with IFTTT few days ago and I accidentally discovered that you can actually use IFTTT iOS app as a FREE spy app to secretly collect, monitor every single iOS photo being taken on your spouse or daughter's iPhonE, iPad. Good news is: the process is no rocket science and you don't have to spend a penny nor you need to jailbreak your iOS device to accomplish this.

For the uninitiated, IFTTT (If This, Then That) is a massively popular web automation service that allows you to automatically perform certain actions based on your conditions (or triggers). IFTTT termed them as recipes, and there are plenty of recipes flooded out there that should help you save time by automating certain asks. One good example is you can get SMS alerts from specific email addresses, or you can let your device to automatically send screenshots to your email.

Remotely Get a Copy of Every Single iOS Photo Taken on iPhone Without Getting Caught

Step 1 Compel your target to install IFTTT. Sure it won't be a problem as IFTTT has hundreds of awesome recipes up its sleeve. If you know your partner's iTunes account, then, that's a bonus as you can install the IFTTT straight away.

Step 2 Once you've successfully installed IFTTT, best to burry it in the Utilities folder or anywhere that's least accessed.

Step 3 Enable Background App Refresh for IFTTT. This ensures that all new photos are uploaded to IFTTT server when online. Go to Settings > General > Background App Refresh

Step 4 Disable IFTTT's iOS Notification to ensure your target won't get notified every time the recipe runs. Go to Settings > Notifications, select IF and turn off Allow Notifications slider.

Step 5 Create a new recipe with the following trigger and action:

TRIGGER: Any new photo (under iOS Photos channel)
ACTION: Send an email (under Gmail channel)

See video walkthrough below.

Be sure to save your new recipe and you're good to go!

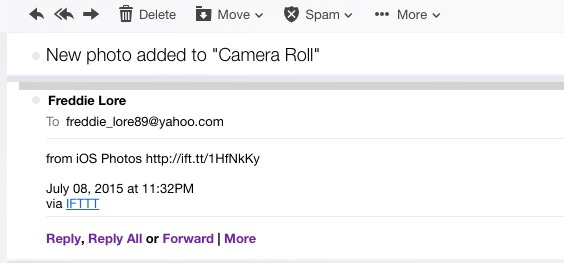
Now, every time a new photo is added on your target's phone, you will automatically get notified via email including the link of the newly added photo, as seen below:

Caveats

a) The target's iPhone or iPad should be connected to the internet for this remote photo spying method to work. Not necessarily connected all the time but should be connected once in a while so IFTTT can push new photos to their server.

b) Data delivery is a bit delayed.

I don't want this recipe to be called as an exploit but rather a heaven-sent functionality you can use to spy on anyone's iPhone and be in the know what your daughter, girlfriend or wife is up to.

Use IFTTT As A Spy App: Secretly Copy, Collect iOS Photos on iPhone, iPad (No Jailbreak)

As someone on Quora once said, “Quora is a giant campfire where random people come along, sit down, and tell their stories”.

Quora, without a doubt, is one great platform where Mark Zuckerberg of Facebook, James Wales of Wikipedia and countless others including world-renowned NASA scientists, astronauts and engineers converge and embark into a stimulating and immersive discussion of just about anything.

So it's normally safe to assume that Quora hosts a plethora of smart & insightful discussions, answers and thoughts from qualified & experienced people with different professional background which are sure a delight to read.

Curiosity.com: Get Answers To Life Biggest Questions From World's Brightest Minds

And if you're like me who doesn't have the luxury of time to immerse and browse through Quora during the day, you probably have wished to just feed those interesting reads to your favourite news reader app like Pocket so you can read them later offline.

The thing is: Quora hasn't have this feature yet nor Pocket has integration support for our beloved Quora.

But fret not, there is a way out..

Add “Save To Pocket” Button In Quora for Offline Reading

Meet Quora Save To Pocket, a Google Chrome extension that allows you to push contents from Quora to Pocket. With this extension, you can save any answer, question or blog post to your Pocket account straight from your Quora feed. Sweet...

How it works

The add-on works this simply:

You install the Chrome extension. Once added, you connect the app to Pocket via the standard OAUTH authentication protocol, and you're done. Save to Pocket link should now automatically appear on every thread and answer on Quora, as seen below:


Wikipedia Gets Export-To-eBook Feature, Lets You Export Wikipedia Articles Into Instant Free e-Book

Pocket actually has its own vendor-specific browser extension that makes it easier to add links to your Pocket account. The problem with their official browser extensions, when used in Quora pages, is you can't selectively add those specific answers you find interesting. And considering how Quora renders its pages, Pocket's official add-ons meet an incompatibility with Quora as yet.


LINK: Quora Save To Pocket (Chrome)

How To: Send, Save Quora Answers In Pocket and Read Offline

Truth be told: Google Docs is one of the coolest word-editing software there is to get the job done like no other. Its collaborative editing and cloud-centric nature make it really a smart choice to make our digital lives a lot easier.

But despite its shiny reputation, Google Docs also has its surprising limitation: you won't be able to access and use thousands of sleek, custom fonts from Google Fonts collection. Yes, you read it right — Google hasn't pushed that feature yet to their Google Docs app which is being heavily relied by millions of users across the globe.

Filling this void is Extensis, a company specialising in font management software, who has launched Extensis Fonts.

Use custom Google Fonts in your Google Documents with Extensis Fonts (link)


3 Things You Didn't Know Google Spreadsheet Can Do For You

Extensis Fonts is a free Google Docs add-on that lets you access and use Google Fonts in your Google Docs files. So if you feel too limited and dissatisfied with Google Docs' built-in fonts, you've got to check out Extensis Fonts.

Getting Started

Now, let's get the ball rolling. Follow this guide on how to use custom Google Fonts in your Google Documents:

Step 1 Open any Google Document, or create a new one.

Step 2 From the Add-ons menu, click Get Add-ons

Step 3 In the Search Add-ons box, enter “Extensis Fonts” (without quotes)

Step 4 Select the Extensis Fonts add-on from the list.

Step 5 Click the Free button in the upper right hand corner.

Step 6 Click Accept to install the add-on to your Google Docs account.

Step 7 To launch the Extensis Fonts add-on, navigate to the menu and hit Add-ons > Extensis Fonts > Start.

You're done.

Once Extensis Fonts add-on is added to your Google Document, a new Extensis Font panel will be accessible on the right. This is where you access the thousands of Google Fonts collection and apply it to your Google Docs or current text selection.

PRO TIP: You can get Extensis Fonts to display only the trending and the most popular Google fonts by sorting it out accordingly.

Get Notified When A Collaborator Made Some Changes On A Shared Google Spreadsheet

Final Verdict:

Extensis Fonts is one cool Google Docs add-on you cannot miss. You may not need it every day, but in case you want to give your Google Docs a facelift, then you should check out Extensis Fonts. It's FREE.


LINK: Extensis Fonts 

Extensis Fonts Lets You Access, Use Google Fonts In Your Google Documents

Now that Apple Music is finally out, you probably have given it a spin and eventually fell in love with the app.

It is hard not to fall in love with Apple's streaming app; its much larger iTunes library plus better radio recommendation make it really a prime music app you can't miss.

And if you've finally decided to move from Spotify to Apple Music, your next step should be: export all your Spotify playlists and import them to Apple Music all at once. And that's the painful part as currently Apple hasn't rolled out yet its own migration tool that makes it easy to move, import your Spotify playlist to Apple Music. And no, both Exportify and Beats Music migration tool do not work either as yet.


How To: Remotely Control Apple Music on Computer, Mac Using iPhone, iPad

The Fastest Way to Automatically Convert Spotify Playlists to Apple Music Playlists

If you can't wait to jump ship, Applefy seems to be the only best & painless way to transfer your beloved Spotify music playlists to Apple Music. But it only works on OSX right now and can be a bit buggy if dealing with music available in Spotify but not in Apple Music. Here's how to get started:

Step 1 Download & install the latest build of Applefy (3.02MB)

Step 2 Launch Applefy and login with your Spotify details.

Step 3 Select the playlist you want to export from the dropdown list and hit 'Save Playlist' button, as seen below:

Step 4 Navigate to your home folder and there will be a folder called Applefy (bring your Spotlight and search for Applefy. This folder contains your exported Spotify playlist containing MP3s.

Step 5 Open iTunes, go to the Playlists tab and make a new playlist.

Step 6 Drag the MP3 files into your newly-created playlist, and then Select all and right click and Choose 'Add to iCloud Music Library' (SEE DEMO)

Step 7 Once the songs have been registered, right click again and hit 'Remove download', you can now stream or download the full song using your Apple Music subscription.

You're done!

How To: Remotely Control Apple Music on Computer, Mac Using iPhone, iPad

How To: Quickly Move, Import Your Spotify Playlists To Apple Music

It appears that the clock timer app in the latest version of iOS is finally working. So if you're wondering how you can add that sleep timer functionality on your Spotify or Apple Music on your iPhone or iPad, then, watch the video below and see how it's done:


This trick also works on other music player or podcast apps like Pandora, Rdio, etc. It basically kills whatever media playback active on your iPhone or iPad once the timer's up.

Use iOS Clock Timer App As Music Sleep Timer for Spotify, Apple Music, etc