Not everyone has the time and skill to generate a simple 2-3 minutes social video for Facebook or Instagram. Stitching your video clips and adding music can be all easy to achieve on iOS, but adding styled, custom text? It can be bloody difficult feat especially for a non-techie person who easily gets intimidated by video editing apps.

iOS' built-in video editing app iMovie doesn't make the cut either. Their “Add Text” overlay functionality is just plain boring, unusable. iMovie is decent enough in combining your clips with nice transitions and custom audio background but not in adding custom styled text.

The hunt for Canva for video

I had this interesting challenge last week where I needed to add a few texts to my travel videos. And me being a non-multimedia person, I'd rather do it straight on my iPhone and totally skip the headache of editing them with Adobe Premier or Quik, which for me are all complicated to use.

With that said, I had to check out and try nearly almost all video editing apps on iOS that allow me to add a text overlay for my videos. Some are very promising but one app that really stood out: Vont.

What is Vont?

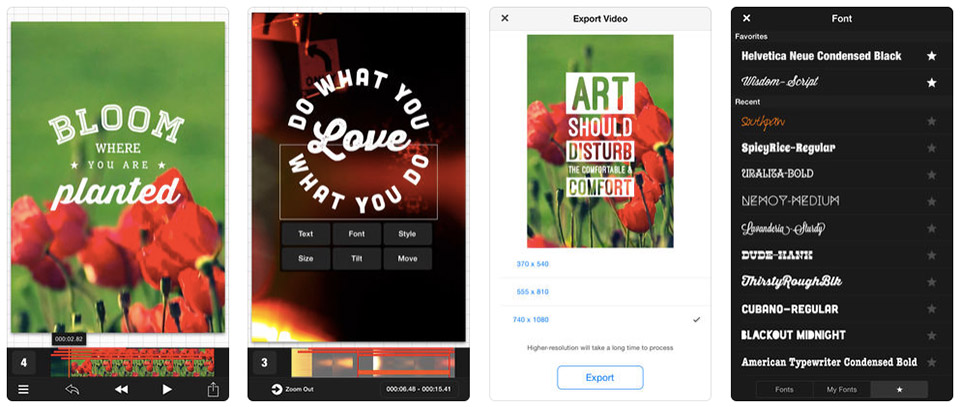
Vont, currently available on iOS, lets you add highly customizable text overlays to videos. You have the flexibility to choose your own font or use Vont's font collections, change font sizes and colors. And the best part? It lets you insert multiple text overlays to any given video timeframe.

New AI-Powered Apps Help You Generate Captions, Hashtags for Instagram

And the fun doesn't stop there. Vont also lets you add transitions to each text overlay, giving you full control how you want your text enters the viewport.

Here's Vont in action:

It's easy to imagine Vont as Canva for videos. First off, Vont interface is so neat and it's a delight to use, almost similar to Canva.

For the uninitiated, Canva is a must-have app that lets you create professional-looking photos and banners for all your social media needs. Its suite of pre-made layouts makes it easy to create graphics, cards, flyers, invitations, and posters straight from your iPhone or iPad.

How To: Watch YouTube, Netflix on Sticky, Floating Window While Keeping Other Apps Opened

The true strength of Canva lies in its ability to let anyone — with or without design experience — generate professional-looking visuals for their marketing needs.

Now, if you're looking for Canva for video alternative offering the same editing experience, then, you've got to check out Vont.

Vont: Canva for Video Alternative that Lets You Easily Add Custom Text to Videos (iOS)

If you've been a long time user of WhatsApp for Android or iPhone, you probably have noticed that nice floating video player that pops up right within the app every time you click on a shared video from YouTube, Facebook, Instagram and Streamable. That feature is called Picture-in-Picture (PiP) launched back in December last year.

Now in what seems to be an attempt to inflate the amount of time you spend on WhatsApp, the same PiP feature is now available in WhatsApp Web. Which means you can now chat with your friends and watch shared videos from YouTube or Facebook WITHOUT leaving the app. Sweet.

New Chrome Add-on Lets You Watch YouTube Videos While You Search, Browse — Similar to YouTube Mobile App

The update comes from WhatsApp Web version 0.3.2041, which is expected to be followed by a few more enhancements later this year like dark mode, face recognition and more.

How to open shared YouTube/Facebook videos within WhatsApp Web

  1. Ensure you have the most recent version of WhatsApp Web. WhatsApp normally auto-downloads whatever updates available. If you think you're not getting the update, you may need to hard-refresh your browser or clear cache/cookies.
  2. Now, on your computer head to https://web.whatsapp.com/ and follow on-screen instruction.

New Browser Extension "Turn Off The Lights" Gives YouTubers The Feel Like They're In A Cinema

Support for PiP for WhatsApp Web may not be a big update for some but it's a welcome addition to those heavy WhatsApp Web users.

WhatsApp Web Now Lets You Watch Shared YouTube, Facebook Videos Within the App

Talk about geeky fun.

Technology is now getting to be more fun and hilarious without being a geek yourself.

PBS Newshour has recently created a new tool (more of a new toy application) that lets users make personal political advertisements easily. It is a great way to get a laugh out of your friends and relatives who will view your political ad. You can even create a dumb political video with you as the villain of the ad.

Make Your Own Political Ad With Your Facebook Data (link)

Whatever political ad you decide to make, whether character, small-town, credential, metro-America, biographical, or attack type, it will be fun and easy to make. All you need to do is to go to https://www.pbs.org/newshour/adlibs/, log in to your Facebook account, and just follow the instructions on the PBS Newshour site. It is that easy.

PBS Newshour

While doing all this, you can even stop at various sections of the video of your choice and insert any Facebook posts or photos you want to insert. You definitely control the ad’s template all throughout.

On the learning side, you get to see just how political ads are made and the rigid guidelines these ads follow. As it turns out, the application does not allow you to make attack ads against anybody on Facebook except yourself.

Slide.ly: Turn Your Instagram, Flickr & Facebook Photos Into Stunning Video Slideshows

The timing could not have been better with elections coming up this November in the USA and early next year for some Asian countries.

Here's my personalized ad: LINK (Only my FB friends can view this)


PBS Has a New Tool That Lets You Make Your Own Political Ad with Your Facebook's Data

Back in the good ‘ol days, Scribd and Slideshare allowed you to host your PowerPoint photo presentations. These sites were very popular at that time. The problem is, you can’t use these sites to create new slideshows from the beginning.

There is also Prezi, Zoho, Microsoft Office web apps, and even Google Docs that are advanced resources you can utilize to create online presentations. However, none of these allows you to create simple slideshows as quickly and easily.

Create Video Slideshows From Facebook, Instagram Photos With Slidely (link)

Now, meet Slide.ly, it's a new web app that makes it easy to create photo slideshows from Picassa web albums, Instagram photos, Google Images, Flickr photos, and Facebook albums. Slide.ly also allows you to upload pictures from your own desktop and puts them together into a musical slideshow of your own production and making. You can simply pull images and photos from shared multiple social sites you share with others and just pick out the specific photos you like to create your very own photo album or photo slideshow.

Slide.ly can even be used for office or class presentations so long as there’s an internet connection available.

Prezi: Create Visually Engaging, Rich Media Presentations, Slideshows Online FREE

Using Slide.ly is a snap. First you need login using your Slide.ly or Facebook account HERE. Once logged in, Slide.ly should bring you this:


Here you can select an album and individually select those photos you want to be added in your Slide.ly. You may also remove and re-arrange the selected photos, and instruct Slide.ly to randomly select the photos to be displayed by simply toggling the "Shuffle" button, as seen below:


Now, hit "Preview and Save Slidely" button, until Slide.ly bring you this:


From here you can select a track as music background for your Slide.ly. You can pick up from YouTube, SoundCloud, and you can even upload your own track. You can even choose from the thousands of free tracks from Slide.ly itself for your gallery, theme, or audio background.

Now it's time to add some effects. Just select any of the nine transition effects found in the upper right, as seen  here:


One unique feature of Slide.ly is that you can add pictures from any of your friend’s Facebook albums. Just make sure the privacy settings of the album or specific pictures are set to public or have been shared to you in the past.

Here's a Slide.ly presentation I created for the legendary Filipino rock band "Eraserheads":


Slide.ly: Turn Your Instagram, Flickr & Facebook Photos Into Stunning Video Slideshows

I really find it annoying for social reader apps like Yahoo! to post something on my behalf on my Facebook Wall without me knowing. Every time I read an article on Yahoo!, an update is automatically posted on my Feeds, telling my friends what I just read.

The update made by these social readers usually contains items such as "Freddie just read an article" plus the article link. And this is no cool as you're exactly telling the world your reading habits.

So, how can you prevent social reader apps like Yahoo! from posting on your behalf? Mike Klawrence has this neat solution: Unsocialize, a link unsocializer for Firefox & Chrome.

Stop, Prevent Yahoo! and Other Websites From Automatic Posting On Your Timeline

Unsocialize is a Chrome and Firefox extension that allows you to open articles in a new tab without getting redirected to third-party apps and having to grant them access to your Facebook information. The extension provides a right-click menu item "Unsocialize", which essentially bypasses the install request and any other tracking metrics.

Normally, when you click social reader links especially that of Yahoo!, Facebook takes you to the install app request page, requiring you to give permission to third-party apps. The screenshot below shows an example of what the page looks like.


But with Unsocialize, you can bypass this authorization process, thus preventing social reader apps from posting on your behalf. All you have to do is to right-click on any social reader links, then hit "Unsocialize" (see screenshot below).


Unsocialize is definitely useful especially if you don't want your reading habits to be traced.

Download Unsocialize: The Link Unsocializer For Google Chrome
Download Unsocialize: The Link Unsocializer Add-on For Firefox

How To: Stop, Prevent Yahoo & Other Social Reader Apps From Posting On Your Behalf On Facebook

Most of us are registered to at least one social networking site, more probably than not, Facebook or Twitter. But why do we use these social network sites and disclose our personal and private lives to the cloud? Yes! I hear you! To connect to our long lost friends, family and colleagues.

It is through social media that we are able to share our memories and other significant moments in our lives with our families and friends that has been separated from us geographically.

New Browser Extension Lets You Zoom Facebook Photos By Simply Hovering Them

Facebook has been kind enough to keep on researching and developing ways to present those precious memories with style and class. And one of Facebook's latest additions is: Timeline Movie Maker.

Bring Your Facebook Profile to Life with Timeline Movie Maker (link)


Facebook in cooperation with Definition 6 has rolled out a new web app called Timeline Movie Maker. The app allows you to create a mini-movie of your life, compiling the most golden events of your life. All you have to do is click on the green button and allow it to access your Facebook profile and the application will sort thru all of your posts and select the most interesting ones and make it to a short clip.

You may also add soundtrack to add a dramatic feel to your movie.

So go check it out! Have fun and share those quirky and fun moments in your life with your friends.

How To: Find Who Deleted, Removed You As Friend On Facebook


Griffith Boniel

About the author:

Griffith Boniel is a Bukidnon-based photographer, Nikon User, and a Nokia fan who's also passionate about social media, mobile and web technology. You can follow @gboniel on Twitter.

Timeline Movie Maker: Create A Short Clip From Your Facebook Timeline

For some, not every single aspect of Facebook is a complete clean-cut. Taking its Image Viewer as an example, you have to do the wear-and-tear on your mouse; click on every single photo that appears either on your feed, wall or to someone else' gallery to get the sufficient detail of the image. And once a larger version gets displayed, you need to click the tiny Close button again to close the viewer.

Kind of annoying, isn't it?

Thankfully, there is such a browser extension that automatically enlarges, zooms in the photo currently being hovered, making Facebook less of a hassle!

FB Photo Zoom: Lets You Zoom Facebook Photos By Mouse-Overing Them [link]

FB Photo Zoom is the Chrome extension that truly saves you time when viewing photo streams on Facebook. With this free Chrome add-on, you'll find it much quicker to interact with Facebook photos: you just have to mouse over those photos. In other words, you just have to position your cursor on top of any photo in your feeds, then wait a second until the full-sized version of the image appears.


For non-Chrome users, you may want to checkout Thumbnail Zoom for Firefox. As with the former, this add-on shows a floating panel with the full size of a thumbnail when hovering over an image or thumbnail. Other than Facebook, Thumbnail Zoom supports Twitter, MySpace, Amazon, Picasa, Flickr, LinkedIn, Hi5, Twitpic, deviantART, PhotoBucket, Tagged, Last.fm, Wikipedia, YouTube, DailyMile, IMDb, Imgur, Photosight.ru and Google Images.

Upload Photos On Facebook By Bulk or Folder


How do you find these image enlarger add-ons useful? Share your thoughts in the comments below.

New Browser Extension Lets You Zoom Facebook Photos By Simply Hovering Them

I am writing this post not to encourage privacy intrusion, hijacking, Facebook account hacking, or anything of that sort. I am writing this post to demonstrate just as how easy it is for almost anyone to break into your Facebook account (and other online services) using only an Android phone. This post also explains how you can essentially shield yourself from any form of intrusion attacks when online.

The controversial Android app is called Faceniff, a truly clever session hijacking app that allows you to sniff and intercept web session profiles over Wi-Fi network where your phone is connected to. Think of Faceniff as Firesheep, but for Android.

Use Existing Wi-Fi Network To Transfer Files From Android To PC (and Vice Versa)

Faceniff uses the method called Session Hijacking, a good old process of exploiting valid web sessions, which enables attacker to gain unauthorized access to your account and private information. With Faceniff, you can intercept web sessions from web services such as FaceBook, Twitter, YouTube, Amazon, Tumblr, MySpace, and even Blogger. And worst, web sessions established via HTTPS can even be cracked. Alarming isn't it?

Share Your Internet Connection Without Using Ad-Hoc

Well, the more disturbing part about it is that almost anyone with a "rooted" Android phone can do it, and even gradeschooler can dot it. Faceniff doesn't have a special requirement to run except that you have a "superadmin" privileges on your Android phone.

Faceniff Lets You Hack Facebook Accounts With Ease

I had the chance to install the app and see things in action on my phone. Below is a quick rundown on how I make Faceniff work, and browse through my friend's Facebook accounts without them knowing:

Step 1 Download and install Faceniff HERE.

Step 2 Once installed, launch it. You should be prompted for a Superuser permission. Just hit "Allow" or "Yes" (depending on your phone).

Step 3 There are a couple of instruction that pops up especially if you open the app for the first time. Just follow them carefully...until you arrive into the start-up screen.

Step 4 Toggle "START" and optionally enable SSLStrip to start Faceniff. If valid web sessions found, it will be displayed like this:


Step 5 Click on any of those "hijacked" accounts. Android should then prompt you for a list of browsers currently installed on your device. In my case, I used Opera Mobile as I wasn't able to make it work with default browser, Skyfire and even Opera Mini. Just make sure to set "Mobile" as Opera Mobile's User Agent configurable in the Settings > Advanced menu.


And Voila...

If you constantly connect to a wireless public network like in cafes or malls, recognize that your communication online can anytime be sniffed by almost anyone. Wireless network is notably vulnerable to packet sniffing as the exchange of data is done wirelessly. This vulnerability gives bad guys the opportunity to steal information exchanged over the air.

So, how to stay safe online? 

Whenever possible, don't connect to already congested public Wi-Fi network. Rather use the 3G/4G services offered by your ISP. And Virtual Private Network (VPN) applications would also help.  

New Android App Lets You Sniff Internet Sessions, Hack Facebook Account

The dreaded timeline feature of Facebook is upon us, and is inevitable.

 Facebook has decided to make the timeline feature mandatory across all its users. Problem is, at once in our lives, we’ve made a pretty bad decision of posting status updates that can make or break our application from a job or can destroy our current relationship. Facebook has no built-in feature that will allow us to delete our previous posts from a certain year.

There was once an Android application called Exfoliate, that they said, kept Mark up all night figuring how to combat the application that automatically deletes things for you. But Facebook has made moves and now the application is not available.

 Here, we present you a “brute-force” alternative that will help you “automate” the cleaning up process of your timeline. This may not be a full automation of the process but will definitely do you a favor.

TOOLS NEEDED:

- A web browser that supports iMacros (e.g. Firefox, Chrome)
- iMacros add-on for your chosen browser
- A little patience
- Common Sense

In this tutorial, we will use the Mozilla Firefox browser.

PROCEDURE:

Step 1 Launch Mozilla Firefox.

Step 2 Download and install iMacros for FireFox.


Just click on the Add to Firefox link and follow on screen instruction to complete installation. After installation, allow it to restart your browser.

Step 3 When Firefox has restarted, go to your Facebook timeline page and start managing your timeline.

To do this thoroughly, I suggest we do it by month instead of by year.

Step 4 On the rightmost part of your timeline page, you will see the timeline. Click on the year you want to start, for this tutorial, I chose the year 2009. Clicking on the year 2009 will expand it with months.

Step 5 Right-click on the month you want to start with and select Open in New Tab.
Close you current tab and let’s start the actual process.

*Note: This will delete every post without giving you the ability to choose which post it deletes or skips.
On our next tab, we will see something like this.
Step 6 Let’s now activate iMacros. Locate the iMacros icon on your browser.


It’s the small icon to the left of the address bar. Click on it to activate the tool.

Once activated you will see this.


Step 7 Right click on the #Currenr.iim and select Edit Macro.

This window will pop-up. Current script may be different in your case.
Step 8 Select all and delete everything written in there and replace it with this.

VERSION BUILD=7401110 RECORDER=FX
REFRESH
TAG POS=1 TYPE=I ATTR=CLASS:mrsimgsp_78bswxsx_580af6
TAG POS=1 TYPE=SPAN ATTR=TXT:DeletePost...
TAG POS=1 TYPE=INPUT:BUTTON ATTR=NAME:ok&&VALUE:DeletePost

After doing so, click on save.

Click on the one you saved and click Play. You can also look at he Repeat Macro portion and select the number of times you want the process to execute.

Enjoy.

iMacros: Mass Delete Previous Status, Wall Posts On Facebook By Year/Month

Just recently Facebook was again stormed by another dreadful attack. The coordinated spamming attack that lashed out Facebook this time is no more ordinary: pornographic and violent images have infiltrated news feeds and have gone viral across the web.

Clickjacking was the method used by notorious hackers responsible for the attack; they provide you with fake and eye-popping links (often coming from a trusted friend) which if clicked, advanced scripting gets executed within your browser, causing the spam link to spread even farther.

Check If Your AntiVirus Is Working Using Only Your NotePad

If you've been victimized by this extremely unpleasant attack, it's recommended that you change your account password as soon as possible, and don't bother to click on eye-catching links posted by your Facebook friend especially if you're in doubt.


Facebook seems to have struggled too much in eliminating this sort of attack. But you too can help thwart these attacks and make Facebook cooler again. Here's 5 Security Tips Steps On How To Stop, Prevent Facebook Spam from farther propagating on Facebook.

Tips On How To Protect Yourself From Facebook Porn Attack

Finally, it's here! Shortly after the announcement of video chat with Skype, Facebook has rolled out another support for videos, photos, Google Docs and other publicly accessible contents as attachments to your comments on Facebook. Now you can add, attach or embed YouTube videos, photos, and other external contents within the Facebook comments and let your friends play or view them inside comments’ thread.

Learn How To Find Who Deleted, Removed You As Friend On Facebook

All you have to do is to paste the link of the video (e.g. http://www.youtube.com/watch?v=w3He6D_jG6M&NR=1), photos, Slideshare presentation, or public Google Docs document. Facebook will then automatically render the object within the comment section. Facebook friends who participated in the thread can then view the external objects inside the comments, eliminating the need to open it separately in a new tab or window.

Facebook Video Chat -- 10 Things You Need To Know

The sophistication of Google+ may have taken a serious bite out of Facebook traffic but that's not exactly a big deal for team Facebook. In fact, the goings-on in Google have motivated Facebook to come up with something new to make the website even more exciting and engaging.

How do you like this new feature of Facebook? Share them as comments below or better yet, spread the word! Share this post to your friends!

Add, Embed Videos, Photos, Google Docs Within Facebook Comments

Ever wanted to know who deleted you on Facebook? Ever wondered why the number of your Facebook friends has changed? Want to get notified when someone removes you as friend on Facebook? Facebookers who're curious (and hurt) about those who took time removing you as friend on Facebook can now take advantage of a handful of tools that tell you whether someone unfriends you on Facebook.

At first, I thought of it as a scam. Who would ever thought this is possible when Facebook has this restrictive policy especially when it comes to privacy thing? But again I was wrong; it is actually possible to find out who unfriended or removed you as friend on Facebook, and am going to show you how:

Find Out Who Deleted, Unfriended You On Facebook

The first method that we're going to use is Unfriend Finder, a browser extension designed for major web browsers such as Mozilla Firefox, Google Chrome, Safari and Opera. Unfriend Finder, as what the name goes, tracks your friend's list and notifies you for any irregularities or "unfriends" made by your friends.

For Mozilla Firefox Users:

If you're using Firefox, you need to install Greasemonkey first, it's a Firefox add-on, to make Unfriend Finder work for you. By the time you have Greasemonkey installed, download Unfriend Finder for Firefox. Once Unfriend Finder is installed, close the tab with Facebook, or/and open a new tab and go to Facebook.com. You should be welcomed with the introduction to Unfriend Friend, where it will take you through the necessary steps, and tips you need to get started.

For Google Chrome Users:

For non-Firefox users like Chrome, the process should be fairly simple. Just search for Unfriend Finder in Google Web Store or you can download Unfriend Finder for Chrome here. Once installed, go to Facebook.com and you should get the same welcome screen.

NOTE: Be sure to uninstall all previous extensions of Unfriend Finder to make it work.

"Who Deleted Me?" also is worth a try. This is a free service that notifies you via email whenever a friend removes you as friend on Facebook. The only downside for this is that email notification is delivered weekly, bi-monthly or monthly. And "unfriends" made prior to the installation/integration of "Who Deleted Me?" are not recorded.

How To: Find Who Deleted, Removed You As Friend On Facebook

Prompted by the recent launch of video chat service of Google+, social networking giant Facebook fired back by rolling out another exciting service -- the video chat.

Powered by Skype, the new video chat service of Facebook lets you video call your friends in realtime, just like what you normally do on Skype. And the best part about it is that you can leave video messages to your offline friends, and have your friends read through your video message at later time.

Upload Multiple Photos To Facebook All At Once

The new Facebook video chat is currently available in India. So if you're in India, find time to check the service out and see for yourself how video chat of Facebook really works. For those who're outside India, let me just give you a quick view about the service by pointing out the most important things you need to know, as follows:
  • Of course, you and your Facebook friends will be needing a functional microphone and webcam to see and hear each other in real time. If your friends don't have webcams but have a working microphone, you can still hear them but no way to see them talking.
  • The first time you make a video call to your friend or your Facebook friend tries to video chat you right the first time, you'll be asked to complete the video chat setup. To start the setup process, just call a friend by simply clicking the video icon at the top of your chat window. From there you should be able to see "Set Up" button, click on it and follow the instructions on how to set up video calling on Facebook.
  • By the time you've successfully setup the Facebook video chat, the call you've started above with your friend should connect automatically. If nothing happens, call again by clicking the video icon at the top of your chat window.
  • To make a call, just visit friend's profile and click on the "Call" button in the top right corner
  • When a friend answers your call, you may have to wait a moment for your call to connect before the video chat begins.
  • Dates of each successful call you make and receive are saved within your ongoing conversation history in Facebook Messages.
  • Only confirmed friends can call you.
  • As with Skype, you can specify whether or not you're available for video chat. To set your video chat availability status, click the settings icon in the right corner of the chat list and check/uncheck "Available to Chat"
  • You can block a friend or group of friends from calling or chatting with you
  • Facebook video chat is currently not supported on Linux-based computers.

Stop Facebook Spam - 5 Tips To Avoid Facebook Trojans, Virus

I hope this piece of info helps you setting up your Facebook video chat. Remember that a one time setup both for you and your friends is needed before you can make a call. And as with other video chat systems, you can also block unwanted calls and hide your online visibility. Access Facebook video chat here!

Facebook Video Chat - 10 Things You Need To Know

Social bookmarking giant Facebook was recently stormed by malware attacks. Facebook walls, chat box and even inbox were flooded with spam messages, links from unsuspecting friends. Worst part is, malware writers still able to penetrate and distribute such annoying spams and viruses throughout Facebook page.

So, how can we stop such malwares from further propagating throughout Facebook? Well the process is simple: curb your clicking habit, use common sense, and stop supporting such malicious activity by simply reporting it to the Facebook admin. Take a peek below on how you can do your part to stop viruses, malwares inside Facebook.

Save Time: Bulk upload photos on Facebook By Folder

Stop Facebook Viruses - 5 Tips To Avoid Facebook Spam Messages


Facebook Virus
Tip #1. Be careful with eye-catching or bizarre Facebook stories

Be cautious enough and think before you click anything on Facebook. Virus writers are smart organisms; they present their malwares in a form of catchy titles or links in order to grab your attention. Common attention-getters that you need to avoid include "funniest ever", "OMG", "most hilarious video ever", "you've got to see this", many others. You've got to report them immediately.

Tip #2: Never click on "See who views your profile" or "See your stalkers" links

Facebook has long stated that they never track page views on each profile account. Thus, it's above impossible for third party developers to come up with Facebook app that can generate profile views. Read Facebook Private Policy, it was clearly stipulated there.

New Browser Extension Lets You Zoom Facebook Photos By Simply Hovering Them

Tip #3: Study the source - see how your friend constructs his/her post

You should know or at least familiar with how your friends speak their minds over Facebook. If the status or wall post of your friend is unusually different from his/her normal tone, do not click on it.

Tip #4: Avoid clicking on links that have been posted by multiple users/friends

If you begin seeing lots of wall post from your friend with same eye-popping messages, better report it right away. Chance are it could be the notorious Facebook virus Koobface - the most popular spam virus in Facebook.

Tip #5. Be careful with chat messages from friends asking for funds

Money transfer scams unfortunately are also on Facebook, so you need to be wary over chat messages informing that your particular friend needs cash.

Learn How To Find Who Deleted, Removed You As Friend On Facebook

Getting rid of Facebook spams is really that easy. Remember to always report spam applications on Facebook and avoid clicking on bizarre stories loaded with "magic words" -- for a cleaner and faster Facebook.

Please help spread the word. Kindly share this post to your friends.

Stop Facebook Spam - 5 Security Tips To Avoid Facebook Viruses

If you want to upload photos to Facebook in bulk or in folder, well, then, you'll need this cool Window application by brainfight.com - Easy Photo Uploader.

Easy Photo Uploader for Facebook is a windows application that automatically resize and upload photos to your existing or new Facebook photo album. That is, you no longer have to upload your photos one by one. Easy Photo Uploader is integrated in the shell menu, directly from the windows file explorer.

Tip: Get rid of Facebook spam - here's how to stop it

Uploading photos to Facebook in any folder with Easy Photo Uploader(FREE Download Here)

How Easy Photo Uploader Works?

You need to select your account first, create a Facebook album (you can also use the existing album), and the program will automatically resize to the maximum resolution allowed by Facebook. Your photos are resized first before they get transferred to Facebook servers allowing to upload photos at impressive speed.

How To Use Easy Photo Uploader?

Step 1. Make a selection, right click and select the menu item "Send your photo(s) to Facebook".


Step 2. Select your Facebook account or enter your Facebook login and password.

Step 3. Select in which album you want the pictures to be posted, or you can create one, with also the security settings from the application itself.


That's it! Easy Photo Uploader will then resize to a preset and post all the photos in your Facebook album.


Upload Photos To Facebook in Bulk or in Folder