Disclaimer: The purpose of this tutorial is to demonstrate just as how easy it is for anyone with a rooted Android phone to take control of the entire WiFi network you're currently on be it at home, cafes and school. While we believe that the tool and the method you are about to read can be an invaluable one if prudently used, we do not condone nor promote the idea of manipulating one's wireless network to your advantage. Please use this at your own risk.
Ever wondered why you're not connected to the internet even if you're connected to a shared WiFi network? Chances are you're deliberately getting blocked from accessing the internet not by the cafe owner but by a fellow regular who find joy in seeing you annoyed, disgruntled.
Due to the 'open' nature of Google-backed Android, developers have come up with ways to exploit the platform creating applications so clever that most of them don't even make its way to the Play Store.
One great example is the app you might have already heard called WiFiKill.
WiFikill, as you can see in the disclaimer above, is one bad-ass, root-only
Android app designed to do just that: block or restrict other users & devices to access the internet through shared wireless network. So if you're hanging out in a coffee shop hotspot and you notice the internet seems to be lagging a little more than you expect, then, you can take matters into your own hands. Disconnect, disable their internet connection.
Here's how to disable internet access for any device on a shared WiFi network
The process is no brainer, and even grade schoolers can do this. All you need is a compatible rooted Android phone and you're good to go.
Step 1 Download WiFiKill using WifiKill Downloader
HERE. Two variants to choose from:
- FREE version — ads-supported and it shuts down after 5 minutes (more limitations are expected in the next updates)
- PRO version — requires you to make a donation through PayPal via WiFiKill Downloader
Or you can download the older version of
WiFiKill v2.1.apk.
Step 2 Once installed, launch the app and grant whatever Superuser request it prompts.
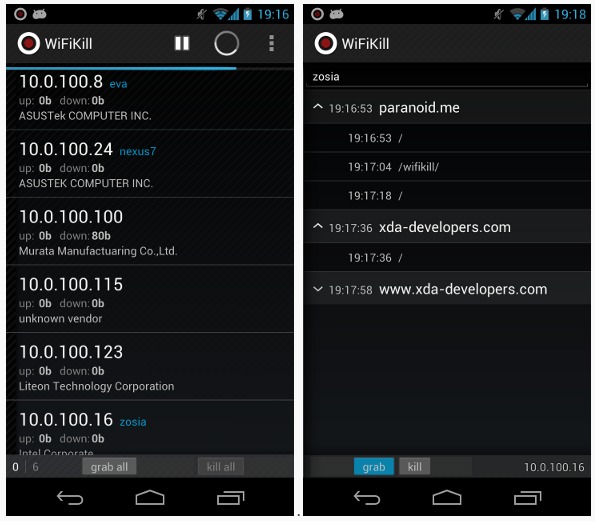
Step 3 Tap the Play button beside the Refresh icon. It should start scanning for the entire WiFi network. Once done, it should show all devices connected to the wireless network as seen below:
(
PRO TIP: enable
Show Network Names in the
Preferences to show the device' names)
 Step 4
 Here's the fun part. Choose the device you want to disconnect from the network and toggle the
Grab slider. It should display the network usage as well as the website being accessed. Once you made that selection, just toggle the
Kill slider.
And you're done. The target device should now be blocked and denied to access the internet even if they're connected to the WiFi network. And if you're really that evil, you can even disconnect all devices connected to the network.
See, WiFiKill is one dangerous tool if it lands in the wrong hands.
The Good...
Despite its controversial nature, there are great use cases for this app too. You might want to use it against your kids to restrict access to the internet especially during bed time. Or you're in a coffee shop and you see someone's abusing the extra bandwidth juices for Justin Bieber clips on YouTube, then you can quickly kill their internet connection without them knowing. Yes, the targeted device still says connected to the WiFi network.
So, how you protect yourself?
As much as you can, avoid connecting to the publicly available WiFi network. Bring your own broadband or tether your iPhone or Android so you can browse the web in peace.
For more information about the app, go to
WiFiKill official page.


