Soundslice is a web app for those people who seriously want to learn how to play the guitar without learning to read notes.

Many guitar players today, especially those still in the learning process, cannot read sheet music. They learn by using available guitar tabs or transcribing the music themselves. Arrangements, solos, chord changes, and small licks are done by transcribing music using tabs.

How To: Create, Add Links To Already Uploaded Videos On YouTube

Transcribing music can be a weary process. Some write on sheets of paper, while those with a computer create a lame text-file tab. However, since the transcription is not recorded, when the player goes back to what was created, he has to play the original recording just to get the phrasing and sense of timing.

Unfortunately, in this age of great technological creations, no one seems to have figured out a way to playback a transcribed guitar tab file. Oh, sure, there’s Guitar Pro, except it plays back in lousy MIDI format that cannot play the actual guitar sounds.

Mozilla's Popcorn Maker Lets You Enhance, Recreate Existing Videos from YouTube, Vimeo

Now, many musicians doing transcribing and tablature often wonder in this age of the Mars Rover why no one has found time for computers and the web to mate and produce an online collaboration for a web application for guitar players.

Just recently, Adrian Holovaty and PJ Macklin, programmer and designer respectively, and both guitar players, created Soundslice. This web app allows you to sign up for free, loop, and annotate guitar videos from YouTube.


Soundslice is not hard to use:

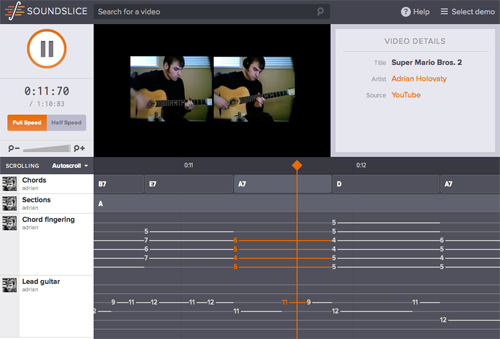
1 You just need to create an account with YouTube that allows you to annotate, create tracks, locate licks, make chord charts and tabs, and be able to slow down the video while annotating and looping.

2 Go to SoundSlice and add a track using the "+" button on the lower left side.

3 Select a part of the video using the timeline and click the "Annotate" button that shows up when you hit the "a" on the keyboard.

4 Keep repeating the process until you complete the synced collection of annotations.

5 If you get lost over something, just click the “Help” button on the upper right side for more interface details. You can even create using keyboard shortcuts.

Link: SoundSlice

SoundSlice Teaches You How to Play Guitar Fast By Syncing Guitar Tabs With Video

You might have already heard about 'Popcorn', it’s an HTML5 media framework written in JavaScript for filmmakers, web developers, and anyone who wants to create time-based interactive media on the web. Popcorn.js is part of Mozilla's Popcorn project.

Good news is: Team Mozilla has launched version 1.0 of its Popcorn Maker, a web-based video editing app powered by the Popcorn framework.

Well, what’s so exciting about this app is that regular users can easily re-create or enhance already existing videos online -- be they from YouTube or Vimeo -- thereby allowing you to add image, map overlays, and links from Twitter, Wikipedia, and other websites. So the result would be like a highly-interactive web page rather than a traditional video.


Popcorn Maker helps to change or transform usually passive video viewing into a feature-rich interactive experience that allows for greater viewer engagement. Eventually, a more advanced version of the app will be able to create shoppable videos or video ads for advertisers on YouTube. In this way, you can easily link to a product website or immediately buy a product while watching a video that shows the products.


See Popcorn Maker in action HERE.

Mozilla's Popcorn Maker Lets You Enhance, Recreate Existing Videos from YouTube, Vimeo

ThingLink is an app that will bring new life to your photos.

But no, this is not the boring Instagram-like type of app where the fun ends up with photo filters.

ThingLink is a provider of image interaction tools. It uses free tagging tools to give photos new life by using sound, voice, social media, and other fun links.

Slide.ly: Turn Your Instagram, Flickr & Facebook Photos Into Stunning Video Slideshows

Imagine your pictures becoming stories in themselves. For instance, an ordinary high school graduation class picture comes to life when you embed the names of each single person in the photo complete with profiles, where they are now and what they are doing in life after, say, 20 years. What a way to make a great online yearbook!

Make Your Images Come Alive With Music, Video, Text, Images (link)

The ThingLink app makes everything online that can be embedded come to life on any image. Streaming media, music videos, social profiles, facts and figures, surveys, documents, and even statistical graphs can be enabled for any picture you choose. The pictures you choose can be anything from educational photos for your classes to your own Facebook vacation pictures. Here's a demo:

You can go beyond creativeness to invent interactive greeting cards, posters, wedding, and birthday invitations. You can also spice up boring profile images, family pictures, maps, and even fashion shoots.

YouTube-Powered VeedList Lets You Create Custom YouTube Playlists

ThingLink is an app that can make people think, laugh, cry, or just smile just from viewing ordinary pictures.

ThingLink: Make Your Photos Interactive By Embedding Videos, Music, Text or Another Images

Goodness, what will people ever think of next in terms of technology?

A website called paludour.net (link) is introducing a new application for Windows called the AutoUSBCheck. It can be downloaded to any computer to be used for automatic copying, backup, or stealing data from any USB flash drive that is plugged into the computer. It also shows when a USB flash drive has been used on the computer and extracts a copy of the USB drive data to the hard drive.

Prevent Others From Opening Certain Programs Installed On Your Computer

AutoUSBCheck is so easy to use:

1 Download and install AutoUSBCheck HERE.

2 Once installation is complete, launch the app -- go to Start > Programs > AutoUSBCheck Preferences. You should be prompted like this:


3 Just hit OK(you may enter the unlock code to download the Full version). This should bring the AutoUSBCheck dialog, as seen below:


4 Click Start button to activate program. And you're done!

If the application is in active state and any USB flash drive is plugged into the computer, the app will silently copy USB files without user's knowledge in the background unto the hard drive to be accessed later.

Advantages:

  • You get to know if a USB flash drive was ever plugged into your computer get to copy the flash drive contents.
  • Automatically backup files once USB stick is inserted.
  • Once active, it is automatic and silent.
  • Compatible with Windows 7, Vista, and XP.
  • You can limit or unlimit what size file to copy.

Disadvantages:

  • Free version is only a trial version. Paludour.net will send the full version of AutoUSBCheck if user sends a donation of €6 Euro or $ 9US.
  • Rare incompatibilities may occur.
  • Use at own risk because there is no technical support.

Add Multiple Tabbing Support To Windows File Explorer With Clover [Must Have]


This App Silently Copies All Data to Your Hard Disk Once A USB Flash Drive Is Plugged In To Your PC

With the internet so open to anyone, it is no surprise that copyright infringement and other content theft is rising fast. The best protection you can give to all your online images is to embed photo watermarks online to personalize and thereby, clearly identify all your image files.

Basically, according to the FreeDictionary.com and Dictionary.com, a watermark on any picture simply means:
"The faint design made on paper during manufacture, that is visible when held against the light and typically identifies the maker."
The best example for a watermark are those found on Australian dollar bills and South Korean Won bills.

Create, Add Links To Already Uploaded Videos On YouTube

Traditionally, watermarks are added by embedding a custom text or tile into the image using photo-editing software like Adobe Photoshop. But no, you don't have to go through the same old process of watermarking your photos this time. There is this awesome online photo watermark creator that can surely save you time when watermarking your photos online.

Picmarkr: Free Online Photo Watermark Creator To Watermark Your Images Without Using Photoshop (link)

With Picmarkr Free Online Photo Watermark Creator, you can easily watermark your online images for free.

In using Picmarkr.com, there are simply three very easy steps to follow:

1 Upload images or photos of your choice Upload any picture or image of your choice from your Facebook account, you blog, flickr.com, or Picasa.com. Then, using the Picmarkr Watermark Creator, you can upload and watermark up to five images at once. You can even resize your pictures as you see fit, from 500 up to 1024 pixels.


2 Select a Watermark Format You have a choice from the three popular formats, text, image, or tiled watermarks.


3 Download the Watermarked Images After selecting the watermark format you want, the watermarked image should be ready for downloading.

Extract All Images Embedded In .DOC Word Documents All At Once

Picmarkr.com can also be used to add watermarks to images without using software that are stored in a PC or laptop.

How To: Create, Add Watermark to Your Photos Without Using Photoshop

You can now easily convert Wikipedia articles into free e-Books.

For those Wikipedia lovers who love to spend eons of time researching on various subjects or who just love to read from Wikipedia articles, here is a new feature introduced by Wikipedia itself for both reading and storage convenience. When you need to read Wikipedia articles offline, you can now transfer them into e-Book form, all for free.

Grab Existing Website and Browse It Offline - Turn, Convert Any Websites Into eBook

Since we mentioned offline, the advantage of having an e-Book means you can read the article from any e-reader, tablet, mobile phone, or just your desktop when you're offline. You get the chance to read the e-book anywhere: in your car while stuck in traffic, in the subway, or while waiting for your doctor's appointment. You no longer have to lose an article among the hundreds of bookmarks you have hoarded. 

The feature is very simple to use. Just activate the "Create A Book" link located at the left sidebar of Wikipedia at the "print/export" section, as seen below:


Once activated, the user can start compiling articles or complete categories into a personal collection, and begin exporting them. Format choices can be PDF, EPUB, or OpenOffice.

Convert Texts From Printed Documents, Books Into PDF Using Phone’s Camera

Should you choose to, the user can also order a printed version or book through Pedia Press, the official print-on-demand partner of Wikipedia. Here's a video walkthrough:


Now is your chance to compile all your favorite articles on Metallica. Or was it J. Edgar Hoover?

Wikipedia Gets Export-To-eBook Feature, Lets You Export Wikipedia Articles Into Instant Free e-Book

The day social networking giant Facebook acquired image-sharing mobile app Instagram for US$1 billion, many Instagram users startled and decided to delete their account.

If you're among those unhappy, long-time Instagram users who wish to completely delete your Instagram account, you might want to perform a complete backup of your Instagram photos first.

Backup, Save SMS Text Messages To Gmail All At Once (Android)

Here, we will present you handy and best methods to backup all your Instagram photos online. All you need is to sign in or sign up for these apps so you can download Instagram photos straight to your hard drive.

Free Tools To Download, Export and Backup Instagram Photos

1. Instaport (link)

Instaport must be the simplest way to export or backup all your Instagram photos by downloading a single zip file. All you need to do is to sign up the Instaport app with your Instagram User ID and password, then choose in which format you want to export all your Instagram collections.

There are advance options too: you may download Instagram photos taken at particular dates or by tags, as seen below:


2. CopyGram (link)

CopyGram is yet another awesome tool to backup your Instagram photos online. Using the app is a snap. First you need to do a one-time registration to their website and then allow CopyGram to connect to your Istagram. Once done, you should be taken to the homepage, displaying your friend's latest uploads.


Now, to backup your Instagram photos, just click the link "BACK UP PHOTOS" at the top of the nav bar and you are ready to backup all you Instagram photos. Just enter your e-mail ID and then hit the Backup now button to get the backup in your e-mail account inbox.

Cloud Save - The Quickest Way To Download, Backup Files Straight To The Cloud

You may not need these Instagram photo downloaders this time, but they're good websites to bookmark when you do.

How To: Export, Backup All Instagram Photos Online

Ever wondered how to recover and restore all deleted/lost photos, JPEG files on your Android device? Well, good news!

The guys at Defiant Technologies, LLC have finally created a FREE Android app called DiskDigger that allows users to retrieve, recover all photo files that have been lost or removed due to deliberate or accidental deletion.

Backup, Save SMS Text Messages To Gmail All At Once (Android)

DiskDigger is already a popular Windows app that lets you recover virtually all types of files on your PC. And with the availability of its Android app, you'll surely get a peace of mind with the lone fact that in the event of accidental file deletion, you can still recover all those precious photos and restore them back to your device's internal memory or memory card.

Free Android App To Recover, Restore Lost Photos, JPEG files

DiskDigger for Android (link) is all you need when you want to recover deleted photos and images from your Android device. Think of DiskDigger as a Recycle Bin, but for Android, which means you can still recover those photos, JPEG files that were accidentally deleted.

Using the app:

Note: DiskDigger only works on rooted Android devices, so you may need to root your device to enjoy this app.

Here's how to restore, recover deleted/lost photos with DiskDigger:

Step 1 Download and install DiskDigger for Android at Google Play Store.

Step 2 Launch the app. It should display all the system devices (including the memory card) that you can scan for lost files, as seen below:


For now, it will list them using their Linux device names (not very visually appealing, but this will be improved in the future). The memory card should appear as "/mnt/sdcard" or something similar.

Step 3 Select the device to scan (memory card in our case), and then press the "Scan device" button to proceed (you might see a Superuser request window; just press "Allow").

You will then see the main DiskDigger window, which shows you the progress of the scanning, as well as the recoverable files that have been found so far:


Step 4 You can press on any of the recoverable files, which will show you a preview of the file on the right, as shown below:


Step 5 And finally to recover the deleted files, just tick the recoverable files on checkbox and then hit "Save" or "Email".

That's it!

Filtering files:

You may also take advantage of the Filter function of the app. Just press the "Filter" button to filter the recoverable files based on file type, and file size. This is useful if you want to impose a minimum size on the files shown.

Diskdigger for Android is extremely useful for those looking for ways on how to recover deleted/lost photos  from their Android device. The app is currently on its beta stage and will only recover the .JPG and .PNG files of your device.

How To: Recover, Restore All Deleted/Lost JPEG Files, Photos On Your Android Device

The seemingly endless disk spaces of gigabytes and terabytes in desktops, laptops, and now with external hard drives means that people today can have as much music in their files as the whole Library of Congress. It also means that some music files in our collection can become redundant. It makes no difference if you are listening to music using your desktop and a VLC player.

However, it will matter if duplicate tracks play on a portable USB thumb drive. Aside from two or three of the same songs playing, there is the matter of limited space in a portable player. In that sense, it would be better to completely remove redundant files to make more room in a limited 1 or 2 gig portable player.

Turn Your Laptop, PC Into Wi-Fi Hotspot Without Using Ad-Hoc -- Internet Sharing Made Easy

In this article we're going to walk you through how to remove duplicate media files on your PC. Using this tiny software called CopyTrans and iTunes, it will be easier to find those duplicate files and finally take those junks files out from your desktop or laptop.

Get Rid Of Duplicate Media Files On Your PC With CopyTrans + iTunes

Note: While you can always navigate to File > Display Duplicates on iTunes to display and delete those duplicate media files, physical files are not actually removed at all; iTunes will only take them out from the library.

Alright, here we go.

All you need to do is to download the free CopyTrans free app, extract, and then run the executable file. Before running the app, make sure that iTunes or any other media player is closed. The app tool is portable and does not require any kind of installation. When you run the tool, it automatically scans your iTunes library or entire Mp3 files and immediately shows the results categorized into different albums, like this:


After this, all you need to do is to click on the album and select the duplicate tracks for the cleanup. This is found at the left-hand side bar. Once the tracks are selected, a small blue screw icon will appear. If you click on this, the track will be deleted (see screenshot below).

Grab Existing Website and Browse It Offline - Turn, Convert Any Websites Into eBook

Instead of scanning your entire music collection manually, CopyTrans is the best way how to delete duplicate mp3 files.

Download CopyTrans HERE

How To: Find, Delete Duplicate Media Files On Windows 7 (CopyTrans Method)

Here’s the situation. You have a lot of work to do. Perhaps you have a deadline at work to submit a report. Perhaps you’re catching up with your school term paper deadline. Perhaps you’re working as a home based web developer and your client has set a deadline.

But, the temptations are numerous. You end up watching the latest Linkin Park videos on YouTube, or you keep commenting and uploading on Facebook, or you can’t seem to stop the latest downloads of “Game of Thrones.”

Split Screen: Splits Your Web Browser into Multiple Resizable Windows

This doesn’t sound good for productivity. It can get you fired, or you end up with a failing grade, or worse, you lose your client.

It really boils down to personal self-discipline. However, there’s an app that can help you with your self-discipline issues and to help you get the real work done.

Save Yourself from Time Sinks & Be Productive Online With LeechBlock (link)

Image Courtesy of Techifire
Introducing an extension called Leechblock. It works perfectly well with Firefox. This may sound almost impossible, but, the extension app does work.

All you need to do is download Leechblock, install it, then restart your browser. Now comes your honesty and discipline factor. Select the site or sites that make you unproductive and block them on the browser’s tool menu.

But, it doesn’t stop there. You can set the time periods that these sites should be blocked. That’s right; you’re not depriving yourself completely. It’s just a discipline thing. You can even set the number of minutes or hours you can allow yourself to visit the selected sites per hour or per day.

Block, Restrict Access To Unwanted Websites - No Additional Software Needed

Lastly, you can select the days of the week Leechblock should block these sites. You can also set an optional “custom name” for the selected sites such as “The Force Balances Time between Work and Play” or other funny or not so funny file names. Putting up custom file names allows you to categorize what sites you’re blocking.

You can add sites anytime to the block lists on Leechblock. Can you undo the blocked sites? Here’s where the discipline factor comes in. Of course, you can unblock anything, but, Leechblock will make it difficult for you.

So, stop wasting your time and get back to work. But, before you do, download Leechblock first.

For Chrome, you may want to check out Nanny, yet another productivity add-on similar to LeechBlock that allows you to be more productive and less distracted by blocking sites.

How To: Temporarily Block, Restrict Access to Unwanted Websites and Increase Productivity

Don’t you hate it when people copy or steal your photos or images then use them on other web sites or content without your permission? Problem is, how do you search millions of websites for copyright infringement?

Now, you can find out if your photos or internet images are being used by others in violation of copyright infringement laws. A new and innovative forensics Firefox extension makes discovering copyright infringement easy.

"Datum Search By Image" Makes It Easy To Find Stolen Photos Online (link)

If you're wondering about how to find your stolen photos online, then, you've got to check out "Datum Search By Image". Created by the Datum Company,  this Firefox extension allows you to search and track those images you think are being copied and used illegally. Datum Search utilizes the power of Google and TinEye, thus, allowing you to search for duplicate image use. Simply download, install, and restart your Firefox. The function is then automatically added to the right click menu.

Image Courtesy of Mozilla.org
The technology of searching for copyright infringement from Google and TinEye has been available for some time now. What the Datum Company has done is to combine these two into more practical use for a more efficient approach to internet image forensics.

Stop, Prevent Yahoo & Other Social Reader Apps From Posting On Your Behalf On Facebook

The forensic Firefox extension thus, uses these two highly rated reverse image engines and takes advantage of the unique methods of discovery offered by both engines. This ensures the best quality results for all forensic searches and leads to discovering if your image content has been stolen.

Datum Search is so far the most user-friendly and the fastest method to finding image copyright infringement online. Get it HERE.

Find Your Stolen Photos Online With This Forensic Firefox Extension

Here’s the thing, you’re doing research on the net and you need to take notes. What you’re doing is you’re either switching screens continuously from the website to your notes or you just minimize Microsoft Office Word or Notepad to take notes, which can be very tedious and annoying.

Now, there’s a simpler way to facilitate research work and learning. Google Chrome introduces Split Screen, a Chrome extension for convenient note taking.

Split Your Chrome Browser into Multiple Resizable Windows With Split Screen (link)

Split Screen is a free add-on for Google Chrome. It simply splits the screens on your PC browser into multiple re-sizable windows. Its default feature is its two windows, the left window opening up as a notepad for taking notes.


Another feature of Split Screen is that it can be set so that two websites open side by side. This is useful if you need to do multiple sources research or site comparisons. The user can even split the screen horizontally, another great option feature. If the user decides to split two notepads with one website, it can be done.

How To: Password Protect, Lock Google Chrome Browser

Split Screen is easily customized. All you need to do is select from the “Options” or just type the appropriate command into the address bar of a window.

Installation of the Google Chrome extension is fast and easy. It just gives another good reason to stick with, and use, Google Chrome.

Split Screen: Splits Your Web Browser into Multiple Resizable Windows

You must have already aware of HTML5. It'a next-generation web technology that provides a standard for playing audio and video files. Advanced mobile browsers such as the built-in browser on your Android/iPhone and third-party apps like Opera Mobile and SkyFire support HTML5.

But here's the problem:

Not all websites are built with HTML5. Which means whenever you play any media files embedded on  non-HTML5 sites, they'll prompt you to download it.

Play, Stream All Music Files, MP3 Saved From Your DropBox

While you can always download the media file on your phone for later streaming (a podcast perhaps), why not play it right away? Doing the latter will not only save you time but also disk space.

Play Audio, Video Files On Non-HTML5 Websites Straight From Your iPhone/Android

You might want to enjoy a podcast before you finally drift off to bed, so here I'm going to share you a simple workaround on how to play MP3 and video files embedded on a website straight from your Android/iPhone browser -- no need to download.

Here's how:

Step 1 On your mobile browser, obtain the direct link of the file. In Opera Mobile we usually do it by opening the link in a new tab, until a download dialog pops up, as seen below (notice the download link):


With the above example, our direct link is: http://pbstatic.s3.amazonaws.com/introduction-to-monetizing-blogs.mp3. Copy it.

Step 2 Using your HTML5 browser (we recommend Opera Mobile), head to W3school Audio TryIt site. For video, point your browser here.

On your mobile browser, you should see something like this:


Step 3 In the <source> tag, replace the src attribute with the direct link of the file. Once you've done that, hit "Edit & Click Me" button.


And voila, you should be able to play the MP3 file directly on your mobile browser — no need to download boatloads of audio/video files!

How To: Stream, Play MP3 & Video Files Embedded On Non-HTML5 Websites From Your Mobile Browser

You probably have tons of files stored on your DropBox account. And admit it: managing these files this big is a daunting task, and it only gets harder when you start dumping more files across your DropBox account over time.

Whether you are an occasional or heavy DropBox user, getting your DropBox files organized isn't exactly something that should stress you out. SortMyBox is a fantastic tool that you should check out if you want to automate the sorting and organization of your Dropbox files.

SortMyBox Lets You Organize, Sort DropBox Files Based On Your Rules

SortMyBox is a free and easy-to-use file management app for DropBox that automatically sorts DropBox files/folder based on the rules you setup. SortMyBox uses the popular "when this, do that" format, similar to Gmails' filters. That is, when certain file name or extension is detected, SortMyBox will then move those files to the folder you want, based on the sorting rules you setup.

Play, Stream All Music Files Saved From Your DropBox Account (No Need To Download)

Getting Started With SortMyBox

SortMyBox is pretty straightforward to use. First you need to point your browser to SortMyBox's website (link). From here you should be able to login and connect through your Dropbox account.

Note: A folder named "SortMyBox" will be automatically created inside your Dropbox account. This will be the folder in which you drop your files for sorting.

Now it’s time for you to create your first rule. There are basically three types of rules, as seen in the screenshot below:


(a) Filter files by extension (or a comma-separated list of extension). You can instruct SortMyBox to automatically move files to specific DropBox folders when a certain file comes with a file extension that matches to that of your rule.

(b) Sort by a word in the name. If you want to automatically move all files containing the word "img" to /Photos/ directory, then, this filter is ideally right for you.

(c) Filter by name pattern. Allows you to create a pattern in the name to filter by, with or without an extension (e.g. "The Carpenters *.mp3").

Get A Consolidated View Of All Email Attachments In Gmail — View All Gmail Attachments All At Once

To wrap it up, you can setup rules that identify a file’s extension, name contents or a name pattern. And files get sorted every 15 minutes. Yes, it's that sweet. So go, check it out HERE.

SortMyBox Is The Email Filters For DropBox — Organizes Your DropBox Files Based On Your Rules

I really find it annoying for social reader apps like Yahoo! to post something on my behalf on my Facebook Wall without me knowing. Every time I read an article on Yahoo!, an update is automatically posted on my Feeds, telling my friends what I just read.

The update made by these social readers usually contains items such as "Freddie just read an article" plus the article link. And this is no cool as you're exactly telling the world your reading habits.

So, how can you prevent social reader apps like Yahoo! from posting on your behalf? Mike Klawrence has this neat solution: Unsocialize, a link unsocializer for Firefox & Chrome.

Stop, Prevent Yahoo! and Other Websites From Automatic Posting On Your Timeline

Unsocialize is a Chrome and Firefox extension that allows you to open articles in a new tab without getting redirected to third-party apps and having to grant them access to your Facebook information. The extension provides a right-click menu item "Unsocialize", which essentially bypasses the install request and any other tracking metrics.

Normally, when you click social reader links especially that of Yahoo!, Facebook takes you to the install app request page, requiring you to give permission to third-party apps. The screenshot below shows an example of what the page looks like.


But with Unsocialize, you can bypass this authorization process, thus preventing social reader apps from posting on your behalf. All you have to do is to right-click on any social reader links, then hit "Unsocialize" (see screenshot below).


Unsocialize is definitely useful especially if you don't want your reading habits to be traced.

Download Unsocialize: The Link Unsocializer For Google Chrome
Download Unsocialize: The Link Unsocializer Add-on For Firefox

How To: Stop, Prevent Yahoo & Other Social Reader Apps From Posting On Your Behalf On Facebook

As a non-US citizen, I also have a fair share of frustration with Pandora. And while Spotify is available with greater country support than Pandora, still I live in country where neither of the two streaming services was ever supported. So there's no way for me to enjoy really good music like that of Pandora and Spotify.

Luckily, there are few good online music streaming services that offer almost the same feature sets at no cost. And here we're going to share a short list of top 5 FREE online radio services that we think are the best.

Top 5 Best Pandora & Spotify Alternatives

Below is a quick rundown of top 5 best Pandora and Spotify alternatives that will sure quench your music thirst.

8Tracks.com (link)


The number 8 is the minimum number of tracks you must add to create your own mix. You can either create one of your own taste, or browse through the playlists others created, I’m pretty sure there’s one just right for you, if not, you can always create your own. With their mobile app for android and iPhone, you’ll never be separated from your music. The stream also plays uninterrupted, so it will play just like a radio would.

Grooveshark.com (link)


Grooveshark has a good amount of song library for you too choose from and also features releases from rising bands. When you find new songs that you like and would like to share to a loved one or a friend, you can easily do so because of its excellent social media integration like Twitter and Facebook.

We Are Hunted (link)


When someone hears the word “indie” in band or song, there’s a stereotype that it’s mediocre. Think again. With We Are Hunted, you’ll be able to discover new emerging bands and also see what other people say about the song. You can also share your newfound favorites on Facebook and Twitter.

Google Music (link)

Google Music offers services with the likes of iTunes store and Amazon mp3. Google Music also allows you to purchase music with an extra feature of uploading your purchased mp3s up to 20,000 songs from your home drive and listening to it on your android mobile and on another Mac or PC via web. It also gives recommendation of songs based on your frequently listened tracks. It also features instant mix, like Genius mix on your iTunes.

ex.fm (link)


exfm is a music library with a twist of social media. If other social networks allows you to discover and rediscover friend, exfm allows you to discover and rediscover music. One of the features I love most is the TasteMaker. There are times that you just can't decide what song to listen to. With the help of TasteMaker, it presents you a pool of selection by people with great taste for music.

YouTube-Powered LoudLee Lets You Create Personalized Online Radio, Listen To Music Online

There you go. These are just some of the services out there. Take your pick and choose what's best for you.


Griffith Boniel

About the author:

Griffith Boniel is a photographer, Nikon user, and a Nokia fan who's also passionate about social media, mobile and web technology. You can follow @gboniel on Twitter.

Top 5 Best Pandora, Spotify Alternatives For Streaming Music Online

Here's another good reason why Gmail is still the best email service as yet:

You can now get a consolidated view of all email attachments sent to your Gmail account.

Being able to view and manage all email attachments in single manageable place basically means convenience. You don't want to waste your time searching through your inbox for email attachments, right?

Access, Manage All Files Stored Across Multiple Cloud Accounts All At Once

Well, the consolidation of email attachments is not at all a built-in feature of Gmail. Rather it is made possible by another web services called Attachments.me and DropBox. And Griffith, one of my readers here, shares you the gist on how get it up and running.

Very few simple steps and you should be able to see all Gmail attachments in one manageable place.

Access, Manage All Email Attachments In One Manageable Place (Gmail)

Note: Before you do the setup, make sure you're logged in to both DropBox and Gmail accounts. And to make the setup short, use Google Chrome browser.

Getting started with Attachments.me

Attachments.me is quite snap to use. First you need to download/install Attachments.me Chrome extensions from its website (link). Once installation is complete, you should be taken back to your Gmail's account. This time, you may need to authorize the app to connect to your Gmail account.

Cloud Save: The Quickest Way To Download, Backup Files Straight To The Cloud

Once Attachments.me and Gmail are connected, you'll now get introduced on how to make it work. An on-screen instruction should be displayed straight on your inbox, hinting you to do some basic actions such as connecting Attachments.me and DropBox (or Box) account, saving your first email attachment to your cloud storage account (in this case, DropBox), and specifying DropBox directory where email attachment gets saved.

The on-screen instruction will also introduce you to "filters", which allows you automatically send, save all email attachments to your DropBox/Box account when certain criterion meets. This is really handy when you want to put all work-related files sent as email attachments in one manageable size.

Automatically Backup WordPress Blog Database To DropBox

Now, as soon as DropBox authorization/setup is complete, you should  be able to view and manage all your email attachments from your DropBox account. Or you can access, manage all email attachments straight from your Attachments.me account (we recommend this).

Get A Consolidated View Of All Email Attachments In Gmail — View All Gmail Attachments All At Once

Not all websites are safe for kids; some portals promote sexual curiosity while others expose anti-racism and some violence of that sort. In corporate scene, there are websites that are not supposed to be visited especially during working hours. Facebook, YouTube, TumBlr, Orkut, Twitter – name them all – have been the major problems recently in schools and many other business organizations.

If you’re a mother who wishes to protect your child from bad websites or a network admin who is responsible for the network activity of company workforce, then, this short tutorial will teach you how to restrict internet access to a specific website – no additional software needed.

Block Specific Websites At School, Office Workstations - No Software Needed

Step 1 Log in to your computer as Administrator.

Step 2 Navigate through the Hosts File. Click Start > Run and type the following:
\Windows\System32\drivers\etc\hosts
Windows should prompt you an "Open with" dialog (see below). Just select "Notepad" or any other text editor and hit OK.

NOTE: To access the hosts file on on Windows 7, you may need to temporarily disable all active antivirus software first. Then run Notepad as Administrator, open the host file by navigating over here: \Windows\System32\drivers\etc\hosts.

Step 3 Now, let’s try to block Facebook and Twitter. All we need to do is to add the following codes below the lines containing 127.0.0.1 localhosts (if you cannot see it, create it):
127.0.0.1 facebook.com
127.0.0.1 www.facebook.com
127.0.0.1 m.facebook.com
127.0.0.1 touch.facebook.com
127.0.0.1 twitter.com
127.0.0.1 m.twitter.com
Step 4 Now, save the File and see it yourself!

If you’ve performed right the procedures above, your computer should not be able to access Facebook and Twitter. If you want to block more websites (e.g. Twitter, YouTube, Orkut etc.), just access the Host File and append the domain name or web address and save.

Blocking specific websites is really that easy!

How To: Block, Restrict Access To Unwanted Websites - No Additional Software Needed

While working with other collaborators in our team on a certain web project, I recently learned that uploaded document files that are converted to Google documents format cannot be larger than 2MB. Google Docs seem to protest for any uploaded files/documents of more than 2MB in size, which I believe a big turn off for anyone who wants to get the job done fast.

Here's a sample failed upload prompt from Google Docs. It says "Sorry, this file is too big. We can only convert files up to 2 MB in size.":


Well, obviously there is this file size upload restrictions on Google Docs, and unfortunately there's not such a good web app similar to Google Docs that offers seamless, real-time collaboration at no cost.

Access, Manage All Files Stored Across Multiple Cloud Storage Accounts In One Place

So let's get our head back to Google.

Getting Rid Of Google Docs' 2MB Upload File Size Limits

If you ever found yourself in a complete need to upload large documents, spreadsheets to Google Docs but could not due to file size restrictions, you might find this simple workaround useful. (For more of our Google-related goodies, you can find them HERE).

Alright, here's the trick:

Rather than uploading your large files, spreadsheets and documents to Google Docs, send them all to your own Gmail account. As soon as you receive all the documents, save them to your Google Docs account. Yes, it's really that quick.

Cloud Save - The Quickest Way To Download, Backup Files Straight To The Cloud

Here are the basic steps:

Step 1 Send the document to your own Gmail account.


Step 2 Once received, click on "View". Gmail should launch Google Doc viewer in a separate tab/window.


Step 3 Now, hit that tiny "Save in Google Docs" button at the upper right corner of the viewer. Once done, you should see your newly-added file to your Google Docs collection.

It's quite surprising to note that it takes only Gmail to remove that file size upload restriction in Google Docs. So next time, if you encounter that same Google Docs prompt again, just follow that dead simple Google hacks. Enjoy!

How To: Circumvent, Remove The Maximum 2MB File Size Upload Limits In Google Docs

Android evangelist Zen is quick to suggest that I should've had QR images added to all iPhone & Android downloadables featured here. According to him, users will find it easier to access those mobile goodies if they can just point their camera down to every QR code, and let the phone do the magic.

And yes he's right; you want to give the best possible user experience from your blog, right?

DynoTag: A New QR Tagging Service That Helps You Find Your Lost Stuff

If you're wondering about how to dynamically generate QR codes for any given URL or web page, you might want to check out this cool QR Code API generator courtesy of Tag.cx.

Easiest Way To Dynamically Generate QR Codes Via JavaScript

Tag.cx QR Code Generator is a tiny JavaScript library that lets you programatically generate QR Codes for any given web link. Generating QR Codes using their API is a snap. Just copy and paste below JS lines anywhere on your blog post and it will magically display a QR Code image  pointing to the page.

<script src="http://www.tag.cx/qr-codes/tag-cx-qrcode.js" type="text/javascript"/>
<script type="text/javascript">
generateQRCODE("qr","150","http://www.rushlywritten.com");
</script>

The above script calls a function generateQRCODE() which will automatically generate a QR Code image for rushlywritten.com. Now mobile phones can easily bookmark your webpage, just by taking a picture of the image generated by this script. For a complete implementation instruction, head over here.

Learn How To Automatically Generate Thumbnails, Screenshots For Any Website

Tag.cx' QR Code generation service is a complete clean-cut if you want to programatically generate QR codes for any given website. Just a few lines of scripts, you'll see the QR code magically sits there.

You might not need Tag.cx' QR Code Generator right now, but it's a good site to bookmark for the future when you do.

QR code image for Tag.cx:

Dynamically Create, Generate QR Codes For Download Links, URLs