Here's another good reason why Gmail is still the best email service as yet:

You can now get a consolidated view of all email attachments sent to your Gmail account.

Being able to view and manage all email attachments in single manageable place basically means convenience. You don't want to waste your time searching through your inbox for email attachments, right?

Access, Manage All Files Stored Across Multiple Cloud Accounts All At Once

Well, the consolidation of email attachments is not at all a built-in feature of Gmail. Rather it is made possible by another web services called Attachments.me and DropBox. And Griffith, one of my readers here, shares you the gist on how get it up and running.

Very few simple steps and you should be able to see all Gmail attachments in one manageable place.

Access, Manage All Email Attachments In One Manageable Place (Gmail)

Note: Before you do the setup, make sure you're logged in to both DropBox and Gmail accounts. And to make the setup short, use Google Chrome browser.

Getting started with Attachments.me

Attachments.me is quite snap to use. First you need to download/install Attachments.me Chrome extensions from its website (link). Once installation is complete, you should be taken back to your Gmail's account. This time, you may need to authorize the app to connect to your Gmail account.

Cloud Save: The Quickest Way To Download, Backup Files Straight To The Cloud

Once Attachments.me and Gmail are connected, you'll now get introduced on how to make it work. An on-screen instruction should be displayed straight on your inbox, hinting you to do some basic actions such as connecting Attachments.me and DropBox (or Box) account, saving your first email attachment to your cloud storage account (in this case, DropBox), and specifying DropBox directory where email attachment gets saved.

The on-screen instruction will also introduce you to "filters", which allows you automatically send, save all email attachments to your DropBox/Box account when certain criterion meets. This is really handy when you want to put all work-related files sent as email attachments in one manageable size.

Automatically Backup WordPress Blog Database To DropBox

Now, as soon as DropBox authorization/setup is complete, you should  be able to view and manage all your email attachments from your DropBox account. Or you can access, manage all email attachments straight from your Attachments.me account (we recommend this).

Get A Consolidated View Of All Email Attachments In Gmail — View All Gmail Attachments All At Once

Not all websites are safe for kids; some portals promote sexual curiosity while others expose anti-racism and some violence of that sort. In corporate scene, there are websites that are not supposed to be visited especially during working hours. Facebook, YouTube, TumBlr, Orkut, Twitter – name them all – have been the major problems recently in schools and many other business organizations.

If you’re a mother who wishes to protect your child from bad websites or a network admin who is responsible for the network activity of company workforce, then, this short tutorial will teach you how to restrict internet access to a specific website – no additional software needed.

Block Specific Websites At School, Office Workstations - No Software Needed

Step 1 Log in to your computer as Administrator.

Step 2 Navigate through the Hosts File. Click Start > Run and type the following:
\Windows\System32\drivers\etc\hosts
Windows should prompt you an "Open with" dialog (see below). Just select "Notepad" or any other text editor and hit OK.

NOTE: To access the hosts file on on Windows 7, you may need to temporarily disable all active antivirus software first. Then run Notepad as Administrator, open the host file by navigating over here: \Windows\System32\drivers\etc\hosts.

Step 3 Now, let’s try to block Facebook and Twitter. All we need to do is to add the following codes below the lines containing 127.0.0.1 localhosts (if you cannot see it, create it):
127.0.0.1 facebook.com
127.0.0.1 www.facebook.com
127.0.0.1 m.facebook.com
127.0.0.1 touch.facebook.com
127.0.0.1 twitter.com
127.0.0.1 m.twitter.com
Step 4 Now, save the File and see it yourself!

If you’ve performed right the procedures above, your computer should not be able to access Facebook and Twitter. If you want to block more websites (e.g. Twitter, YouTube, Orkut etc.), just access the Host File and append the domain name or web address and save.

Blocking specific websites is really that easy!

How To: Block, Restrict Access To Unwanted Websites - No Additional Software Needed

While working with other collaborators in our team on a certain web project, I recently learned that uploaded document files that are converted to Google documents format cannot be larger than 2MB. Google Docs seem to protest for any uploaded files/documents of more than 2MB in size, which I believe a big turn off for anyone who wants to get the job done fast.

Here's a sample failed upload prompt from Google Docs. It says "Sorry, this file is too big. We can only convert files up to 2 MB in size.":


Well, obviously there is this file size upload restrictions on Google Docs, and unfortunately there's not such a good web app similar to Google Docs that offers seamless, real-time collaboration at no cost.

Access, Manage All Files Stored Across Multiple Cloud Storage Accounts In One Place

So let's get our head back to Google.

Getting Rid Of Google Docs' 2MB Upload File Size Limits

If you ever found yourself in a complete need to upload large documents, spreadsheets to Google Docs but could not due to file size restrictions, you might find this simple workaround useful. (For more of our Google-related goodies, you can find them HERE).

Alright, here's the trick:

Rather than uploading your large files, spreadsheets and documents to Google Docs, send them all to your own Gmail account. As soon as you receive all the documents, save them to your Google Docs account. Yes, it's really that quick.

Cloud Save - The Quickest Way To Download, Backup Files Straight To The Cloud

Here are the basic steps:

Step 1 Send the document to your own Gmail account.


Step 2 Once received, click on "View". Gmail should launch Google Doc viewer in a separate tab/window.


Step 3 Now, hit that tiny "Save in Google Docs" button at the upper right corner of the viewer. Once done, you should see your newly-added file to your Google Docs collection.

It's quite surprising to note that it takes only Gmail to remove that file size upload restriction in Google Docs. So next time, if you encounter that same Google Docs prompt again, just follow that dead simple Google hacks. Enjoy!

How To: Circumvent, Remove The Maximum 2MB File Size Upload Limits In Google Docs

Android evangelist Zen is quick to suggest that I should've had QR images added to all iPhone & Android downloadables featured here. According to him, users will find it easier to access those mobile goodies if they can just point their camera down to every QR code, and let the phone do the magic.

And yes he's right; you want to give the best possible user experience from your blog, right?

DynoTag: A New QR Tagging Service That Helps You Find Your Lost Stuff

If you're wondering about how to dynamically generate QR codes for any given URL or web page, you might want to check out this cool QR Code API generator courtesy of Tag.cx.

Easiest Way To Dynamically Generate QR Codes Via JavaScript

Tag.cx QR Code Generator is a tiny JavaScript library that lets you programatically generate QR Codes for any given web link. Generating QR Codes using their API is a snap. Just copy and paste below JS lines anywhere on your blog post and it will magically display a QR Code image  pointing to the page.

<script src="http://www.tag.cx/qr-codes/tag-cx-qrcode.js" type="text/javascript"/>
<script type="text/javascript">
generateQRCODE("qr","150","http://www.rushlywritten.com");
</script>

The above script calls a function generateQRCODE() which will automatically generate a QR Code image for rushlywritten.com. Now mobile phones can easily bookmark your webpage, just by taking a picture of the image generated by this script. For a complete implementation instruction, head over here.

Learn How To Automatically Generate Thumbnails, Screenshots For Any Website

Tag.cx' QR Code generation service is a complete clean-cut if you want to programatically generate QR codes for any given website. Just a few lines of scripts, you'll see the QR code magically sits there.

You might not need Tag.cx' QR Code Generator right now, but it's a good site to bookmark for the future when you do.

QR code image for Tag.cx:

Dynamically Create, Generate QR Codes For Download Links, URLs

You cannot quickly trash all SMS text messages saved on your phone. Chances are there might be some good old important information buried down on your inbox that you just missed to look up. While you can always do a quick scan to those SMS text messages stored on your phone, the process could be utterly tiresome especially if you're dealing with hundreds to thousands of messages.

If you're wondering about how to backup, export your good old SMS text messages before finally trashing them all, you might want to check out SMS Backup +.

Backup, Save All SMS Text Messages To GMail All At Once (Android)


SMS Backup + is a tiny piece of app for the Android that  lets you copy all SMS text messages from your phone to your Gmail account. A new label called "SMS" will be created on your Gmail once backing up is complete.

How To: Backup, Export SMS Text Messages Into Text File

SMS Backup + is very easy to use. You just have to connect your Gmail account with SMS Backup + and grant access to the app if you're opening the app for the first time.

Here's a quick walkthrough:

Step 1 Download and Install SMS Backup + from Google Play Store HERE.

Step 2 Once installed, connect your Gmail account with SMS Backup + (this is required). You just have to hit the tiny "Connect" checkbox, until the app prompts you this:


Step 3 Grant SMS Backup + access to your Gmail account.


Step 4 Once access is granted, you should be taken back the app. From there you can start right away the backup process, as seen here:


It's that easy!

Cloud Save: The Quickest Way To Download, Backup Files Straight To The Cloud

I always make it a habit to free my phone from unnecessary logs and dead-old text messages for this reason: I want my phone to be as manageable and smooth as possible. And this is where SMS Backup for Android comes in handy.

Backup, Save SMS Text Messages To Gmail All At Once (Android)

Whether you're looking for a Quit Claim Deed, Non-Disclosure Agreement or Bill of Sale, finding legal documents online can be downright annoying. You'll get overwhelmed by the number of options when you google something like "General Contract Forms", etc. Finding reliable document online is like finding a needle in a haystack, and yes it's a pain!

Thankfully there is such a good and reliable website that helps you find legal documents you need -- all for free.

Docracy: Your Free Online library for Open Source Legal Document Templates (link)

The free web resource is called Docracy -- it's a library of contracts, legal agreement and other legal documents submitted and maintained by Docracy users all over the world. Docracy was created to make it a  a lot easier for anyone to find high quality and trustworthy legal documents from reputable and transparent sources.

Burn Note Lets You Send Password-Protected, Self-Destructing Email Messages

A one-time registration for a free Docracy account is needed to get started. Registration process doesn't take any longer than a couple of seconds. As soon as your account is created you'll  be able to start sharing and accessing all the legal documents you could ever need.
Once you find a document, Docracy gives you the option to edit and save it for later use. PDF and Word version of the document is available too so you can instantly print and get a hard-copy of it.

Access, Manage All Files Stored Across Multiple Cloud Storage Accounts All At Once

You may not need a legal document right now, but it's a good site to bookmark for the future when you do. Docracy's database of documents is constantly growing so go check it out!

Docracy: Your One-Stop Repository for Free, Open Source Legal Document Templates

It's really a pain in the neck when you found some interesting Android apps in the Market but ended up frustrated because they are not available in your country. And yes its not cool, especially if the app you're about to download is FREE.

Android Market is not directly to blame; its the application developers actually who pose those download restrictions, making some apps in the Market not available in your country. But don't worry, there's a fix.

Android App Not Available In Your Country? Here's The Fix

Market Enabler is the Android app you need. It's a fully working workaround that enables you to download Android apps not available in your country. What Market Enabler does is temporarily change the SIM issuer code in your system, making it possible to download Android apps which are not supposedly available in your country.

Watch YouTube Videos Blocked or Not Available In Your Country

Market Enabler tricks the device location in order to access the Market from other countries, since the Android market is country and carrier specific.

Follow this simple guide on how to download and install Android apps not available in your country:

Note: Your Android device needs to be rooted for Market Enabler to work.

Step 1 Download and install Market Enabler from Google Play HERE. Or you can get the APK file HERE.

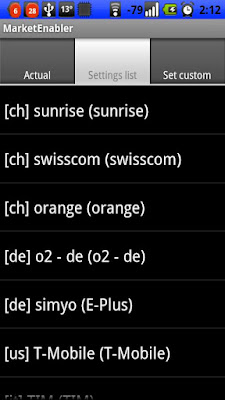
Step 2 Open Market Enabler and choose a provider to fake. (e.g. T-Mobile [USA]).

Step 3 Minimize/close ‘Market Enabler’, and then launch Android Market app (now Google Play) then search for your app.

Step 4 Once you find the 'restricted' app, just hit ‘Download’ button and then the Android Market will open with the app magically there.

It's that easy!

How To: Download, Install Android Apps Not Available In Your Country

Previously on this blog we have talked about SMS Scheduler apps both for the iPhone and Android.  SMS Scheduler apps are special kind of software that let you schedule, auto-send SMS text messages at later point in time. You just have to specify the sending date and time, and let your phone automatically send those scheduled messages at preset time. Head over HERE to learn more on how to automatically send SMS text messages at predefined time.

This short tutorial will introduce you to yet another awesome scheduling app, but this time for emails.

Check If Email Address Is Valid -- Verify If Email Address Is Existing


Scheduling your emails to be sent in the future is helpful for some reasons. One good example is that you might want to deliver your email at the exact time when the recipient gets to their desk every morning. Or if you know that the recipient always gets online every 8:00 PM, it might also wise to schedule your email to be delivered on that time. You don't want your emails to be buried by all of the other emails, right?

Schedule Emails in Gmail To Be Sent Later

This handy add-on is called RightInbox, a free Chrome and Firefox extension specifically designed for Gmail that lets you schedule, send email messages at predefined time. Once installed, you may need to reload Gmail until you get prompted like this:
Just hit "Continue" until you arrive on this page:
If you've successfully granted access to RightInbox, "Send Later" button should now sits next to "Send Now" button. Here's a quick video walkthrough on how to use RightInbox:


Let Your Browser Talk - Awesome Webpage Reader Plugin For Chrome, Firefox


The good thing about RightInbox is that your email still get delivered even if you shut down your computer. Download RightInbox - The Email Scheduler HERE

How To: Automatically Send Email Messages At Later Time

As with other web browsers, Google Chrome records your login information, passwords, sessions and cookies everytime you visit a website. These are bits of information web browsers store and use so that you don't need to re-login and provide the same information all over again when you visit the same website. The feature is useful, but here's the ugly side: anyone who sneak use your laptop/computer can access the same webpages using your login/cookie information. And this is pretty dangerous if the saved web information has something to do with money.

If you don't want this to happen, one best way is to lock and protect your Chrome browser with a password so that no one else can access the internet without your permission. Take control over who access the internet through your browser; learn how to lock and protect your Chrome browser quickly and easily.

Browser Lock - Restrict People To Use Your Browser


Browser Lock is a free Google Chrome extension that disallows people to access the internet through your browser without your permission. If the plugin successfully installed, you can quickly lock your browser by simply pressing Ctrl+Shift+Lock keys.

Trigger an alarm when someone moves your computer mouse

With Browser Lock, no one can click or use the Tab button to highlight any element when it is locked, scrolling is not allowed either. Even if you open a new tab, reopen the browser or go to another website, it will still be locked and no one will be able to use it.

For download and installation instructions, visit Browser Lock at Chrome App Store.

Protect your USB stick with a password

If you're using Mozilla Firefox and want the same browser lock protection, you may check out this "How To Lock Mozilla Firefox With A Password" eHow tutorial.

How To: Password Protect, Lock Google Chrome Browser

I got my first Android phone with a little excitement that I could enjoy the ease of moving and transferring files between wireless devices with Wi-Fi Direct, a next-generation technology that allows Wi-Fi devices to directly connect to each other with no need for a wireless access point.

Unfortunately, my Droid is deprived with such feature, so every time I transfer large files from my computer to my phone I always had to mount my phone to my PC using standard Data Cable.

How To: Turn Your Laptop, PC Into Wi-Fi Hotspot Without Using Ad-Hoc

There’s no problem with using USB Cable to move files between mobile phones and PC. But for people who constantly forget to bring data cable connector, this surely can be a twinge.

In this post, I’m going to introduce you to a useful Android application that lets you transfer files from PC to mobile phone (and vice versa) via Wi-Fi connection. In other words, we are going to use existing Wi-Fi network to copy/move files from our Android devices to our computer.

Automate Your Phone: Let Your Perform Certain Actions Based On Your Locations

Use Existing Wi-Fi Network To Transfer Files From Android Phone To PC (And Vice Versa)

SpeakToIt: Best Personal Assistant App For Android That Works Like Siri

The application is called Software Data Cable, a truly nifty, helpful application for the Android that allows you to connect your smartphones to the computer without having to connect it with a standard USB cable. This FREE Android application uses a wireless method of transfer through a Wi-Fi connection to allow file transfers from your computer to a storage card attached on your Android phone/tablet (and vice versa). Cool isn’t it?

 Here’s how to copy, transfer files from Android device to your computer over Wi-Fi:

Step 1 Download and install Software Data Cable for the Android HERE. Or you can search for “Software Data Cable” in the Market.

Step 2 Once installed, launch it. You should see this default start-up screen:


Step 3 Hit “Start Service”. The app should then automatically assigns an IP Address and Port number needed to connect to the phone (see screenshot below).


Step 4 Now, using the IP address and port given, enter that into your PC Windows Explorer, and you will then be shown the contents of your memory SD card (as shown below).


You can then easily transfer files from your memory card to your PC (and vice versa). You can also use FileZilla or any FTP client of your choice. Enjoy!

How To: Transfer Files From PC To Android Phone Via Wi-Fi (And Vice Versa)

If you are little too concerned about sending secret messages online, where everything can be snooped out by nearly almost anyone, now a brand new web service called Burn Note seeks to make your private communication online ultra-secure.

Burn Note (link) is a free web service that allows you to send messages with utmost secrecy. The service gives you the ability to password-protect your email/digital messages before it can be viewed by the recipient online. And the real cream of the crop is: recipients only get the chance to read your message once; Burn Note has this self-destructing technology that automatically deletes the message once it is read, leaving no trace online or on your computer.
How Does It Work?

Sending a secure message with Burn Note is quite straight-forward. All you have to do is to visit their nifty website, type in your message, optionally assign a password, and hit “Send”. Burn Note will then automatically generate a unique link which you can send to anyone via email, SMS, or other digital means of your choice.

When the recipient opens your password-protected Burn Note link, he will then be taken to a page prompting for a password. And supposed a valid password has been entered, recipient can then read and destroy the note.


Burn Note allows emails to be viewed for 60 seconds, then “self-destruct”, becoming untraceable online or on your computer.

Prevent Anyone From Opening Certain Applications Installed On Your PC

You don’t need to register to start using Burn Note. But signing up for a free account enables Burn Note to send notifications when your email is opened/read.
Burn Note is a breath of fresh air in secure messaging technology. Aside from giving you the ability to password-protect your email messages online, Burn Note brings a couple of security features which are missing in most private messaging platform of today. 

Burn Note Lets You Send Password-Protected, Self-Destructing Email Messages

Ever wondered how to turn your laptop or notebook into portable Wi-Fi hotspot without using Ad-Hoc? If yes, well, then, this post is for you.

Ad-Hoc, in its simplest term, is a technology that enables “within reach” wireless devices to directly connect and communicate. If you have multiple wireless devices at home, you can actually connect them altogether via an Ad-Hoc wireless network. Ad-Hoc is commonly used as a tethering/internet sharing tool that enables you to share your broadband internet connection at home.

Easiest Way To Block, Restrict Access To Unwanted Websites - No Additional Software Needed

Ad-Hoc is awesome, but only for above-average users. Setting up an Ad-Hoc wireless network requires tidbits of configuration, which if wrongly carried out, can lead to hours of frustration. Thankfully, there’s such an app that simplifies the sharing of internet connection on the fly.

The Quickest and Easiest Way To Share Internet Connection Without Using Ad-Hoc

Meet Connectify, a tiny piece of app that eliminates the hassle of sharing your internet connection via Ad-Hoc. For uninitiated, Connectify is a simple network- connection sharing solution for Windows 7 that turns any laptop, PC with a wireless connection into a Wi-Fi hotspot.

Sharing internet connection with Connectify is simple enough; all you have to do is to download the Connectify app (see link below), set your desired hotspot name and password, and you’re good to go!

Grab Existing Website and Browse It Offline - Turn, Convert Any Websites Into eBook

There are two variants of Connetify: the Free and Pro version. The free version of Connectify is already powerful that it even comes with handy web connectivity and management options like the ability to disconnect attached clients.

Access Your Firefox, Chrome Bookmarks On Any Computer Anywhere

Connectify must be the quickest and easiest way to share internet connection as it requires nothing more than setting up a password and a connection type to turn any notebook, laptop into a Wi-Fi hotspot.


Connectify Free Download

How To: Turn Your Laptop, PC Into Wi-Fi Hotspot Without Using Ad-Hoc -- Internet Sharing Made Easy

When you're working in a shared computer, it is often necessary to restrict others from accessing certain applications/programs installed on your PC. You don't want other people to get access with your confidential information by just simply launching certain apps without you knowing. Also, you cannot afford your kids to mess around with your files and open certain apps which could potentially bring them to websites with inappropriate contents.    

How To: Sync Your Files Across Multiple Computers, Mobile Devices

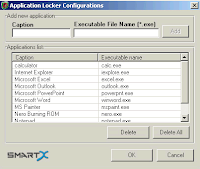
Here I am going to walk you through to another free tool that can help you prevent others from executing certain applications installed on your computer. The tool is called Applocker, a free software locking tool that locks certain applications on your computer. If you don't want others to run certain apps on your computer, then, Applocker is for you.

Applocker - Prevent Others From Opening/Executing Certain Apps On Your Computer

Applocker is a freeware that prevents specified programs from being launched. It lets you limit what applications can be used on your computer. Applocker is very useful especially for parents who want to restrict their kids to use computer, or just to keep certain programs out of reach of other people. Applocker is only limited to locking .EXE files, so you cannot lock control panel, and anything of that sort. You can however lock things like Task Manager, Explorer, Firefox, FileZilla and other .EXE files.

Protect Your USB Stick With A Password

Here's how you can lock specific programs on your computer with Applocker:

  1. Download and install your free copy of Applocke here.
  2. Launch and configure the app.
Applocker may not be the best free app-locking software available today, but we can still get the best protection by doing some 'dirty tricks'. Applocker by default allows you to lock any application by simply specifying executable's file-name. But the app doesn't have this feature of self-protection -- Applocker is not protected by itself.

Password Protect, Lock Google Chrome

To protect Applocker from being launched, just move Applocker.exe and config.txt  to any secret directory, or you can save it on your flash drive. Access both files here: C:\Program Files\SmartX\Smart-X AppLocker. And yes, you can also lock Applocker.exe using the app itself; just go to Application Locker Configuration and add Applocker.exe as protected .EXE. In order to open the locked Applocker.exe, just rename the actual Applocker.exe file to anything like Applocker1.exe.

Lock certain programs installed on your PC; prevent your kids and other users from opening unwanted apps!


How To: Lock, Protect Certain Programs Installed On Your Computer

Looking at the ubiquity of many web-based presentation tools flooded online, you might as well wonder why would I had to write this tiny piece of post when you can anytime pull off your chair and access those long-standing presentation software online. Well, my explanation is simple: Prezi is irresistibly awesome online presentation tool that transforms your sheer ideas into visually stunning presentations! 

So, what is Prezi?

Prezi is the new God when it comes to creating visually attractive yet professional presentations online. Already used by hundreds to thousands of public speakers, students and exhibitionists, Prezi is a free cloud-based presentation software that revolutionizes the way you present your ideas. All you need is an advanced browser (i.e. Mozilla Firefox, Google Chrome, Safari, Opera) and a little bit of creativity to play around your ideas.

Prezi already comes with beautiful themes, editable "prezi" templates, so you don't need to visualize your idea from scratch. The zoomable canvas makes it fun to explore ideas and the connections between them. The result: visually captivating presentations that lead your audience down a path of discovery. 

Key features of Prezi:

Pan and Zoom
Visualize your ideas. Pan Left, Move Right, Zoom-in on a detail, or Zoom-out to show the big picture.

Import Media
Insert images, videos, YouTube videos, PDFs, PowerPoint (PPT) or other media to make your prezi highly visual.

Add Storyline
Use frames and paths to turn your prezi into a cinematic journey.

Full Toolset
Choose from our collection of templates and themes to personalize your prezi.

Present Online and Offline
Present online or download and show your prezi anytime, anywhere.

Work Together
With Prezi Meeting, you can collaborate on your prezis in real time, whether across the room or across time zones.

Presentations are a great way to convey ideas to your clients, students or co-workers. Creating presentations can sometimes be an irksome task but thanks to the creator of Prezi -- not only can you create visually attractive presentation online but you'll surely have a presentation that stands out! See Prezi in action HERE.


Prezi: Create Visually Engaging, Rich Media Presentations, Slideshows Online FREE

Previously on this blog we have talked about Torrific, a free web-based torrent downloader that allows you to download torrent files using only your Chrome, Firefox or any browser of your choice. Torrific generates a direct link of any valid .torrent link and then present that torrent in a single, manageable zip file. Torrific also is a good alternative if you're looking for ways on how to download torrent file using only your iPhone, Android, Symbian or any mobile handsets.

Download Specific Parts, Portions Of YouTube Videos

Torrific is already awesome, but just as no one is saint to give anything free with no flaws, Torrific also poses limitations and may not always work over time. Thankfully, there's such a good website that works almost similar to Torrific; it lets you download torrent files using only your web browser.

BitLet: Download Torrent Files Using Chrome, Opera, or Firefox Browser [link]

BitLet is a web service that gives torrent downloaders a new option to share, download torrent files online. BitLet can be a good alternative to Torrific as it can download torrent files using only your web browser -- no BitTorrent needed.
BitLet is very easy to use; you just have to enter a valid .torrent URL and allow BitLet to connect to the swarm on behalf of the end user. BitLet will then prompt you for download folder where you want to save the file.

Download, Save Files Straight To Cloud Storage Providers With CloudSave

BitLet is also available as browser extension on Google Chrome. Once installed, Chrome automatically
detects all the links to torrent files within the pages you're browsing and it will make those links open BitLet's download popup, allowing you to start downloading in a few clicks.

BitLet: Lets You Download Torrent Files Using Only Your Browser

At last, the file management tool we've been waiting for has finally arrived!

Everybody can now access all backup files stored across multiple cloud storage providers all at the same time. If you love how TweetDeck or HootSuite works for your social media accounts, you'll also love this new file management tool designed for the cloud!

Access, Manage Backup Files Stored In The Cloud All At Once With Otixo

Meet Otixo, a new breed of file management web service that offers a whole new level of convenience. Otixo gives you a consolidated view of all files stored in the cloud by allowing you to connect all your favorite cloud storage services such as DropBox, Google Docs, Box, MobileMe, among others. Otixo works by fetching all your files stored in the cloud, populate and list them altogether in a single interface. Otixo exactly does what TweetDeck or HootSuite does for social media accounts, but for files stored in the cloud!


With Otixo you can:

1. Search and find your files across many cloud-based services in one simple step.

Admit it: it's a pain to look for a particular file especially when all you can remember is that it was saved somewhere in the cloud and you can't seem to remember which cloud services it was saved. Finding a particular file is even awful lot harder especially if you're to deal with a large collection of files. Thankfully Otixo comes with a smart search function enabling you to search for a particular file, regardless of its virtual file location. Think of Otixo like Apple's Finder or Window's File Explorer, but for the cloud.

2. Move files from one service to another without downloading them first to your computer.

There are several occassions when I need to transfer files from my Google Docs to DropBox account. For example, I want to generate a direct HTTP link for my PSD file stored in Google Docs so I can edit it using PSD editor online. Google Docs unfortunately cannot provide me a public HTTP link (required by most online PSD editor) so I need to move the file to DropBox first and let DropBox generates a public HTTP link for me. Also, Google Docs can't seem to render images embedded in a document or spreadsheet so all I need to do is to generate a public link so I can fully open the file using free document and excel viewing tool online.

Learn How To Play, Stream All Music Files, MP3 Saved From Your DropBox

3. Access your many online services with a single username and password.

The real beauty of Otixo is that you get access to all your files saved across multiple cloud storage accounts. Just one-time login takes you to the neat and interactive interface of Otixo where you can quickly manage your backup files stored in DropBox, SugarSync, Google Docs, Picasa, Box, etc. Otixo is also available on mobile so people on-the-go can access and manage their files on the fly.

Otixo is one of the many great web applications that are hard to be missed. Sign up for your FREE otixo account here!

Access, Manage All Files Stored Across Multiple Cloud Accounts All At Once

Google has this awesome service called Web History. This least-known service of Google is turned on by default, which allows you to view and manage your web activity, including web visits and Google searches. With Google's web history you'll be able to know your previous searches, including the set of keywords you used that lead you to a specific website.

Get Notified When Someone Talks About You On The Web

Google's Web History is great, BUT here's the ugly side: almost anyone can gain access to your searches and web visits online! If you constantly lend your laptop to a friend or a working colleague, it's likely that you forgot to end your session on Google. And suppose you've successfully logged out on Google, it doesn't mean you're safe. Almost all browsers are capable of holding your login information, so it's not impossible for anyone to mess around your account!

Google Search Trick You're Restricted To Use

Clearing web browsing history on your browser is not enough, you've got to make sure that all sessions, data auto-filled on web forms, and browsing information saved on Google are all cleared. Here I'm going to show you how to turn off and disable this Web History service of Google.

Google Knows What You Search, Visit Online - Here's How To Disable It

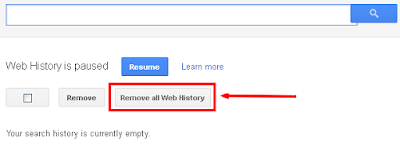
To disable Google Web History, just access Google Web History homepage (make sure you're logged in using your Google account). Then click "Remove all Web History" to stop Google from tracking your online seaches and web visits. It's that easy!

Google's Web History can be both useful and a nightmare. Useful because you can use it for parental audit and control. But on the other hand, it can be a privacy-invading jiggery. You don't want other people know what you search or visit online, right?

Read more about Google-related goodies here.

Google Records Your Online Searches, Web Visits - Here's How To Disable It

In my previous post I demonstrated how easy it is to play all audio files, music collection straight from your DropBox account. Using this wonderful creation of John Mills, you can enjoy your music stored on DropBox anytime, anywhere-- just specify the DropBox folder you wish to play and let the app streams all your music files stored in that folder.

Learn How To Resume Interrupted Video Uploads On YouTube

Here I'm going to give you another reason why you need to use DropBox. Today we can now automatically send and save YouTube videos straight to your DropBox folder. Thanks to Samrat Man Singh for his amazing tool called VideoDropper.

VideoDropper Lets You Send YouTube Videos Directly To Your DropBox Folder


VideoDropper is a YouTube-to-DropBox web service that simplifies the grabbing of YouTube videos on the fly. VideoDropper allows you download YouTube videos directly to your Dropbox folder, so that you can watch them later at your leisure.

Just login with your Dropbox account, specify the YouTube video URL, and let VideoDropper "drops" that video straight to your DropBox folder.

Play YouTube Video At Specific Minutes/Seconds

VideoDropper also gives you the option to download mobile-optimized YouTube videos so you can view it on the iPhone/iPod Touch. See the action HERE.

How To: Send, Save YouTube Videos Straight To Your DropBox Account

For some, the creation of online memorials where people can virtually lit candles, pay tributes, and leave messages can be a whole lot absurd idea. But for me, it is seriously fun and exciting idea. Even the departed ones born during Stone Age would surely love this insanely crazy idea; they will be memorialized online...and that would mean forever.

Create Professional Catalogs, Brochures, Manuals Online

Those who have just lost or about to lose (sorry for the word) the most important people in their lives may want to check out iMorial, a free online tribute and memorial website open for everyone. Think of it as Wikipedia and Facebook combined. Bereaved families can post a bio or a short story about the life of the departed; date and cause of death, hobbies, favorite artists, interests, affiliations, many others.


The iMorial page for your loved ones also has a wall (similar to Facebook), where family members and friends and long-lost friends can post a tribute, or leave personal messages both for the departed and bereaved family. Orbituary notices and funeral arrangements can also be posted as well as photographs, slideshows, albums or videos. And the nice thing about it is that you can post instructions for those visitors who wish to make contributions in the memory of the departed one.

Creating virtual memorials with iMorial is easy. Just specify the memorial name, provide some details, choose layout for the memorial, and start posting messages, announcements, notices, media, etc. As soon as you're done creating iMorial page for your loved one, you can then notify family and friends of the memorial address.

Check If Email Address Is Valid or Existing

It's never too late to create a memorial website for the departed people you hold dearly. Signup for a free iMorial account here and make your late loved ones happy!

PS: No pets allowed.

How To: Create Online Memorial Website For Your Loved Ones

How many times have you gone to situations when you needed to download a file but worried because of the credibility of the source site? How many times do you see links shared in your wall, email or in a forum only to find that it contains potentially unsafe stuff like virus, trojan, or worm? Sure, you've already installed a top-notch antivirus software, but adding one more line of defense is sure worth your effort to protect your PC.

Check if your antivirus software is working - use only Notepad

If you're ever unsure about the credibility of the file, software you're about to download in the internet, one best way is to scan the download link or URL first prior to download. This way you'll be able to protect yourself from malicious files which could jeopardize your system. Take advantage of the following free online scanning tools and websites that can analyze, determine whether the file is containing a virus through its URL or download links only.

Free Online Tool and Websites To Scan URL

VirusTotal - Scan, Analyze Files and URL For Worms, Trojans, Viruses [LINK]

VirusTotal is an award-winning online file and URL scanner developed by Hispasec Sistemas. This online link URL scanner analyzes suspicious files and URLs, enabling you to identify if the file you're about to download is safe and virus free. VirusTotal combines multiple antivirus engines which makes it easy to identify viruses, worms, or trojans based on the URL or direct download link you've provided.

Easiest way to protect your USB from malwares - NO software needed

VirusTotal is easy to use; just click on "Submit a URL" tab, paste file URL on the textbox, and allow VirusTotal to scan and analyze your file. Start a safe download; scan file URL first prior to download!

GaryHood Online URL Virus Scanner - Scan Direct Download Links First Before Download [LINK]

GaryHood is another online virus scanner that can determine whether the file you're about to download is safe or not. This online file and URL scanner uses most advanced antivirus engines such as F-PROT, Avira AntiVir, BitDefender, AVG, and ClamAV, which makes it powerful to identify viruses, worms or trojans packed inside the file.

One notable feature of GaryHood online file/URL scanner is that it scans each file inside a zip file. The website is easy to use; just specify file URL or download link to scan and tick on "URL" as scan method. Check if file is safe for download here.


Dr.Web Link Checker - Check Links for Worms, Virus [LINK]

Dr. Web Link Checker is a free browser extension that works well in Opera, Chrome, Mozilla Firefox and Internet Explorer. This small add-on allows you to scan URL/links or to scan a file before you even download it. Since this link checker is an add-on, you just have to right-click any URL/download link to scan before you visit it or download it. Install Dr. Web LinkChecker add-on here. Enjoy!

Delete persistent, undeletable file or folder - using only Notepad

If you find this post useful, kindly recommend or share it to your friends!

Scan File Before Download - Scan URL for Virus