Here’s something nice for iPad users as well those into artistic stuff and art cutouts.

Did we say cutout? Like kid stuff cutouts? Well, it’s more than that. The Apple iPad app is called Foldify. It lets you draw, print, and fold beautiful 3D figures that you created yourself. You can print the foldable 3D figures on any kind of paper you want.

This is tremendous news for hobbyists who not only enjoy collecting action figurines but, also in creating their own various cutout collections. This is also great news for hobbyists who are into diorama modeling. Now they can create 3D cutout backgrounds that they can use with Styrofoam backing.


The fun part of all this is creating whatever you want and however you want. Foldify was created by a new company called Pixle that allows you to create print out 3D paper figures straight from you iPad. Foldify will soon be coming out for release at all Apple iStores. The app will be available for all iPad versions except first generation ones.

Twitter Poster: Turn Your Tweets Into A Poster, With Picture Of Yours


When you enter the site, http://foldifyapp.com/, you will need to open a video on how the app works. You will also be asked to leave your e-mail address so they can inform you later if the app is already available.


Based on the video, Foldify allows you to choose from many different 3D shapes. From those choices, you can add unique faces, shapes, mouths, noses, eyes, and color to create your own figurine. Once finished, you can print out the finished drawing and start folding to bring together your creation.

One cool thing that seems to stand out in the video is the preview pane that lets you see the 3D paper figurine in its folded form even before you print it out. It updates in real time and even allows you to rotate the drawing for a 360-degree view.

Foldify Lets You Create, Print and Fold Beautiful 3D Figures on iPad

You might have already heard about 'Popcorn', it’s an HTML5 media framework written in JavaScript for filmmakers, web developers, and anyone who wants to create time-based interactive media on the web. Popcorn.js is part of Mozilla's Popcorn project.

Good news is: Team Mozilla has launched version 1.0 of its Popcorn Maker, a web-based video editing app powered by the Popcorn framework.

Well, what’s so exciting about this app is that regular users can easily re-create or enhance already existing videos online -- be they from YouTube or Vimeo -- thereby allowing you to add image, map overlays, and links from Twitter, Wikipedia, and other websites. So the result would be like a highly-interactive web page rather than a traditional video.


Popcorn Maker helps to change or transform usually passive video viewing into a feature-rich interactive experience that allows for greater viewer engagement. Eventually, a more advanced version of the app will be able to create shoppable videos or video ads for advertisers on YouTube. In this way, you can easily link to a product website or immediately buy a product while watching a video that shows the products.


See Popcorn Maker in action HERE.

Mozilla's Popcorn Maker Lets You Enhance, Recreate Existing Videos from YouTube, Vimeo

Almost everyone has been through this nerve-racking experience before. You are filling out an online form, and it is a long one. Perhaps it is an online Auto Loan or Mortgage Refinancing form. You are finished so you click on the ‘Submit’ button. Only, what happens is that you get an error message, and when you click the 'Back' button, the form is blank. So, what do you do, start over again?

Password Protect, Lock Google Chrome Bookmarks And Access Them Anywhere

Now you can install a Google Chrome add-on called Lazarus. Simply put, Lazarus saves everything you typed into that form, so if anything should happen, all the data is saved and can be recovered from the Lazarus menu.

Lazarus: Autosaves Everything You Type On A Form From Form-killing Timeouts, Crashes (link)

Lazarus is a simple form recovery add-on for Chrome browsers. In case you experience those nasty network errors, crashes, and other form-erasing timeouts, this app automatically saves and recovers everything you typed on an online form.

There is even an option wherein all the data you typed can be encrypted and saved on your computer, safely.

Lazarus is free and can be automatically installed on your Google Chrome. To date, more than 500,000 have downloaded Lazarus.

Learn How To Automatically Send Email Messages At Later Time (Gmail)

A new 3.0 version will be released soon for compatibility with Mozilla Firefox and Safari.

Download: Lazarus Form Recovery [Chrome link]

Lazarus Is Your Time-Saving Chrome Add-On That Saves Anything You Type On A Web Form

The title says it all. Yes, anything is possible with technology these days, even if it does border on the somewhat risky or foolish.

ThrowMeApp (pun is intended to catch people’s attention, get it?) is used to take aerial pictures of you and your friends. This is a new aspect of app photography you can explore so long as you are willing to take the risk.

Recover, Restore All Deleted/Lost Photos On Your Android Device

All you need to do is to throw your Android compatible device (such as the new Samsung Galaxy series of phones) up in the air and catch it when it comes down.

ThrowMeApp Takes Aerial Pictures When You Throw Your Android Device in the Air (link)


Here's how ThrowMeApp goes:

  • Turn on the app and throw your Android phone up in the air. It will take a photo at the highest point and when facing down.
  • The app needs lots of light for good pictures. So the app works best outdoors on a clear day.
  • The key to taking good pictures is throwing the phone in such a way that the screen is facing upward.
  • ThrowMeApp adapts to the way you throw and will eventually improve timing after a few throws in the same manner.
  • No professional ever gets it right the first time, so you need to practice your throws.
Warning: The user alone is responsible for the phone and preventing it from breaking or hitting people.

What makes ThrowMeApp amazing is that it takes really clear pictures without the usual motion blurs associated with high speeds.

ThrowMeApp Brutally Makes Your Android Device Useful Again

ThingLink is an app that will bring new life to your photos.

But no, this is not the boring Instagram-like type of app where the fun ends up with photo filters.

ThingLink is a provider of image interaction tools. It uses free tagging tools to give photos new life by using sound, voice, social media, and other fun links.

Slide.ly: Turn Your Instagram, Flickr & Facebook Photos Into Stunning Video Slideshows

Imagine your pictures becoming stories in themselves. For instance, an ordinary high school graduation class picture comes to life when you embed the names of each single person in the photo complete with profiles, where they are now and what they are doing in life after, say, 20 years. What a way to make a great online yearbook!

Make Your Images Come Alive With Music, Video, Text, Images (link)

The ThingLink app makes everything online that can be embedded come to life on any image. Streaming media, music videos, social profiles, facts and figures, surveys, documents, and even statistical graphs can be enabled for any picture you choose. The pictures you choose can be anything from educational photos for your classes to your own Facebook vacation pictures. Here's a demo:

You can go beyond creativeness to invent interactive greeting cards, posters, wedding, and birthday invitations. You can also spice up boring profile images, family pictures, maps, and even fashion shoots.

YouTube-Powered VeedList Lets You Create Custom YouTube Playlists

ThingLink is an app that can make people think, laugh, cry, or just smile just from viewing ordinary pictures.

ThingLink: Make Your Photos Interactive By Embedding Videos, Music, Text or Another Images

Talk about geeky fun.

Technology is now getting to be more fun and hilarious without being a geek yourself.

PBS Newshour has recently created a new tool (more of a new toy application) that lets users make personal political advertisements easily. It is a great way to get a laugh out of your friends and relatives who will view your political ad. You can even create a dumb political video with you as the villain of the ad.

Make Your Own Political Ad With Your Facebook Data (link)

Whatever political ad you decide to make, whether character, small-town, credential, metro-America, biographical, or attack type, it will be fun and easy to make. All you need to do is to go to https://www.pbs.org/newshour/adlibs/, log in to your Facebook account, and just follow the instructions on the PBS Newshour site. It is that easy.

PBS Newshour

While doing all this, you can even stop at various sections of the video of your choice and insert any Facebook posts or photos you want to insert. You definitely control the ad’s template all throughout.

On the learning side, you get to see just how political ads are made and the rigid guidelines these ads follow. As it turns out, the application does not allow you to make attack ads against anybody on Facebook except yourself.

Slide.ly: Turn Your Instagram, Flickr & Facebook Photos Into Stunning Video Slideshows

The timing could not have been better with elections coming up this November in the USA and early next year for some Asian countries.

Here's my personalized ad: LINK (Only my FB friends can view this)


PBS Has a New Tool That Lets You Make Your Own Political Ad with Your Facebook's Data

Goodness, what will people ever think of next in terms of technology?

A website called paludour.net (link) is introducing a new application for Windows called the AutoUSBCheck. It can be downloaded to any computer to be used for automatic copying, backup, or stealing data from any USB flash drive that is plugged into the computer. It also shows when a USB flash drive has been used on the computer and extracts a copy of the USB drive data to the hard drive.

Prevent Others From Opening Certain Programs Installed On Your Computer

AutoUSBCheck is so easy to use:

1 Download and install AutoUSBCheck HERE.

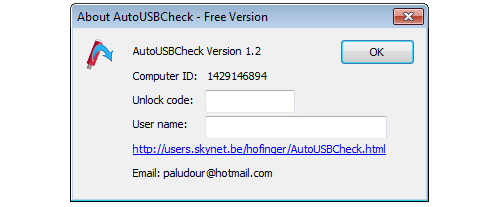
2 Once installation is complete, launch the app -- go to Start > Programs > AutoUSBCheck Preferences. You should be prompted like this:


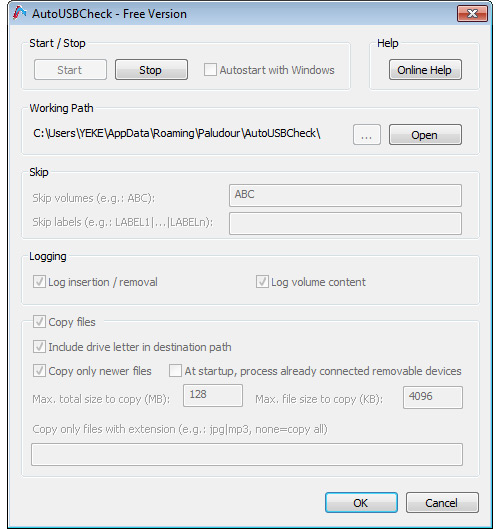
3 Just hit OK(you may enter the unlock code to download the Full version). This should bring the AutoUSBCheck dialog, as seen below:


4 Click Start button to activate program. And you're done!

If the application is in active state and any USB flash drive is plugged into the computer, the app will silently copy USB files without user's knowledge in the background unto the hard drive to be accessed later.

Advantages:

  • You get to know if a USB flash drive was ever plugged into your computer get to copy the flash drive contents.
  • Automatically backup files once USB stick is inserted.
  • Once active, it is automatic and silent.
  • Compatible with Windows 7, Vista, and XP.
  • You can limit or unlimit what size file to copy.

Disadvantages:

  • Free version is only a trial version. Paludour.net will send the full version of AutoUSBCheck if user sends a donation of €6 Euro or $ 9US.
  • Rare incompatibilities may occur.
  • Use at own risk because there is no technical support.

Add Multiple Tabbing Support To Windows File Explorer With Clover [Must Have]


This App Silently Copies All Data to Your Hard Disk Once A USB Flash Drive Is Plugged In To Your PC

With the internet so open to anyone, it is no surprise that copyright infringement and other content theft is rising fast. The best protection you can give to all your online images is to embed photo watermarks online to personalize and thereby, clearly identify all your image files.

Basically, according to the FreeDictionary.com and Dictionary.com, a watermark on any picture simply means:
"The faint design made on paper during manufacture, that is visible when held against the light and typically identifies the maker."
The best example for a watermark are those found on Australian dollar bills and South Korean Won bills.

Create, Add Links To Already Uploaded Videos On YouTube

Traditionally, watermarks are added by embedding a custom text or tile into the image using photo-editing software like Adobe Photoshop. But no, you don't have to go through the same old process of watermarking your photos this time. There is this awesome online photo watermark creator that can surely save you time when watermarking your photos online.

Picmarkr: Free Online Photo Watermark Creator To Watermark Your Images Without Using Photoshop (link)

With Picmarkr Free Online Photo Watermark Creator, you can easily watermark your online images for free.

In using Picmarkr.com, there are simply three very easy steps to follow:

1 Upload images or photos of your choice Upload any picture or image of your choice from your Facebook account, you blog, flickr.com, or Picasa.com. Then, using the Picmarkr Watermark Creator, you can upload and watermark up to five images at once. You can even resize your pictures as you see fit, from 500 up to 1024 pixels.


2 Select a Watermark Format You have a choice from the three popular formats, text, image, or tiled watermarks.


3 Download the Watermarked Images After selecting the watermark format you want, the watermarked image should be ready for downloading.

Extract All Images Embedded In .DOC Word Documents All At Once

Picmarkr.com can also be used to add watermarks to images without using software that are stored in a PC or laptop.

How To: Create, Add Watermark to Your Photos Without Using Photoshop

At long last, the multiple tab browsing support you've loved and seen on apps such as Chrome and Firefox has finally landed on Windows Explorer.

Thanks to this handy Windows app called Clover which adds a multiple tab functionality to your Windows default File Explorer. That is, when you want to navigate to another file, you don't need to launch it in a separate window and have multiple windows opened at the same time.

Turn Your Laptop, PC Into Wi-Fi Hotspot Without Using Ad-Hoc -- Internet Sharing Made Easy

The current version of Windows File Explorer doesn't have a multiple-tabbing support yet. And so Clover must be a good news especially if you do a lot of copy, paste, move, cut or deletion of files.

Get A Google Chrome-Like Tabs Interface On Windows Explorer With Clover (link)

Clover (2.7MB) is a tiny, free Windows app that adds a multiple-tab functionality on your Windows File Explorer. Once installed, you'll get a Google Chrome-like tabs interface on top of the Explorer of every window.


No special requirements to use this app. All you have to do is to download and install Clover from their website (link).

Extract All Images Embedded In .DOC Word Documents All At Once

Other notable goodness of Clover:

Convenient Tab page

To master the powerful, easy-to-tab, just remember that Ctrl + T to open the page, and Ctrl + W close the page, Ctrl + Tab to switch pages, the work efficiency far more than doubled!

Seamless integration of operating system

Clover by the BHO plug-in form, integrated into Windows Explorer, to keep your usual habits, without having to learn new software operation, and immediately you can use.

Lightning-fast bookmarks bar

Press Ctrl + D to add the current path, or directly to the folder into the bookmarks bar. No longer around to look for the folder to access, instant reach, how happy!

Clover is a a must-have utility app that makes file browsing a completely new experience. Supported platform includes Windows XP, Windows Vista, Windows 7 and Windows 8, on both 32-bit and 64-bit OS editions.

Add Multiple Tabbing Support To Windows File Explorer With Clover [Must Have]

The day social networking giant Facebook acquired image-sharing mobile app Instagram for US$1 billion, many Instagram users startled and decided to delete their account.

If you're among those unhappy, long-time Instagram users who wish to completely delete your Instagram account, you might want to perform a complete backup of your Instagram photos first.

Backup, Save SMS Text Messages To Gmail All At Once (Android)

Here, we will present you handy and best methods to backup all your Instagram photos online. All you need is to sign in or sign up for these apps so you can download Instagram photos straight to your hard drive.

Free Tools To Download, Export and Backup Instagram Photos

1. Instaport (link)

Instaport must be the simplest way to export or backup all your Instagram photos by downloading a single zip file. All you need to do is to sign up the Instaport app with your Instagram User ID and password, then choose in which format you want to export all your Instagram collections.

There are advance options too: you may download Instagram photos taken at particular dates or by tags, as seen below:


2. CopyGram (link)

CopyGram is yet another awesome tool to backup your Instagram photos online. Using the app is a snap. First you need to do a one-time registration to their website and then allow CopyGram to connect to your Istagram. Once done, you should be taken to the homepage, displaying your friend's latest uploads.


Now, to backup your Instagram photos, just click the link "BACK UP PHOTOS" at the top of the nav bar and you are ready to backup all you Instagram photos. Just enter your e-mail ID and then hit the Backup now button to get the backup in your e-mail account inbox.

Cloud Save - The Quickest Way To Download, Backup Files Straight To The Cloud

You may not need these Instagram photo downloaders this time, but they're good websites to bookmark when you do.

How To: Export, Backup All Instagram Photos Online

Here’s the situation. You have a lot of work to do. Perhaps you have a deadline at work to submit a report. Perhaps you’re catching up with your school term paper deadline. Perhaps you’re working as a home based web developer and your client has set a deadline.

But, the temptations are numerous. You end up watching the latest Linkin Park videos on YouTube, or you keep commenting and uploading on Facebook, or you can’t seem to stop the latest downloads of “Game of Thrones.”

Split Screen: Splits Your Web Browser into Multiple Resizable Windows

This doesn’t sound good for productivity. It can get you fired, or you end up with a failing grade, or worse, you lose your client.

It really boils down to personal self-discipline. However, there’s an app that can help you with your self-discipline issues and to help you get the real work done.

Save Yourself from Time Sinks & Be Productive Online With LeechBlock (link)

Image Courtesy of Techifire
Introducing an extension called Leechblock. It works perfectly well with Firefox. This may sound almost impossible, but, the extension app does work.

All you need to do is download Leechblock, install it, then restart your browser. Now comes your honesty and discipline factor. Select the site or sites that make you unproductive and block them on the browser’s tool menu.

But, it doesn’t stop there. You can set the time periods that these sites should be blocked. That’s right; you’re not depriving yourself completely. It’s just a discipline thing. You can even set the number of minutes or hours you can allow yourself to visit the selected sites per hour or per day.

Block, Restrict Access To Unwanted Websites - No Additional Software Needed

Lastly, you can select the days of the week Leechblock should block these sites. You can also set an optional “custom name” for the selected sites such as “The Force Balances Time between Work and Play” or other funny or not so funny file names. Putting up custom file names allows you to categorize what sites you’re blocking.

You can add sites anytime to the block lists on Leechblock. Can you undo the blocked sites? Here’s where the discipline factor comes in. Of course, you can unblock anything, but, Leechblock will make it difficult for you.

So, stop wasting your time and get back to work. But, before you do, download Leechblock first.

For Chrome, you may want to check out Nanny, yet another productivity add-on similar to LeechBlock that allows you to be more productive and less distracted by blocking sites.

How To: Temporarily Block, Restrict Access to Unwanted Websites and Increase Productivity

If you're a regular on YouTube, you should have seen that annoying clutters like advertisements, comments, sponsored and related videos sections on YouTube. While these YouTube elements are supposedly helpful at times, they're actually a kind of distractions for some. Remember that our eyes can only handle one at a time, beyond that drives our concentration away.

Hate The Long Intro On YouTube? Jump To Specific Seconds, Minutes While Playing YouTube Videos

Thankfully, there is such a good browser extension called "Turn Off The Lights" that seeks to give YouTube users the cinematic experience by fading the page background to dark, thus making the YouTube video to stand out.

Give YouTube Videos A Cinematic Look With "Turn Off The Lights"

"Turn Off The Lights" is a free Chrome and Firefox extension that promised to remove unnecessary distractions when watching a YouTube video online. With just a click of a button, the entire web page will be fading out to dark, except for the view port of the YouTube video you're watching. Clicking again the button resets the page back to normal.

YouTubeToMP3.com Lets You Download Audio MP3s Directly From YouTube Video

Getting started is a snap. Just download and install Turn Off The Lights for Google Chrome HERE or install the Firefox version HERE. Once installed, a lamp icon should be visible next to your address bar. As seen below:

Now, while on YouTube, clicking on it will increase page's opacity, thus allowing you to focus only to the video you're watching.

Download Specific Parts, Portions Of Any YouTube Video

Users also have the option to change the black opacity to 100% or less — useful when you want the page to appear almost black. Just right click on the lamp icon, and click "option". If you want to automatically turn the lights off when playing a video, you can do that as well. Just enable the option "autoplay" in my option page.

For more of our YouTube goodies, head over HERE.

New Browser Extension "Turn Off The Lights" Gives YouTubers The Feel Like They're In A Cinema

Previously on this blog we have talked about Browser Lock, yet another awesome browser extension that lets you lock, password-protect Google Chrome browser. If you haven't had the chance to check it out, head over HERE.

Now if you're wondering about how to password lock and restrict others from accessing your Chrome bookmarks on your shared computer, you might want to check this password-protecting browser extension called LockMyFavs.

Prevent Others From Accessing Your Bookmarks - Protect Your Bookmarks With A Password (Chrome)

LockMyFavs (link) is a handy browser extension for Chrome that lets you lock, password-protect your bookmarks on Chrome. With this extension you can create a separate list of bookmarks  right on your Chrome and make them accessible only to you.

Burn Note: Send Password-Protected, Self-Destructing Email Messages

Here's how it works:

Step 1 Download and Install LockMyFavs from Chrome Web Store HERE.

Step 2 Once installed, click on that tiny "favorite" icon that sits next to your address bar, as seen below.


Step 3 If you're using the extension for the first time you may need to complete the one-time registration by simply filling out a valid email address and password, and you're good to go. Otherwise, just login.


Step 4 Once logged in you should be able to see all your web favorites/bookmarks listed under "Library" tab. From there you can search, filter and manage all your saved bookmarks.

Access Your Firefox, Chrome Bookmarks On Any Computer Anywhere

To add new site on your list, just right-click anywhere on the page you're currently browsing and select the Add To LockMyFavs option from the context menu. Or you can click on the LockMyFavs icon on the top.


It's that easy!

Easiest Way To Block, Restrict Access To Unwanted Websites - No Additional Software Needed

The real cream of the crop of LockMyFavs is that your bookmarks will be stored in the clouds. This means that anywhere you go, in any computer, you will have your bookmarks with you!

How To: Password Protect, Lock Google Chrome Bookmarks And Access Them Anywhere

Whether you're looking for a Quit Claim Deed, Non-Disclosure Agreement or Bill of Sale, finding legal documents online can be downright annoying. You'll get overwhelmed by the number of options when you google something like "General Contract Forms", etc. Finding reliable document online is like finding a needle in a haystack, and yes it's a pain!

Thankfully there is such a good and reliable website that helps you find legal documents you need -- all for free.

Docracy: Your Free Online library for Open Source Legal Document Templates (link)

The free web resource is called Docracy -- it's a library of contracts, legal agreement and other legal documents submitted and maintained by Docracy users all over the world. Docracy was created to make it a  a lot easier for anyone to find high quality and trustworthy legal documents from reputable and transparent sources.

Burn Note Lets You Send Password-Protected, Self-Destructing Email Messages

A one-time registration for a free Docracy account is needed to get started. Registration process doesn't take any longer than a couple of seconds. As soon as your account is created you'll  be able to start sharing and accessing all the legal documents you could ever need.
Once you find a document, Docracy gives you the option to edit and save it for later use. PDF and Word version of the document is available too so you can instantly print and get a hard-copy of it.

Access, Manage All Files Stored Across Multiple Cloud Storage Accounts All At Once

You may not need a legal document right now, but it's a good site to bookmark for the future when you do. Docracy's database of documents is constantly growing so go check it out!

Docracy: Your One-Stop Repository for Free, Open Source Legal Document Templates

Previously on this blog we have talked about SMS Scheduler apps both for the iPhone and Android.  SMS Scheduler apps are special kind of software that let you schedule, auto-send SMS text messages at later point in time. You just have to specify the sending date and time, and let your phone automatically send those scheduled messages at preset time. Head over HERE to learn more on how to automatically send SMS text messages at predefined time.

This short tutorial will introduce you to yet another awesome scheduling app, but this time for emails.

Check If Email Address Is Valid -- Verify If Email Address Is Existing


Scheduling your emails to be sent in the future is helpful for some reasons. One good example is that you might want to deliver your email at the exact time when the recipient gets to their desk every morning. Or if you know that the recipient always gets online every 8:00 PM, it might also wise to schedule your email to be delivered on that time. You don't want your emails to be buried by all of the other emails, right?

Schedule Emails in Gmail To Be Sent Later

This handy add-on is called RightInbox, a free Chrome and Firefox extension specifically designed for Gmail that lets you schedule, send email messages at predefined time. Once installed, you may need to reload Gmail until you get prompted like this:
Just hit "Continue" until you arrive on this page:
If you've successfully granted access to RightInbox, "Send Later" button should now sits next to "Send Now" button. Here's a quick video walkthrough on how to use RightInbox:


Let Your Browser Talk - Awesome Webpage Reader Plugin For Chrome, Firefox


The good thing about RightInbox is that your email still get delivered even if you shut down your computer. Download RightInbox - The Email Scheduler HERE

How To: Automatically Send Email Messages At Later Time

For some, not every single aspect of Facebook is a complete clean-cut. Taking its Image Viewer as an example, you have to do the wear-and-tear on your mouse; click on every single photo that appears either on your feed, wall or to someone else' gallery to get the sufficient detail of the image. And once a larger version gets displayed, you need to click the tiny Close button again to close the viewer.

Kind of annoying, isn't it?

Thankfully, there is such a browser extension that automatically enlarges, zooms in the photo currently being hovered, making Facebook less of a hassle!

FB Photo Zoom: Lets You Zoom Facebook Photos By Mouse-Overing Them [link]

FB Photo Zoom is the Chrome extension that truly saves you time when viewing photo streams on Facebook. With this free Chrome add-on, you'll find it much quicker to interact with Facebook photos: you just have to mouse over those photos. In other words, you just have to position your cursor on top of any photo in your feeds, then wait a second until the full-sized version of the image appears.


For non-Chrome users, you may want to checkout Thumbnail Zoom for Firefox. As with the former, this add-on shows a floating panel with the full size of a thumbnail when hovering over an image or thumbnail. Other than Facebook, Thumbnail Zoom supports Twitter, MySpace, Amazon, Picasa, Flickr, LinkedIn, Hi5, Twitpic, deviantART, PhotoBucket, Tagged, Last.fm, Wikipedia, YouTube, DailyMile, IMDb, Imgur, Photosight.ru and Google Images.

Upload Photos On Facebook By Bulk or Folder


How do you find these image enlarger add-ons useful? Share your thoughts in the comments below.

New Browser Extension Lets You Zoom Facebook Photos By Simply Hovering Them

We always love to talk about something cool and awesome in the web. And one of those top-notch web services I just discovered that truly deserves a mention on this blog is: Loudlee.

Loudlee (link) is a brand new music service created by Guy Elharar and Yaron Revah. This Israel-based website harnesses the power of YouTube that gives users a whole new option to discover and listen to their favorite music online. Loudlee is like Pinterest, but for music.

How does Loudlee work?

Loudlee comes with intuitively neat interface, making it easy to use. All you need is a Facebook account, and do a one-time registration using that account. After linking your Facebook account, Loudlee should bring a page which features most recent artists/albums other Loudlee users are tuning to. Here you can hover/navigate through the albums being featured and hit "Play" or "Add".

New Android App Lets You Sniff Internet Session, Hack Facebook Account


Clicking on "Play" button should bring a nifty music player that sits at the right side of the screen, which displays the video of the current song. You may also "Add" tracks to your current playlist from other albums, making your online music experience truly more personal.

Create A Visually Engaging, Rich Media Presentation With Prezi

You can also dive right in and search for songs, artists or album of your choice. You may also listen to an entire album at a time, play specific songs, or even any given artist’s most popular songs. Music will continue to play in the background as you navigate through other websites.

Find Who Deleted, Removed You As Friend On Facebook

The only downside for Loudlee I think is that you cannot save your playlist, but I believe this is an upcoming feature.
 
Spotify or Pandora not available in your country? Give Loudlee a try! 

YouTube-Powered LoudLee Lets You Create Personalized Online Radio, Listen To Music Online

I am writing this post not to encourage privacy intrusion, hijacking, Facebook account hacking, or anything of that sort. I am writing this post to demonstrate just as how easy it is for almost anyone to break into your Facebook account (and other online services) using only an Android phone. This post also explains how you can essentially shield yourself from any form of intrusion attacks when online.

The controversial Android app is called Faceniff, a truly clever session hijacking app that allows you to sniff and intercept web session profiles over Wi-Fi network where your phone is connected to. Think of Faceniff as Firesheep, but for Android.

Use Existing Wi-Fi Network To Transfer Files From Android To PC (and Vice Versa)

Faceniff uses the method called Session Hijacking, a good old process of exploiting valid web sessions, which enables attacker to gain unauthorized access to your account and private information. With Faceniff, you can intercept web sessions from web services such as FaceBook, Twitter, YouTube, Amazon, Tumblr, MySpace, and even Blogger. And worst, web sessions established via HTTPS can even be cracked. Alarming isn't it?

Share Your Internet Connection Without Using Ad-Hoc

Well, the more disturbing part about it is that almost anyone with a "rooted" Android phone can do it, and even gradeschooler can dot it. Faceniff doesn't have a special requirement to run except that you have a "superadmin" privileges on your Android phone.

Faceniff Lets You Hack Facebook Accounts With Ease

I had the chance to install the app and see things in action on my phone. Below is a quick rundown on how I make Faceniff work, and browse through my friend's Facebook accounts without them knowing:

Step 1 Download and install Faceniff HERE.

Step 2 Once installed, launch it. You should be prompted for a Superuser permission. Just hit "Allow" or "Yes" (depending on your phone).

Step 3 There are a couple of instruction that pops up especially if you open the app for the first time. Just follow them carefully...until you arrive into the start-up screen.

Step 4 Toggle "START" and optionally enable SSLStrip to start Faceniff. If valid web sessions found, it will be displayed like this:


Step 5 Click on any of those "hijacked" accounts. Android should then prompt you for a list of browsers currently installed on your device. In my case, I used Opera Mobile as I wasn't able to make it work with default browser, Skyfire and even Opera Mini. Just make sure to set "Mobile" as Opera Mobile's User Agent configurable in the Settings > Advanced menu.


And Voila...

If you constantly connect to a wireless public network like in cafes or malls, recognize that your communication online can anytime be sniffed by almost anyone. Wireless network is notably vulnerable to packet sniffing as the exchange of data is done wirelessly. This vulnerability gives bad guys the opportunity to steal information exchanged over the air.

So, how to stay safe online? 

Whenever possible, don't connect to already congested public Wi-Fi network. Rather use the 3G/4G services offered by your ISP. And Virtual Private Network (VPN) applications would also help.  

New Android App Lets You Sniff Internet Sessions, Hack Facebook Account

As with other web browsers, Google Chrome records your login information, passwords, sessions and cookies everytime you visit a website. These are bits of information web browsers store and use so that you don't need to re-login and provide the same information all over again when you visit the same website. The feature is useful, but here's the ugly side: anyone who sneak use your laptop/computer can access the same webpages using your login/cookie information. And this is pretty dangerous if the saved web information has something to do with money.

If you don't want this to happen, one best way is to lock and protect your Chrome browser with a password so that no one else can access the internet without your permission. Take control over who access the internet through your browser; learn how to lock and protect your Chrome browser quickly and easily.

Browser Lock - Restrict People To Use Your Browser


Browser Lock is a free Google Chrome extension that disallows people to access the internet through your browser without your permission. If the plugin successfully installed, you can quickly lock your browser by simply pressing Ctrl+Shift+Lock keys.

Trigger an alarm when someone moves your computer mouse

With Browser Lock, no one can click or use the Tab button to highlight any element when it is locked, scrolling is not allowed either. Even if you open a new tab, reopen the browser or go to another website, it will still be locked and no one will be able to use it.

For download and installation instructions, visit Browser Lock at Chrome App Store.

Protect your USB stick with a password

If you're using Mozilla Firefox and want the same browser lock protection, you may check out this "How To Lock Mozilla Firefox With A Password" eHow tutorial.

How To: Password Protect, Lock Google Chrome Browser

I got my first Android phone with a little excitement that I could enjoy the ease of moving and transferring files between wireless devices with Wi-Fi Direct, a next-generation technology that allows Wi-Fi devices to directly connect to each other with no need for a wireless access point.

Unfortunately, my Droid is deprived with such feature, so every time I transfer large files from my computer to my phone I always had to mount my phone to my PC using standard Data Cable.

How To: Turn Your Laptop, PC Into Wi-Fi Hotspot Without Using Ad-Hoc

There’s no problem with using USB Cable to move files between mobile phones and PC. But for people who constantly forget to bring data cable connector, this surely can be a twinge.

In this post, I’m going to introduce you to a useful Android application that lets you transfer files from PC to mobile phone (and vice versa) via Wi-Fi connection. In other words, we are going to use existing Wi-Fi network to copy/move files from our Android devices to our computer.

Automate Your Phone: Let Your Perform Certain Actions Based On Your Locations

Use Existing Wi-Fi Network To Transfer Files From Android Phone To PC (And Vice Versa)

SpeakToIt: Best Personal Assistant App For Android That Works Like Siri

The application is called Software Data Cable, a truly nifty, helpful application for the Android that allows you to connect your smartphones to the computer without having to connect it with a standard USB cable. This FREE Android application uses a wireless method of transfer through a Wi-Fi connection to allow file transfers from your computer to a storage card attached on your Android phone/tablet (and vice versa). Cool isn’t it?

 Here’s how to copy, transfer files from Android device to your computer over Wi-Fi:

Step 1 Download and install Software Data Cable for the Android HERE. Or you can search for “Software Data Cable” in the Market.

Step 2 Once installed, launch it. You should see this default start-up screen:


Step 3 Hit “Start Service”. The app should then automatically assigns an IP Address and Port number needed to connect to the phone (see screenshot below).


Step 4 Now, using the IP address and port given, enter that into your PC Windows Explorer, and you will then be shown the contents of your memory SD card (as shown below).


You can then easily transfer files from your memory card to your PC (and vice versa). You can also use FileZilla or any FTP client of your choice. Enjoy!

How To: Transfer Files From PC To Android Phone Via Wi-Fi (And Vice Versa)